Introduction
The screws on the brakes are tight, but it's best to use hand tools so the screws don't get stripped.
What you need
-
-
Remove the two, 23 mm Hex #5 screws holding the brake to the bike.
-
Slide the brake mechanism off and turn it upside down to reveal the screw holding the brake wire.
 Ask FixBot
-
-
-
-
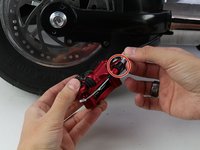
Remove the one, 14 mm Hex #4 screw pushing down the brake wire to the brake mechanism on the bottom.
-
-
-
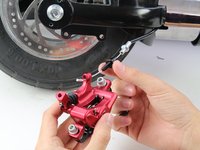
Remove the side screw holding the brake wire and mechanism together with your hands.
-
Slide the brake mechanism off from the brake wire.
-


To reassemble your device, follow these instructions in reverse order.
Cancel: I did not complete this guide.
One other person completed this guide.

Team

Cal Poly, Team S1-G2, White Winter 2019 Member of Cal Poly, Team S1-G2, White Winter 2019
CPSU-WHITE-W19S1G2
3 Members
13 Guides authored