Hover-1 Charger Bluetooth Speaker Replacement

What you need

  1. Hover-1 Charger Bluetooth Speaker Replacement, Unplugging the Battery: step 1, image 1 of 2 Hover-1 Charger Bluetooth Speaker Replacement, Unplugging the Battery: step 1, image 2 of 2
    • Flip the hoverboard over so that the warning label is facing up.

    • Remove the twelve 12 mm screws with a Phillips #2 screwdriver.

    • Remove the four 10 mm screws with a Phillips #2 screwdriver.

    • The screws nearest to the wheels may be hard to access. Be sure to use a long, thin screwdriver.

  2. Hover-1 Charger Bluetooth Speaker Replacement: step 2, image 1 of 1
    • Pull the right cover away from the hoverboard to expose the battery.

  3. Hover-1 Charger Bluetooth Speaker Replacement: step 3, image 1 of 2 Hover-1 Charger Bluetooth Speaker Replacement: step 3, image 2 of 2
    • Disconnect the two pronged black and yellow cable.

  4. Hover-1 Charger Bluetooth Speaker Replacement: step 4, image 1 of 1
    • Pull the left cover away from the hoverboard.

  5. Hover-1 Charger Bluetooth Speaker Replacement: step 5, image 1 of 2 Hover-1 Charger Bluetooth Speaker Replacement: step 5, image 2 of 2
    • Disconnect the two pronged black and yellow cable. The battery is now fully disconnected.

  6. Hover-1 Charger Bluetooth Speaker Replacement, Bluetooth Speaker: step 6, image 1 of 1
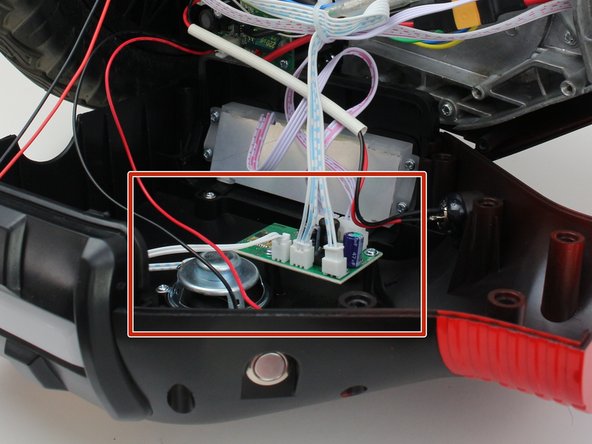
    • Locate the speaker attached to the left cover of the hoverboard.

  7. Hover-1 Charger Bluetooth Speaker Replacement: step 7, image 1 of 2 Hover-1 Charger Bluetooth Speaker Replacement: step 7, image 2 of 2
    • Unplug the red and white four pin connector from the circuit board. Unplugging this connector is photographed as an example.

    • Unplug the red and white four pin connector from the circuit board.

    • Unplug the white and blue three pin connector from the circuit board.

    • Unplug the white and blue two pin connector from the circuit board.

  8. Hover-1 Charger Bluetooth Speaker Replacement: step 8, image 1 of 2 Hover-1 Charger Bluetooth Speaker Replacement: step 8, image 2 of 2
    • Using a Phillips #1 screwdriver, remove the two 7 mm screws from the circuit board.

  9. Hover-1 Charger Bluetooth Speaker Replacement: step 9, image 1 of 2 Hover-1 Charger Bluetooth Speaker Replacement: step 9, image 2 of 2
    • Using a Phillips #1 screwdriver, remove the three screws securing the speaker to the outer shell.

  10. Hover-1 Charger Bluetooth Speaker Replacement: step 10, image 1 of 1
    • Remove the speaker and circuit board from the outer shell.

Conclusion

To reassemble your device, follow these instructions in reverse order.

One other person completed this guide.

Bryson Shishido

Member since: 10/10/19

145 Reputation

1 Guide authored

Team

Cal Poly, Team S12-G1, Regan Fall 2019 Member of Cal Poly, Team S12-G1, Regan Fall 2019

CPSU-REGAN-F19S12G1

4 Members

6 Guides authored

0 Comments

Add Comment

View Statistics:

Past 24 Hours: 1

Past 7 Days: 2

Past 30 Days: 15

All Time: 1,286