
Headphone Jack Replacement

What you need

  1. Headphone Jack Replacement, Headphone Jack: step 1, image 1 of 1
    • Have all of the tools and parts ready for use.

  2. Headphone Jack Replacement: step 2, image 1 of 2 Headphone Jack Replacement: step 2, image 2 of 2
    • Cut off the old faulty headphone jack.

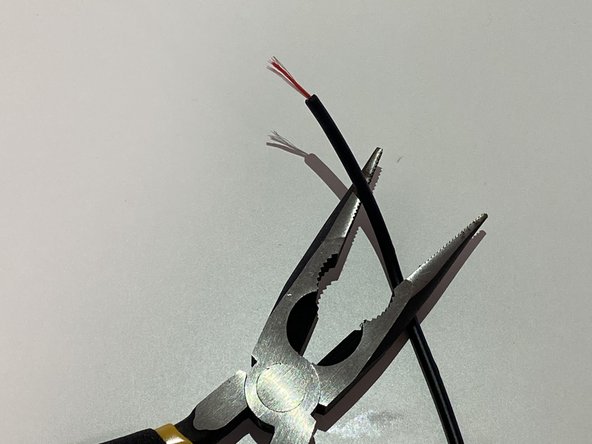
    • Use the wire strippers to strip off the outermost rubber sheathing to expose the individual cords inside.

    • Most headphones have 3 internal wires, sometimes 4.

  3. Headphone Jack Replacement: step 3, image 1 of 2 Headphone Jack Replacement: step 3, image 2 of 2
    • Unscrew the new headphone jack casing.

    • Separate the wires.

    • If you can have it held, it will be easier for working with the soldering iron.

  4. Headphone Jack Replacement: step 4, image 1 of 3 Headphone Jack Replacement: step 4, image 2 of 3 Headphone Jack Replacement: step 4, image 3 of 3
    • Begin adding solder to each of the contacts of the headphone jack.

    • Every so often wipe off the soldering iron on a piece of sponge/cloth.

    • Wipe off excess solder to keep it in good condition

  5. Headphone Jack Replacement: step 5, image 1 of 2 Headphone Jack Replacement: step 5, image 2 of 2
    • Take the casing and thread it to the wire, make sure to put it right way around.

    • Trim excess wire. (optional)

  6. Headphone Jack Replacement: step 6, image 1 of 3 Headphone Jack Replacement: step 6, image 2 of 3 Headphone Jack Replacement: step 6, image 3 of 3
    • Add solder to the ends of each of the wires.

    • Give it a few seconds to make sure it gets through the coating.

  7. Headphone Jack Replacement: step 7, image 1 of 3 Headphone Jack Replacement: step 7, image 2 of 3 Headphone Jack Replacement: step 7, image 3 of 3
    • Solder the wire to the headphone jack.

    • Make sure each wire goes to the right connector.

    • Red and white wires connect to the signal. The remaining one connects the ground connector.

  8. Headphone Jack Replacement: step 8, image 1 of 1
    • Use pliers to crimp the ground connection onto the wire to make it nice and secured.

  9. Headphone Jack Replacement: step 9, image 1 of 2 Headphone Jack Replacement: step 9, image 2 of 2
    • Wrap around the contacts with electric tape to prevent shorts.

    • Move up the outer casing and screw it to the jack with pliers.

  10. Headphone Jack Replacement: step 10, image 1 of 1
    • Test the headphone by plugging it into device.

Conclusion

To reassemble your device, follow these instructions in reverse order.

One other person completed this guide.

Chi Chung Yung

Member since: 05/14/20

208 Reputation

1 Guide authored

Team

0 Comments

Add Comment

View Statistics:

Past 24 Hours: 0

Past 7 Days: 2

Past 30 Days: 18

All Time: 396