
Harley-Davidson Sportster Evolution Spark Plugs Replacement

What you need

  1. Harley-Davidson Sportster Evolution Spark Plugs Replacement, Spark Plugs: step 1, image 1 of 1
    • The spark plugs are easy to spot on the left side of the motorcycle.

    • The procedure for removing the spark plugs is the same for both the front and back cylinder, and either spark plug can be replaced first. This guide will show how to remove and install the spark plug in the rear cylinder.

  2. Harley-Davidson Sportster Evolution Spark Plugs Replacement, Removing the old spark plug: step 2, image 1 of 2 Harley-Davidson Sportster Evolution Spark Plugs Replacement, Removing the old spark plug: step 2, image 2 of 2
    • Carefully remove the spark plug wire. Do not pull on just the wire, squeeze the spark plug boot, and pull it together with the wire.

  3. Harley-Davidson Sportster Evolution Spark Plugs Replacement: step 3, image 1 of 2 Harley-Davidson Sportster Evolution Spark Plugs Replacement: step 3, image 2 of 2
    • Use an 11/16" spark plug socket to unscrew the spark plug by turning in a counter-clockwise direction.

    • Some aftermarket spark plugs that fit the Sportster use a slightly larger 18mm spark plug socket.

    • Remove the spark plug from the cylinder.

  4. Harley-Davidson Sportster Evolution Spark Plugs Replacement, Checking the new spark plug: step 4, image 1 of 3 Harley-Davidson Sportster Evolution Spark Plugs Replacement, Checking the new spark plug: step 4, image 2 of 3 Harley-Davidson Sportster Evolution Spark Plugs Replacement, Checking the new spark plug: step 4, image 3 of 3
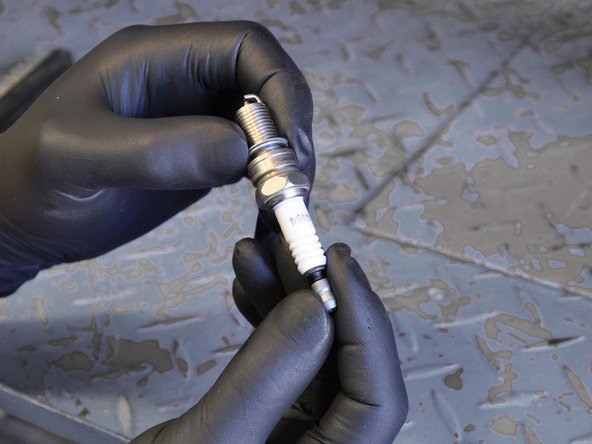
    • Always inspect your new spark plugs before installing. Check the gap on your replacement spark plugs with a feeler gauge. It should be set to .040 inches (1.016mm).

    • If they are not pre-installed, make sure that the crush washer and terminal nut are installed.

  5. Harley-Davidson Sportster Evolution Spark Plugs Replacement, Installing the new Spark Plug: step 5, image 1 of 2 Harley-Davidson Sportster Evolution Spark Plugs Replacement, Installing the new Spark Plug: step 5, image 2 of 2
    • Using your fingers, install the new spark plug into the socket, and hand tighten until firm.

    • Using a torque wrench, tighten the spark plug to the proper specification.

    • When installing spark plugs, proper torque can be important. To loose and they could rattle out or leak; too tight and you can strip your cylinder head. The correct torque for this plug is between 90 and 120 inch lbs.

  6. Harley-Davidson Sportster Evolution Spark Plugs Replacement: step 6, image 1 of 1
    • Reinstall your spark plug wire by pushing it firmly onto the new plug.

    • Make sure that it seats properly. You can usually feel a definitive click when it is installed correctly.

Conclusion

Be sure to repeat the above procedure for the remaining cylinder.

20 other people completed this guide.

Eric Essen

Member since: 06/04/10

17,804 Reputation

8 Guides authored

Team

iFixit Member of iFixit

Staff

135 Members

16,817 Guides authored

8 Comments

Just for information, particularly in the UK, you may be able to purchase sparking plugs cheaper at a Chandlers, as there are quite a few 4-stroke outboard engines use these plugs.

BigRoj - Reply

How do you do this with a XL1200S with dual spark plug heads??

Andy - Reply

Couldn't have made it any simpler

Matt Pramik - Reply

-awesome

- appreciated

Thank you so much for your posting. I'm 2k miles from my daughter who is teaching herself how to maintain her own bike. You site is immensely helpful and appreciated as much.

mrjacecabezut - Reply

Says between 11 and 18 pounds in manuel

bobafett717 - Reply

Add Comment

View Statistics:

Past 24 Hours: 14

Past 7 Days: 130

Past 30 Days: 523

All Time: 85,434