Introduction
This Guide covers replacing the Western Digital hard drive in the MyBook Studio Mac if it no longer works reliably or the 'lifetime' (S.M.A.R.T.) data suggests replacing the hard drive.
What you need
-
-
The aluminum housing of the WD MyBook Studio Mac is secured by screws, top and bottom. Use a size 0 Philips screwdriver to remove the two small screws at the top and bottom of the device.
-
-
-
Now place a narrow blade or a flat-blade screwdriver between the front (case) and perforated top of the device: carefully pry it open. Do the same on the bottom.
-
-
-
As soon as there is enough space for your fingers at the top and bottom, you can continue working without tools. Do not force it or tilt it far from vertical. To do this, alternate between the top and bottom using small incremental movements.
-
-
-
-
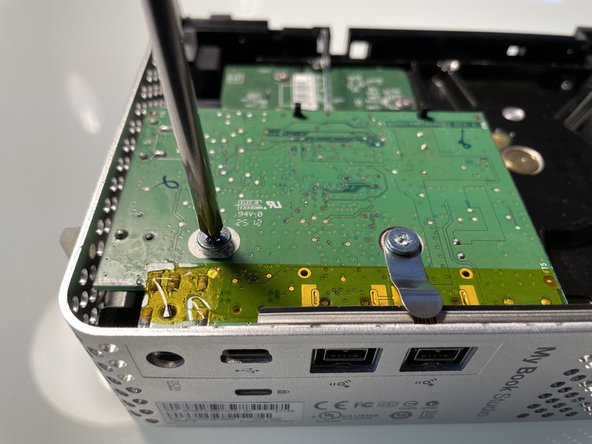
After you have separated the 'electronics assembly' from the 'shell' or 'case', place the electronic component on your work area with the bottom of the SATA controller facing upward.
-
Next, use a Philips 01 screwdriver to remove the two flat-head Phillips screws. If they are very tight at first, avoid putting pressure on the circuit board. A PZ-1 screwdriver is recommended, as it can grip the screw easily with its grooves.
-
For the screw on the right, remember to replace the metal grounding clip at the angle shown later.
-
-
-
The hard drive is now only secured by its connection to the SATA controller at the back. Carefully pry the drive out by the wide side.
-
All the rubber corners are asymmetrical and later will only fit into the case along with the drive in one way.
-
When the front rubber corners come out pull the from the case
-
-
-
Put the rubber Corners on the left and right sides of the housing. (to help keep them straight for reassembly)
-
Remove the two round head screws of the metal drive bracket using the Philips-01 (or PZ-01) screwdriver.
-
TIP: If the device has been sitting around as a backup drive for a long time, you can use a little intuition to reconstruct its original position using the dot-shaped dust residue on the rubber buffers! (As visible here...)
-
-
-
Now you can simply pull the SATA controller to the left away from the drive.
-
-
-
When assembling, proceed in the reverse order. Make sure that the controller sits correctly in the aluminum frame (1) and that its connections are clearly visible on the back of the device.
-
Before you 'slide' the housing back together, thread the plastic light guide very carefully and with a slight bend into the rubber light guide of the status LED.
-


Reverse the steps to reassemble your device.
Cancel: I did not complete this guide.
2 other people completed this guide.
Special thanks to these translators:
100%

Juan Garcia is helping us fix the world! Want to contribute?
Start translating ›