Hamilton Galileo Ventilator Power Supply Replacement

Medical Equipment
Neither iFixit nor this repair guide is endorsed by or affiliated with the medical device manufacturer.

What you need

  1. Hamilton Galileo Ventilator Power Supply Replacement, Opening the Column in the Hamilton Galileo: step 1, image 1 of 1
    • Use a grounding cable and wrist band connected to the GALILEO or other work surface when you are working on the GALILEO.

    • Remove from GALILEO: External mains power supply, Air and oxygen supplies, Patient breathing circuit (for convenience only), Flow Sensor tubes (for convenience only).

  2. Hamilton Galileo Ventilator Power Supply Replacement: step 3, image 1 of 1
    • Loosen the rear panel of the column by removing the six hexagonal-drive (Allen) screws that hold it in place.

  3. Hamilton Galileo Ventilator Power Supply Replacement: step 4, image 1 of 2 Hamilton Galileo Ventilator Power Supply Replacement: step 4, image 2 of 2
    • Without removing any electrical connections, open the left side of the column as wide as practical.

    • This exposes: GALILEO’s internal power supply, The battery fuse, The diagnostic LEDs on the power supply’s main circuit board, and the back up batteries.

    • Make sure no electrical connections are touching the column.

    • Make sure all green/brown grounding (earthing) cables are securely in place.

  4. Hamilton Galileo Ventilator Power Supply Replacement, Power Supply: step 6, image 1 of 2 Hamilton Galileo Ventilator Power Supply Replacement, Power Supply: step 6, image 2 of 2
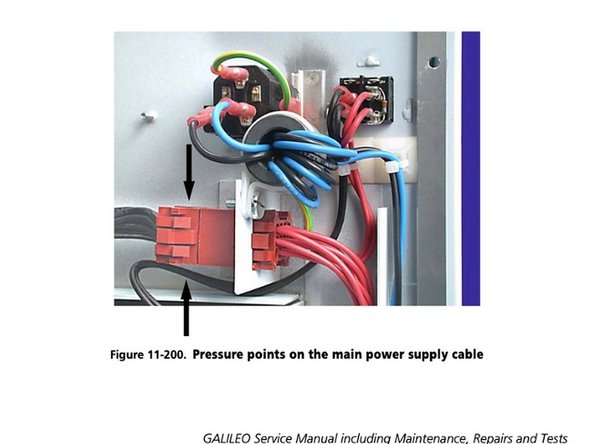
    • Remove all cables connecting power supply to GALILEO.

    • To remove the main power connector, squeeze on the two points indicated in the second picture.

    • Remove the rear cover and place it on a suitable surface.

  5. Hamilton Galileo Ventilator Power Supply Replacement: step 8, image 1 of 1
    • Unscrew the retaining strip securing the power supply in its housing.

  6. Hamilton Galileo Ventilator Power Supply Replacement: step 9, image 1 of 1
    • Slide the power supply out from its housing.

  7. Hamilton Galileo Ventilator Power Supply Replacement: step 10, image 1 of 2 Hamilton Galileo Ventilator Power Supply Replacement: step 10, image 2 of 2
    • To install the new power supply, simply do steps 5-2 in reverse.

    • Make sure the security clamp (shown in picture) is tight before reinstalling power supply.

    • Perform the internal voltage test linked here: page 7-5 of Section 7.3, Checking voltages.

    • If this test is not successful, it is likely that there is a loose connection somewhere between the internal power supply and the printed circuit boards. Check the wires to make sure they are securely fastened.

    • When the above test is successful, continue with the tests in the following sections:

    • 1) Section7, Checking hardware, voltages, and interface

    • 2) Either: Section 9, Running Original Upgrade 1 test software OR Section 10, Running Upgrade 2 test software

Conclusion

To reassemble your device, follow these instructions in reverse order.

One other person completed this guide.

Ian Van Sciver

Member since: 04/09/20

332 Reputation

2 Guides authored

Team

Cal Poly, Team S7-G26, Paton Spring 2020 Member of Cal Poly, Team S7-G26, Paton Spring 2020

CPSU-PATON-S20S7G26

3 Members

4 Guides authored

0 Comments

Add Comment

View Statistics:

Past 24 Hours: 0

Past 7 Days: 1

Past 30 Days: 2

All Time: 499