
HTC myTouch 3G Glass Screen/LED Display Replacement

What you need

  1. HTC myTouch 3G Glass Screen/LED Display Replacement, Remove the Cover: step 1, image 1 of 2 HTC myTouch 3G Glass Screen/LED Display Replacement, Remove the Cover: step 1, image 2 of 2
    • Press both thumbs on each side of the upper corners, and apply pressure in a downward motion.

    • While applying downward pressure, slide the back cover down and off the phone.

  2. HTC myTouch 3G Glass Screen/LED Display Replacement, Remove Battery and SIM Card: step 2, image 1 of 2 HTC myTouch 3G Glass Screen/LED Display Replacement, Remove Battery and SIM Card: step 2, image 2 of 2
    • Remove the battery.

    • Remove the SIM card.

  3. HTC myTouch 3G Glass Screen/LED Display Replacement, Remove SD Card: step 3, image 1 of 1
    • Push the SD card in to eject it.

    • Pull the SD card out.

  4. HTC myTouch 3G Glass Screen/LED Display Replacement, Remove Back Panel Screws: step 4, image 1 of 2 HTC myTouch 3G Glass Screen/LED Display Replacement, Remove Back Panel Screws: step 4, image 2 of 2
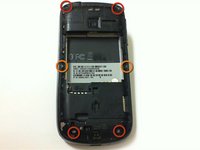
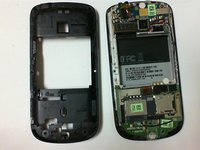
    • Remove the four 6 mm T5 Torx screws from the four corners on the back of the phone.

    • Remove the two 4 mm T5 Torx screws from the middle of the back of the phone.

  5. HTC myTouch 3G Glass Screen/LED Display Replacement, Access the Motherboard: step 5, image 1 of 2 HTC myTouch 3G Glass Screen/LED Display Replacement, Access the Motherboard: step 5, image 2 of 2
    • Pull out the antenna cover to access the motherboard.

  6. HTC myTouch 3G Glass Screen/LED Display Replacement, Dislodge the Back Plate: step 6, image 1 of 2 HTC myTouch 3G Glass Screen/LED Display Replacement, Dislodge the Back Plate: step 6, image 2 of 2
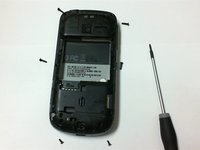
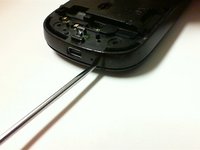
    • Insert a spudger into the gap between the frame and cover. Push downward with the spudger to separate the back plate from the phone.

    • With the spudger in the gap between the frame and cover, move the spudger around the edge of the of the phone to finish removing the back plate.

  7. HTC myTouch 3G Glass Screen/LED Display Replacement, Remove Back Screws: step 7, image 1 of 2 HTC myTouch 3G Glass Screen/LED Display Replacement, Remove Back Screws: step 7, image 2 of 2
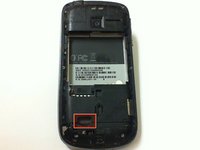
    • Remove the 3 mm Phillips screw located on the side of the bottom left-hand corner of the phone.

    • Remove the 3 mm Phillips screw located on the top right-hand corner of the phone.

    • Do not remove any of the screws located on the actual circuit boards.

  8. HTC myTouch 3G Glass Screen/LED Display Replacement, Separate the Circuit Board: step 8, image 1 of 3 HTC myTouch 3G Glass Screen/LED Display Replacement, Separate the Circuit Board: step 8, image 2 of 3 HTC myTouch 3G Glass Screen/LED Display Replacement, Separate the Circuit Board: step 8, image 3 of 3
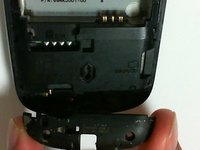
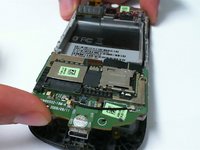
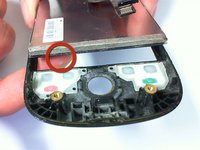
    • Place a finger between the circuit board and front cover, and lift the circuit board gently.

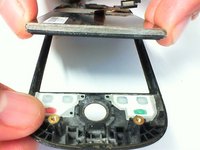
    • Separate the circuit board from the front cover and screen to access the ribbon cable holding them together. Detach the ribbon cable.

    • Finish separating the circuit board from the front panel.

  9. HTC myTouch 3G Glass Screen/LED Display Replacement, Glass Screen/LED Display: step 9, image 1 of 1
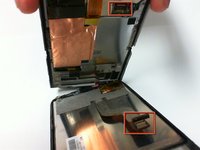
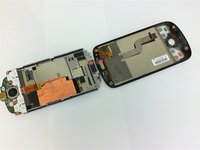
    • After following the prerequisite guide listed above, the phone should have the circuit board housing group on one piece.

    • The front cover and screen of the phone should be located on the other piece.

  10. HTC myTouch 3G Glass Screen/LED Display Replacement: step 10, image 1 of 2 HTC myTouch 3G Glass Screen/LED Display Replacement: step 10, image 2 of 2
    • Place a finger on the front side of the screen, and push up as indicated.

    • Carefully grab onto the sides of the LCD and glass screen.

    • Continue to angle the LCD and glass screen further up.

  11. HTC myTouch 3G Glass Screen/LED Display Replacement: step 11, image 1 of 1
    • Carefully lift the screen away from the front cover.

    • The adhesive should be easy to separate while separating the front cover from the screen.

  12. HTC myTouch 3G Glass Screen/LED Display Replacement: step 12, image 1 of 1
    • Change old LCD and glass digitizer with a replacement.

    • The LCD and glass digitizer can be separated by disconnecting the ribbon cable, and separating the layer of the LCD from the glass screen.

Conclusion

To reassemble your device, follow these instructions in reverse order.

Tony Tran

Member since: 09/25/12

381 Reputation

3 Guides authored

Team

Cal Poly, Team 2-9, Propen Fall 2012 Member of Cal Poly, Team 2-9, Propen Fall 2012

CPSU-PROPEN-F12S2G9

3 Members

10 Guides authored

0 Comments

Add Comment

View Statistics:

Past 24 Hours: 0

Past 7 Days: 0

Past 30 Days: 1

All Time: 2,854