
HTC Vive Camera Replacement

Archived Guide
This guide is retained solely for historical purposes. Use the updated version of the guide to perform your repair.

What you need

  1. HTC Vive Camera Replacement, Release the upper head strap: step 1, image 1 of 2 HTC Vive Camera Replacement, Release the upper head strap: step 1, image 2 of 2
    • Be sure to power down and disconnect your Vive before beginning.

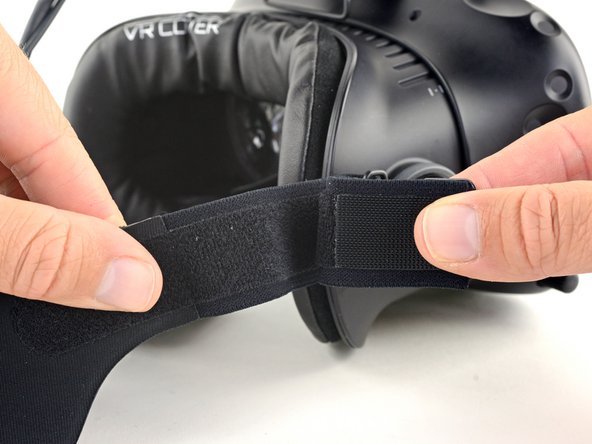
    • Pull the hook-and-loop (Velcro) closure at the top of the head strap apart to release the top of the head strap.

  2. HTC Vive Camera Replacement, Remove the upper head strap: step 2, image 1 of 2 HTC Vive Camera Replacement, Remove the upper head strap: step 2, image 2 of 2
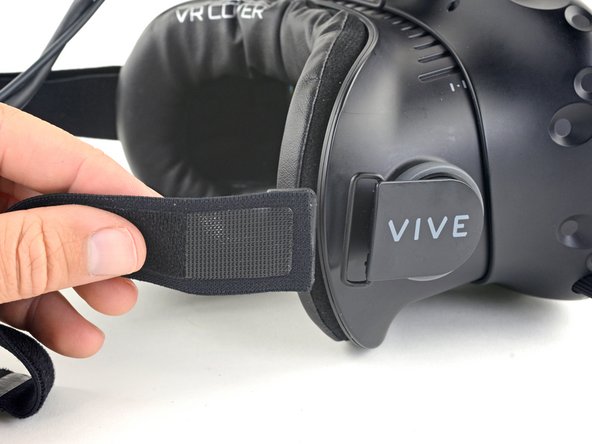
    • Slide the top part of the head strap through its metal loop on the headset to remove it.

  3. HTC Vive Camera Replacement, Remove the right side of the head strap: step 3, image 1 of 3 HTC Vive Camera Replacement, Remove the right side of the head strap: step 3, image 2 of 3 HTC Vive Camera Replacement, Remove the right side of the head strap: step 3, image 3 of 3
    • Pull the hook-and-loop closure at the right side of the head strap apart to release the right side of the head strap.

    • Slide the right side of the head strap through its metal loop to remove it.

  4. HTC Vive Camera Replacement, Remove the left side of the head strap: step 4, image 1 of 3 HTC Vive Camera Replacement, Remove the left side of the head strap: step 4, image 2 of 3 HTC Vive Camera Replacement, Remove the left side of the head strap: step 4, image 3 of 3
    • Pull the hook-and-loop closure at the left side of the head strap apart to release the left side of the head strap.

    • Slide the left side of the head strap through its metal loop to remove it.

  5. HTC Vive Camera Replacement, Remove the head strap: step 5, image 1 of 3 HTC Vive Camera Replacement, Remove the head strap: step 5, image 2 of 3 HTC Vive Camera Replacement, Remove the head strap: step 5, image 3 of 3
    • Slide the head strap along the cable, away from the Vive.

    • When the head strap comes to the end of the cable, gently slide it over the plugs and remove it.

  6. HTC Vive Camera Replacement, Unscrew the head strap mounts: step 6, image 1 of 2 HTC Vive Camera Replacement, Unscrew the head strap mounts: step 6, image 2 of 2
    • Be sure to power down and disconnect your Vive before beginning.

    • Use a T5 Torx driver to remove the two 12 mm-long screws securing the head strap mounts on either side of the headset.

    • For some devices, a T6 Torx driver may work better.

    • The mounts may fall off when the screws are removed, so be careful not to lose any parts.

  7. HTC Vive Camera Replacement, Remove the head strap mounts: step 7, image 1 of 3 HTC Vive Camera Replacement, Remove the head strap mounts: step 7, image 2 of 3 HTC Vive Camera Replacement, Remove the head strap mounts: step 7, image 3 of 3
    • Remove both head strap mounts.

  8. HTC Vive Camera Replacement, Remove the facerest: step 8, image 1 of 2 HTC Vive Camera Replacement, Remove the facerest: step 8, image 2 of 2
    • Slide the facerest straight away from the headset to remove it.

  9. HTC Vive Camera Replacement, Unscrew the outer shell: step 9, image 1 of 3 HTC Vive Camera Replacement, Unscrew the outer shell: step 9, image 2 of 3 HTC Vive Camera Replacement, Unscrew the outer shell: step 9, image 3 of 3
    • Use tweezers to remove the small stickers over the four screws securing the outer shell.

    • Use a T5 Torx driver to remove the four 3.4 mm-long screws securing the outer shell.

  10. HTC Vive Camera Replacement, Remove the outer shell: step 10, image 1 of 2 HTC Vive Camera Replacement, Remove the outer shell: step 10, image 2 of 2
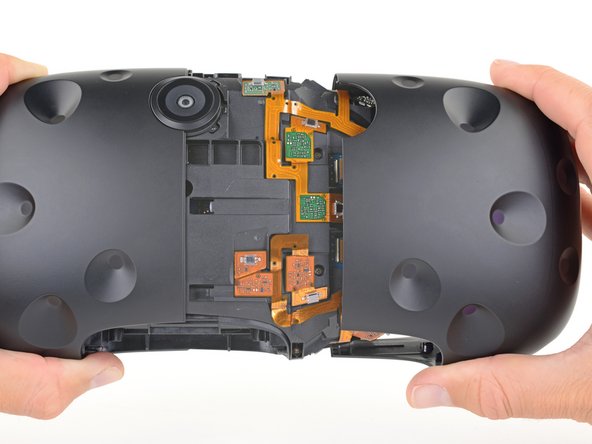
    • Use the flat end of a spudger to pry up the top edge of the right half of the outer shell, behind the component cover and near the seam in the center, until it is unclipped from the headset.

  11. HTC Vive Camera Replacement: step 11, image 1 of 2 HTC Vive Camera Replacement: step 11, image 2 of 2
    • Grasp the right half the outer shell and pull it to the right and toward the front of the headset until you feel the clips on the front of the cover release.

    • If the shell is difficult to remove, try prying along the seam with the flat end of a spudger to release the clips.

  12. HTC Vive Camera Replacement: step 12, image 1 of 2 HTC Vive Camera Replacement: step 12, image 2 of 2
    • Slide the right side of the outer shell to the right and off of the headset.

  13. HTC Vive Camera Replacement: step 13, image 1 of 2 HTC Vive Camera Replacement: step 13, image 2 of 2
    • Repeat the last three steps for the left side of the outer shell and remove it.

  14. HTC Vive Camera Replacement, Disconnect the sensor array cables: step 14, image 1 of 3 HTC Vive Camera Replacement, Disconnect the sensor array cables: step 14, image 2 of 3 HTC Vive Camera Replacement, Disconnect the sensor array cables: step 14, image 3 of 3
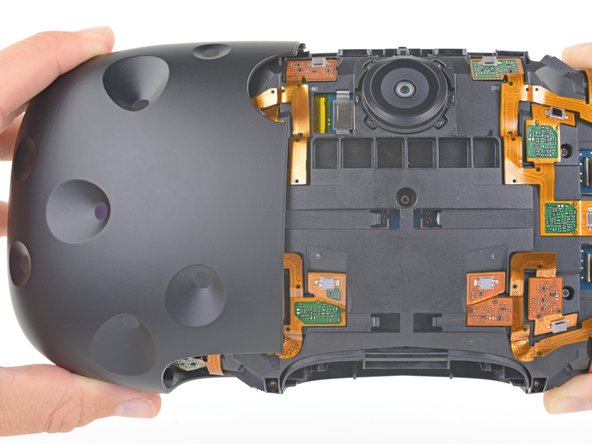
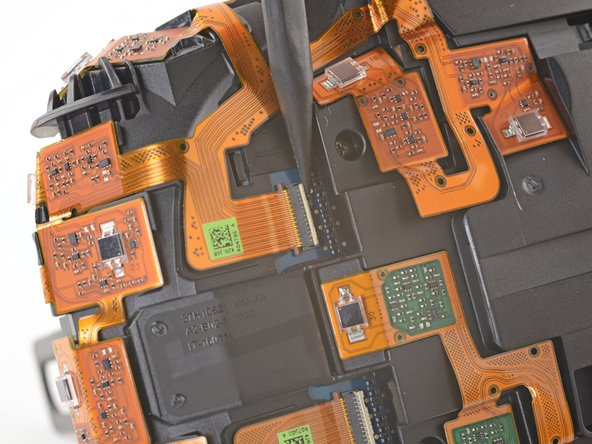
    • Use tweezers to remove the clear tape over all four of the sensor array cable connectors.

  15. HTC Vive Camera Replacement: step 15, image 1 of 3 HTC Vive Camera Replacement: step 15, image 2 of 3 HTC Vive Camera Replacement: step 15, image 3 of 3
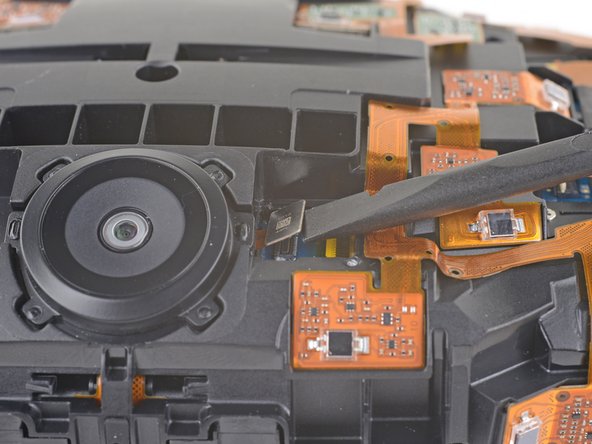
    • Use the pointed end of a spudger to flip up the small locking flap on one of the sensor array ZIF connectors.

    • Slide the cable straight out of its socket on the motherboard.

  16. HTC Vive Camera Replacement: step 16, image 1 of 3 HTC Vive Camera Replacement: step 16, image 2 of 3 HTC Vive Camera Replacement: step 16, image 3 of 3
    • Repeat the previous step for the remaining three sensor array cables to disconnect the remaining cables.

  17. HTC Vive Camera Replacement: step 17, image 1 of 2 HTC Vive Camera Replacement: step 17, image 2 of 2
    • Use tweezers or a spudger to pry up the camera cable cover and remove it.

  18. HTC Vive Camera Replacement: step 18, image 1 of 2 HTC Vive Camera Replacement: step 18, image 2 of 2
    • Use the flat end of a spudger to pry the camera cable connector straight up from its socket on the motherboard.

  19. HTC Vive Camera Replacement, Unscrew the sensor array: step 19, image 1 of 1
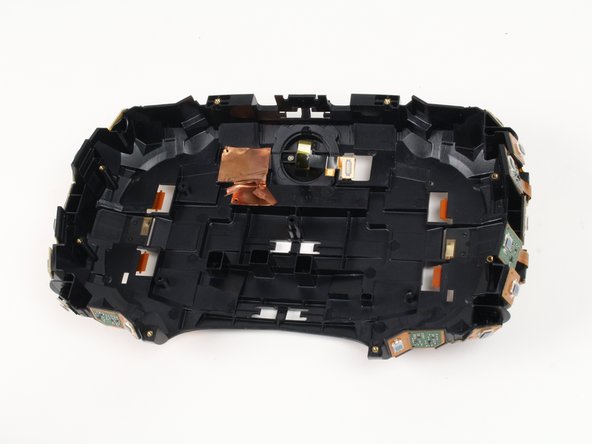
    • Use a PH000 driver to remove the five 3.9 mm screws securing the sensor array.

  20. HTC Vive Camera Replacement: step 20, image 1 of 1
    • Use a PH000 driver to remove the four 3.9 mm screws securing the sensor array.

  21. HTC Vive Camera Replacement: step 21, image 1 of 2 HTC Vive Camera Replacement: step 21, image 2 of 2
    Tool used on this step:
    Phillips #000 Screwdriver
    $5.49
    Buy
    • Use a PH000 driver to remove the four 3.9 mm screws securing the sensor array.

    • You'll need a narrow, long-shaft driver to reach these screws.

  22. HTC Vive Camera Replacement, Remove the sensor array: step 22, image 1 of 2 HTC Vive Camera Replacement, Remove the sensor array: step 22, image 2 of 2
    • Lift the sensor array away from the headset to remove it.

  23. HTC Vive Camera Replacement, Camera: step 23, image 1 of 2 HTC Vive Camera Replacement, Camera: step 23, image 2 of 2
    • Flip the sensor array over 180 degrees.

    • Using tweezers, move the copper tape covering the camera to the side so you can see the screws holding the camera.

  24. HTC Vive Camera Replacement: step 24, image 1 of 3 HTC Vive Camera Replacement: step 24, image 2 of 3 HTC Vive Camera Replacement: step 24, image 3 of 3
    • Remove the two 2mm #00 Philips screws securing the camera.

    • Use tweezers to pull the now freed camera from its slot.

Conclusion

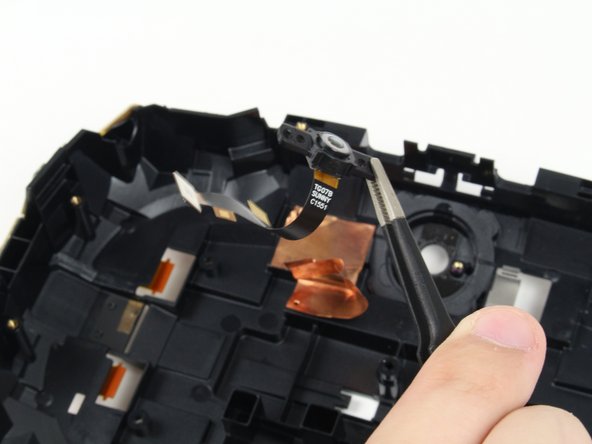
To reassemble your device, follow these instructions in reverse order.

Caleb Watts

Member since: 09/25/17

2,427 Reputation

11 Guides authored

Team

Cal Poly, Team S18-G1, Forte Fall 2017 Member of Cal Poly, Team S18-G1, Forte Fall 2017

CPSU-FORTE-F17S18G1

5 Members

11 Guides authored

One Comment

Do you know where I can buy a replacement camera? Mine seems to be dead.

Andrew Goetz - Reply

Add Comment

View Statistics:

Past 24 Hours: 0

Past 7 Days: 0

Past 30 Days: 0

All Time: 688