
HTC One M9 Rear Case Replacement

What you need

  1. HTC One M9 Rear Case Replacement, SIM Card: step 1, image 1 of 3 HTC One M9 Rear Case Replacement, SIM Card: step 1, image 2 of 3 HTC One M9 Rear Case Replacement, SIM Card: step 1, image 3 of 3
    • Insert a SIM card eject tool or a paperclip into the small hole besides the SIM card tray, located on the upper section of the left edge of the phone.

    • Press to eject the tray.

    • This may require a significant amount of force.

    • When reinserting the SIM card, ensure that its contacts are facing to the rear side. The tapered corner of the SIM card has to point to the outer bottom corner of the tray.

  2. HTC One M9 Rear Case Replacement, MicroSD Card: step 2, image 1 of 3 HTC One M9 Rear Case Replacement, MicroSD Card: step 2, image 2 of 3 HTC One M9 Rear Case Replacement, MicroSD Card: step 2, image 3 of 3
    • The microSD card tray is located on the upper right hand side of the phone, above the volume buttons. To open the tray, insert a microSD card eject tool, or a paperclip, into the small hole in the microSD card tray.

    • Then press the tool or paperclip to eject the microSD card tray.

    • This may require a significant amount of force.

    • When reinserting the microSD card, ensure that it is in the correct orientation to the tray. The electrical connectors should be inserted first, with the microSD card face up.

    • It is normal for the microSD to sit imperfectly in the tray. The microSD card is easy to reposition within the tray.

  3. HTC One M9 Rear Case Replacement, Rear Case: step 3, image 1 of 3 HTC One M9 Rear Case Replacement, Rear Case: step 3, image 2 of 3 HTC One M9 Rear Case Replacement, Rear Case: step 3, image 3 of 3
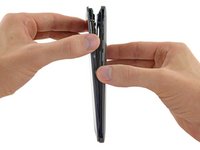
    • Using a plastic opening pick or a spudger, gently pry and remove the cover on top of the case.

    • Remove the two 4 mm T5 Torx screws on the top of the case.

  4. HTC One M9 Rear Case Replacement: step 4, image 1 of 3 HTC One M9 Rear Case Replacement: step 4, image 2 of 3 HTC One M9 Rear Case Replacement: step 4, image 3 of 3
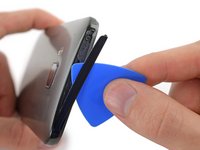
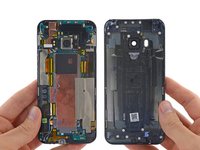
    • Work a plastic opening pick around the perimeter of the device to separate the rear case from the display assembly.

    • The SIM card tray and Micro SD card tray must be removed before the back cover can be removed.

    • Be careful around the power and volume buttons, as they are fairly delicate.

    • Be careful when separating the body from the display assembly, as the rear-facing camera may be stuck to the body with adhesive.

Conclusion

To reassemble your device, follow these instructions in reverse order.

11 other people completed this guide.

Geoff Wacker

Member since: 09/30/13

89,828 Reputation

89 Guides authored

4 Comments

Great guide, changed my backcover in under 5 minutes. Thank you!

Philippe Cambien - Reply

Cannot snap in the cover at the bottom. Afraid to force it a break screen. Please, help.

Sharescience - Reply

Take the case off, bend the little plastic lugs gently out, put the back on starting from the bottom

Adrian Jenkins -

hi guys!

does any one know how to get the back cover of my htc one m9

pollo_s - Reply

Add Comment

View Statistics:

Past 24 Hours: 0

Past 7 Days: 4

Past 30 Days: 11

All Time: 8,600