
Free Shipping on Domestic Orders $75+

HTC Desire S Disassembly

What you need

  1. HTC Desire S Disassembly, HTC Desire S Disassembly: step 1, image 1 of 2 HTC Desire S Disassembly, HTC Desire S Disassembly: step 1, image 2 of 2
    • Pull off the bottom cover.

  2. HTC Desire S Disassembly: step 2, image 1 of 2 HTC Desire S Disassembly: step 2, image 2 of 2
    • Use your fingernails to open the plastic clasp on the bottom right side.

    • The battery can be easily removed because it's only loosely pressed against the top contacts. A characteristic of older smartphones like this one is that the battery can still be removed without tools.

  3. HTC Desire S Disassembly: step 3, image 1 of 2 HTC Desire S Disassembly: step 3, image 2 of 2
    • Now remove the SIM card and the SD memory card.

  4. HTC Desire S Disassembly: step 4, image 1 of 3 HTC Desire S Disassembly: step 4, image 2 of 3 HTC Desire S Disassembly: step 4, image 3 of 3
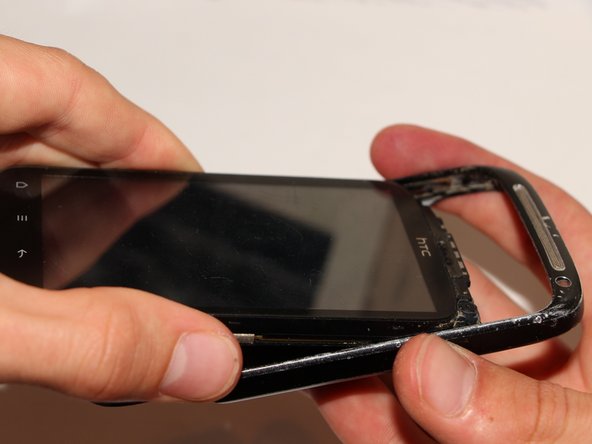
    • To open the top cover, you'll need a guitar pick or a small knife. The cover is pinned and lightly glued, so be careful not to break the small plastic tabs. Cut any glue strands that form when prying it off.

    • Starting at the top corner, carefully pry off the cover and continue along the top edge.

    • Once the top part of the cover is detached from the aluminum frame, you can carefully pull the cover upwards.

  5. HTC Desire S Disassembly: step 5, image 1 of 2 HTC Desire S Disassembly: step 5, image 2 of 2
    • Remove the six Torx T5 screws with a screwdriver. Keep them separate, as they are different lengths.

  6. HTC Desire S Disassembly: step 6, image 1 of 2 HTC Desire S Disassembly: step 6, image 2 of 2
    • You can now simply lift off the plastic frame.

    • Under the plastic frame is an antenna cable, which you can carefully disconnect using tweezers or the tip of a knife.

  7. HTC Desire S Disassembly: step 7, image 1 of 3 HTC Desire S Disassembly: step 7, image 2 of 3 HTC Desire S Disassembly: step 7, image 3 of 3
    • The small circuit board at the bottom edge is glued to the aluminum frame. Using a pick or a knife, you can carefully pry between them and loosen the glue with gentle movements.

    • Next, disconnect the USB connector on the right edge. Be very careful!

  8. HTC Desire S Disassembly: step 8, image 1 of 3 HTC Desire S Disassembly: step 8, image 2 of 3 HTC Desire S Disassembly: step 8, image 3 of 3
    • Now comes the most difficult part of the task: separating the aluminum frame from the rest of the body. To do this, turn the smartphone with the display facing up.

    • Carefully push the bottom part of the board upwards a few millimeters.

    • Carefully bend the small circuit board, which is attached to the large circuit board with two flex cables, backwards. The flex cables must not be creased!

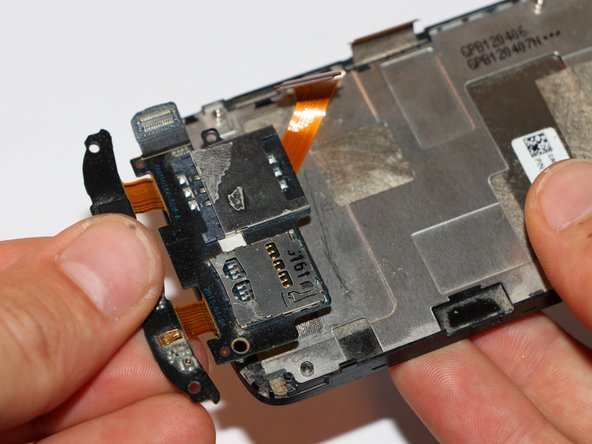
    • Now carefully push the lower part upwards and guide the small circuit board through the frame.

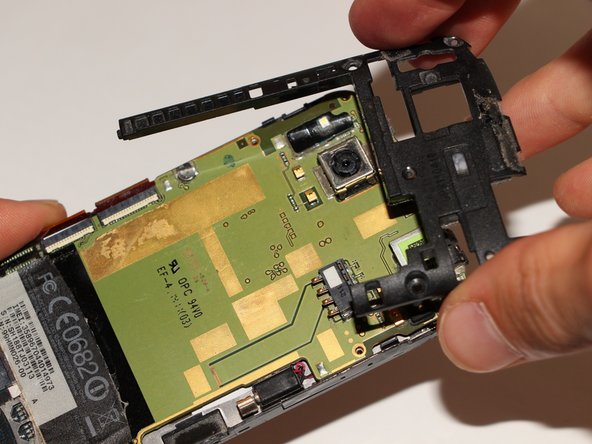
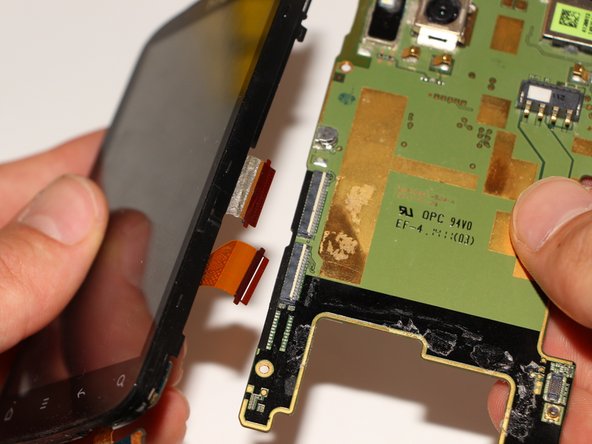
    • Now carefully pull the entire circuit board down and out of the frame.

  9. HTC Desire S Disassembly: step 9, image 1 of 3 HTC Desire S Disassembly: step 9, image 2 of 3 HTC Desire S Disassembly: step 9, image 3 of 3
    • First you need the aluminum frame.

    • Use a Torx T5 screwdriver to remove the two screws from the micro-USB port. You can then remove the port.

  10. HTC Desire S Disassembly: step 10, image 1 of 2 HTC Desire S Disassembly: step 10, image 2 of 2
    • Remove the two Torx T5 screws with a screwdriver.

  11. HTC Desire S Disassembly: step 11, image 1 of 3 HTC Desire S Disassembly: step 11, image 2 of 3 HTC Desire S Disassembly: step 11, image 3 of 3
    • Use a knife or a pick to remove the glued volume buttons from the top plastic frame.

    • Now you can lift off this plastic frame.

    • The main speaker is located on the back of the plastic frame.

  12. HTC Desire S Disassembly: step 12, image 1 of 3 HTC Desire S Disassembly: step 12, image 2 of 3 HTC Desire S Disassembly: step 12, image 3 of 3
    • What would HTC be without a lot of adhesive? You can remove the glued-on film at the bottom with a knife or a pick.

    • Once you have loosened the film at one corner, you can slowly peel it off by hand.

  13. HTC Desire S Disassembly: step 13, image 1 of 2 HTC Desire S Disassembly: step 13, image 2 of 2
    • Carefully remove the vibration motor on the right side.

    • Also remove the glued volume buttons from the bottom edge.

  14. HTC Desire S Disassembly: step 14, image 1 of 3 HTC Desire S Disassembly: step 14, image 2 of 3 HTC Desire S Disassembly: step 14, image 3 of 3
    • Carefully slide a blade or a pick under the circuit board and lift it up.

    • Please make sure that the plastic tab on the lower right side does not break off.

    • Finally, fold the circuit board over as far as shown in the third picture.

  15. HTC Desire S Disassembly: step 15, image 1 of 3 HTC Desire S Disassembly: step 15, image 2 of 3 HTC Desire S Disassembly: step 15, image 3 of 3
    • Carefully remove the antenna cable at the bottom left. Don't pull on the cable itself, but use tweezers to detach it directly from the contact.

    • Carefully remove the volume button contact at the top right.

  16. HTC Desire S Disassembly: step 16, image 1 of 3 HTC Desire S Disassembly: step 16, image 2 of 3 HTC Desire S Disassembly: step 16, image 3 of 3
    • Turn the smartphone over. Use a knife or tweezers to carefully peel off the adhesive strip.

    • Now open the plastic clips of the two connectors and separate the main board from the display unit.

  17. HTC Desire S Disassembly: step 17, image 1 of 2 HTC Desire S Disassembly: step 17, image 2 of 2
    • Use a knife or tweezers to remove the vibration motor. Again, be careful not to pull on the cables, but rather on the plastic contact point.

  18. HTC Desire S Disassembly: step 18, image 1 of 2 HTC Desire S Disassembly: step 18, image 2 of 2
    • Carefully remove the yellow adhesive strip covering the front camera connector.

    • Use a knife or tweezers to open the connector's clamp. There are soldered components right next to it, so don't pry with the tool! Then pull the front camera out of the connector.

  19. HTC Desire S Disassembly: step 19, image 1 of 3 HTC Desire S Disassembly: step 19, image 2 of 3 HTC Desire S Disassembly: step 19, image 3 of 3
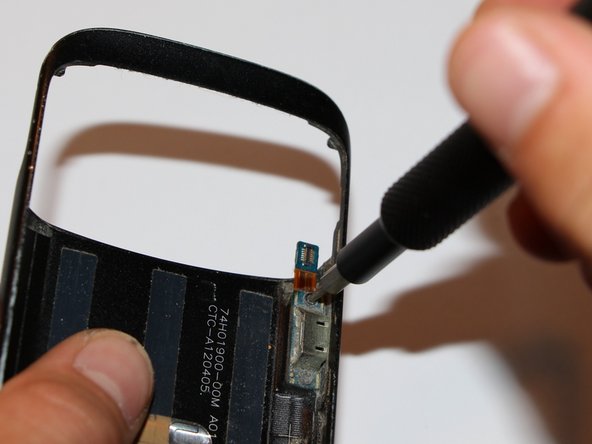
    • Also loosen the yellow strip of the main camera and open the connector as in step 18.

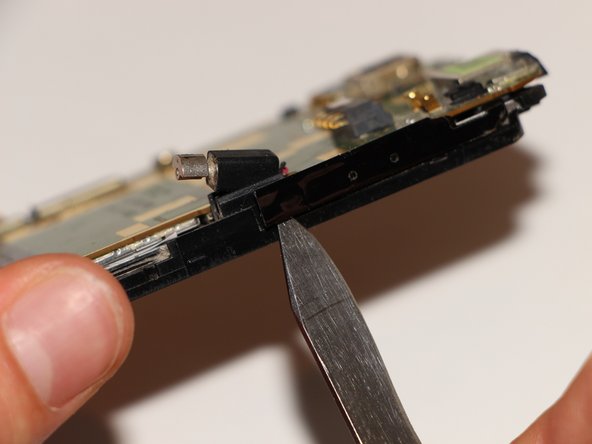
    • On the other side of the circuit board, use an awl or a small screwdriver to carefully push the main camera out of the housing by its metal edge.

    • Now you can lift the camera out from the back and remove it from the connector.

  20. HTC Desire S Disassembly: step 20, image 1 of 3 HTC Desire S Disassembly: step 20, image 2 of 3 HTC Desire S Disassembly: step 20, image 3 of 3
    • Now it's time to get down to the nitty-gritty: the chips! To do this, slide a knife or a pick under the edge of the metal cover and gently push it upwards. The starting point should be at the small metal indentations.

    • Continue this on each edge of the cover until it can be removed.

  21. HTC Desire S Disassembly: step 21, image 1 of 2 HTC Desire S Disassembly: step 21, image 2 of 2
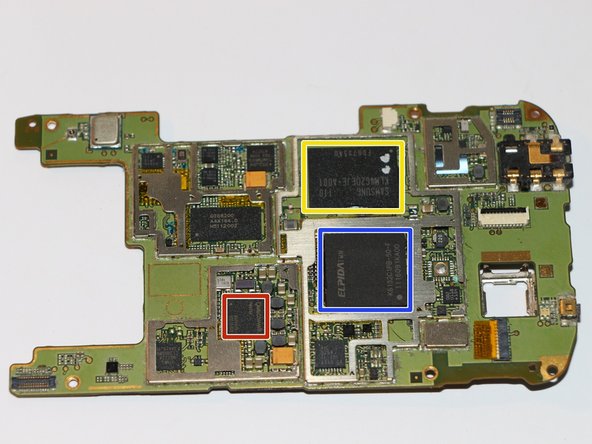
    • This is what the circuit board finally looks like. I was only able to identify three chips.

    • red - processor (Qualcomm Snapdragon MSM8255)

    • blue - RAM (Elpida TWN K6132C1PB-50-F)

    • yellow - internal memory (Samsung KLM4G2DEJE-A001)

    • I would be very grateful for further information on the other chips. Just leave a comment if you have any expertise in this area.

  22. HTC Desire S Disassembly: step 22, image 1 of 1
    • Now take the display unit and remove the Philips Ph00 screw at the bottom edge with a screwdriver.

  23. HTC Desire S Disassembly: step 23, image 1 of 3 HTC Desire S Disassembly: step 23, image 2 of 3 HTC Desire S Disassembly: step 23, image 3 of 3
    • Slowly and very carefully pull the glued flex cable off the display unit.

    • Now, using a knife or a pick, slide under the edges of the SIM and micro SD card holder. This is also glued in place, so slowly work from the edges toward the center and carefully pry it off.

  24. HTC Desire S Disassembly: step 24, image 1 of 3 HTC Desire S Disassembly: step 24, image 2 of 3 HTC Desire S Disassembly: step 24, image 3 of 3
    • This is what the removed display unit should now look like.

    • Remove the phone's speaker at the top edge by pulling it out using a knife or tweezers on one of the spring contacts. Be careful not to bend the contact!

  25. HTC Desire S Disassembly: step 25, image 1 of 1
    • These are all the components of the smartphone at a glance.

Conclusion

Congratulations!

You have successfully disassembled this smartphone. To reassemble, follow all steps in reverse order. You may need to add a little more glue to the parts that were originally glued.

Special thanks to these translators:

de en

100%

These translators are helping us fix the world! Want to contribute?
Start translating ›

Gerdi

Member since: 02/02/16

568 Reputation

1 Guide authored

0 Guide Comments

Add Comment

View Statistics:

Past 24 Hours: 1

Past 7 Days: 15

Past 30 Days: 47

All Time: 675