HP Z2 Mini G3 CPU Fan Replacement

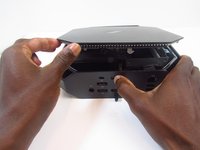
  1. HP Z2 Mini G3 CPU Fan Replacement, Access Panel: step 1, image 1 of 1
    • Turn the device so the back-side of the device is facing you.

    • Be sure that the power is off and the A/C power cord has been disconnected before starting. Removing hardware while the power is on could damage the device or harm yourself.

    • Components of the device are subject to static damage. Work on a hard, grounded surface to prevent damage to the workstation.

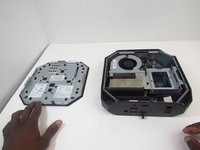
  2. HP Z2 Mini G3 CPU Fan Replacement: step 2, image 1 of 2 HP Z2 Mini G3 CPU Fan Replacement: step 2, image 2 of 2
    • Slide and hold the latch in the direction of the engraved arrow (to the right).

  3. HP Z2 Mini G3 CPU Fan Replacement: step 3, image 1 of 2 HP Z2 Mini G3 CPU Fan Replacement: step 3, image 2 of 2
    • While holding the latch, lift the access panel upwards and towards yourself and set it aside upside-down.

  4. HP Z2 Mini G3 CPU Fan Replacement, CPU Fan: step 4, image 1 of 1
    • Rotate the device so the front side is facing you (the side with the power button) and locate the CPU fan.

  5. HP Z2 Mini G3 CPU Fan Replacement: step 5, image 1 of 1
    • Swing the fan upward, to a 90-degree angle.

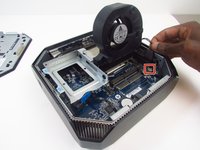
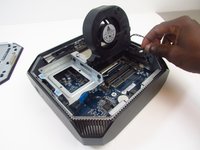
  6. HP Z2 Mini G3 CPU Fan Replacement: step 6, image 1 of 2 HP Z2 Mini G3 CPU Fan Replacement: step 6, image 2 of 2
    • Carefully disconnect the CPU fan by pulling out the wires from the motherboard.

  7. HP Z2 Mini G3 CPU Fan Replacement: step 7, image 1 of 1
    • Swing the fan back down and carefully unhook the CPU fan notches by pulling each tab away from the heat sink holes.

  8. HP Z2 Mini G3 CPU Fan Replacement: step 8, image 1 of 1
    • Swing the fan up again and pull it out.

Conclusion

To reassemble your device, follow these instructions in reverse order.

One other person completed this guide.

0 Comments

Add Comment

View Statistics:

Past 24 Hours: 0

Past 7 Days: 10

Past 30 Days: 41

All Time: 1,282