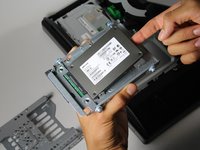
HP ProOne 600 G1 Solid State Drive Replacement

What you need

  1. HP ProOne 600 G1 Solid State Drive Replacement, Solid State Drive: step 1, image 1 of 2 HP ProOne 600 G1 Solid State Drive Replacement, Solid State Drive: step 1, image 2 of 2
    • Push the unlock tabs on the back of the monitor in and towards each other while sliding the back cover up.

  2. HP ProOne 600 G1 Solid State Drive Replacement: step 2, image 1 of 1
    • Pull up on the hard drive bay handle and push it to the left while holding back the metal tab on the bottom.

  3. HP ProOne 600 G1 Solid State Drive Replacement: step 3, image 1 of 1
    • Pull side latch out and slide the hard drive tray out of the bay.

  4. HP ProOne 600 G1 Solid State Drive Replacement: step 4, image 1 of 2 HP ProOne 600 G1 Solid State Drive Replacement: step 4, image 2 of 2
    • Remove the four 5/16" side screws, with the T15 Torx Screwdriver, and gently take out the drive.

Conclusion

To reassemble your device, follow these instructions in reverse order.

2 other people completed this guide.

Attached Documents

Janelle Layman

Member since: 10/01/15

258 Reputation

2 Guides authored

Team

Cal Poly, Team 1-20, Maness Fall 2015 Member of Cal Poly, Team 1-20, Maness Fall 2015

CPSU-MANESS-F15S1G20

4 Members

12 Guides authored

0 Comments

Add Comment

View Statistics:

Past 24 Hours: 3

Past 7 Days: 29

Past 30 Days: 90

All Time: 7,050