Introduction
This guide will help you to remove the print head and to clean the printer : the print head park slot is usually full of ink and dust melted.
What you need
-
-
Turn on the printer
-
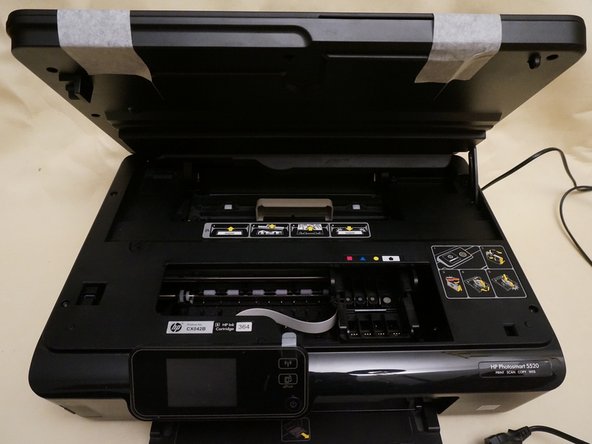
Lift up the scanner glass and the top cover, then the printerhead is centered in the printer case
-
Remove the ink cartridges.
-
Unplug the printer but do not turn off with the front I/O button. Otherwise the printhead will return to its park slot.
-
Use adhesive tape to fix together the scanner glass and the cover
-
-
-
Gently pull on the hook. Retain the scanner glass and the cover once the hook is removed.
-
-
-
-
Unscrew the 7 torx screws. Do not forget the one under the printer label (You have to remove the printer label. Lower right corner).
-
Push the clips at the rear of the LCD panel and pull the LCD panel outwards at the same time
-
Then, pull the ribbon connected to the LCD panel to disconnect the LCD panel from the printer.
-
Remove the 2 remaining torx screws hidden by the LCD panel
-
See where are clips (Blue arrows)
-
-
-
Remove the springs that maintain the print head.
-
Remove the print head by pulling on the ribbons.
-
When inserting the print head after cleaning or replacing, make sure the horizontal plastic ribbon is between the plastic guides, as shown in the last picture. Getting this wrong may cause the print head to jam when you put the power back on at the end.
-
-
-
The printer has an automatic feature to clean the print head. Usually, there is a lot of ink (Probably melt with dust) in the area where the print head is cleaned
-
Remove the 5 torx screw as shown in the picture
-
Assuming the print head is now removed (Not shown on the picture), now gently tip the plastic plate and remove it
-
If you didn't put gloves yet, it is time to do it !
-
Now, push the carriage that holds the print head cleaning system (Red arrows)
-
The carriage that holds the print head cleaning system is now clean (Last picture)
-