
HP Pavilion G60-235DX Screen Replacement

What you need

  1. HP Pavilion G60-235DX Screen Replacement, Keyboard: step 1, image 1 of 2 HP Pavilion G60-235DX Screen Replacement, Keyboard: step 1, image 2 of 2
    • Please turn the power of your device off. If not, it may cause a damage to the computer's hard drive and the person.

    • Slide the lock to remove the battery

    • After removing the battery, you can find 8 screws where battery were placed. Unscrew those 8 screws.

  2. HP Pavilion G60-235DX Screen Replacement: step 2, image 1 of 3 HP Pavilion G60-235DX Screen Replacement: step 2, image 2 of 3 HP Pavilion G60-235DX Screen Replacement: step 2, image 3 of 3
    • Do not force if the frame is not coming out. It may break the clip of the frame.

    • After the screws from battery house are removed, open the laptop to remove the keyboard frame.

    • Approach the frame on the side by using the prying tool. Carefully remove the clip. Watch out not to break the clip.

    • Then use the prying tool to carefully remove the frame from the top. Be careful not to break the clip.

    • Then, press the button located top of the touch pad to completely remove the frame from the bottom of the frame.

  3. HP Pavilion G60-235DX Screen Replacement: step 3, image 1 of 1
    • When the frame is removed, keyboard will be free to be removed. There is cable ribbon to be removed. Gently pull out the ribbon from where it is plugged.

    • The keyboard is now detached from the computer.

  4. HP Pavilion G60-235DX Screen Replacement, Screen: step 4, image 1 of 3 HP Pavilion G60-235DX Screen Replacement, Screen: step 4, image 2 of 3 HP Pavilion G60-235DX Screen Replacement, Screen: step 4, image 3 of 3
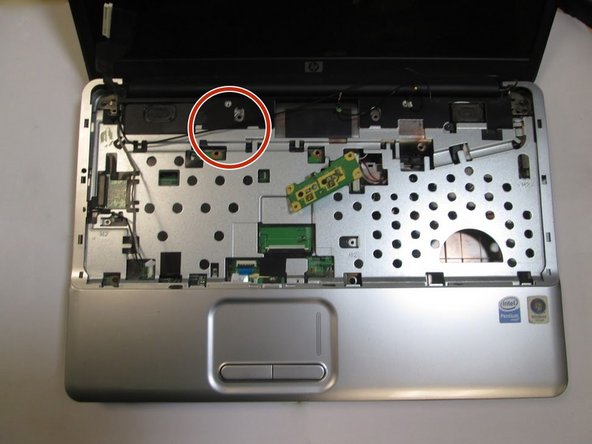
    • Unplug two wires by gently pulling it out.

    • Then remove two wires from the clip that was holding the wire in place.

  5. HP Pavilion G60-235DX Screen Replacement: step 5, image 1 of 1
    • Remove the covered cable ribbon that is located at the left side of the computer.

  6. HP Pavilion G60-235DX Screen Replacement: step 6, image 1 of 1
    • Gently pull the smaller wire from its clip. Please do not pull the wire by holding the wire itself. Use the plastic cover to pull.

  7. HP Pavilion G60-235DX Screen Replacement: step 7, image 1 of 1
    • There are 3 screws holding the screen from laptop each side. Unscrew every screw for each side.

    • Then gently pull out the screen from its place. Be sure not to force it out.

  8. HP Pavilion G60-235DX Screen Replacement: step 8, image 1 of 2 HP Pavilion G60-235DX Screen Replacement: step 8, image 2 of 2
    • Use the spudger to remove the rubber sticker located at the bottom of each side of the screen.

    • Unscrew the the screws from each side.

  9. HP Pavilion G60-235DX Screen Replacement: step 9, image 1 of 1
    • Firmly pry the front screen cover off. Slide the prying tool around the front screen. Please be careful not to destroy the clip. It will destroy the entire screen.

  10. HP Pavilion G60-235DX Screen Replacement: step 10, image 1 of 1
    • Be careful when moving the screen, you may damage the monitor and webcam cable.

    • Remove the screen from its house.

    • Gently disconnect the webcam cable from the monitor which locate at the back of the laptop.

  11. HP Pavilion G60-235DX Screen Replacement: step 11, image 1 of 1
    • Remove four screws from the side.

Conclusion

To reassemble your device, follow these instructions in reverse order.

One other person completed this guide.

Gilbert Han

Member since: 01/24/17

241 Reputation

2 Guides authored

Team

Cal Poly, Team 10-5, Banghart Winter 2017 Member of Cal Poly, Team 10-5, Banghart Winter 2017

CPSU-BANGHART-W17S10G5

3 Members

5 Guides authored

One Comment

Thanks helping me me out. left 1 key screw stuck.

Keyboard wudnt come out SUPRISE SUPRISE!. very kind of to help.

tali9 - Reply

Add Comment

View Statistics:

Past 24 Hours: 0

Past 7 Days: 5

Past 30 Days: 8

All Time: 797