
HP Pavilion 15-AB153NR Hard Drive Replacement

What you need

  1. HP Pavilion 15-AB153NR Hard Drive Replacement, Battery: step 1, image 1 of 1
    • Ensure computer is turned off and unplugged.

    • Slide the battery lock latch on the left to unlock. Slide from left to right to unlock.

  2. HP Pavilion 15-AB153NR Hard Drive Replacement: step 2, image 1 of 2 HP Pavilion 15-AB153NR Hard Drive Replacement: step 2, image 2 of 2
    • Slide the battery release latch on the right with continuous force from right to left.

    • Once battery pops, you may release latch.

  3. HP Pavilion 15-AB153NR Hard Drive Replacement: step 3, image 1 of 2 HP Pavilion 15-AB153NR Hard Drive Replacement: step 3, image 2 of 2
    • Grab the battery, rotating upwards and away from you. This will remove the battery.

  4. HP Pavilion 15-AB153NR Hard Drive Replacement, CD/DVD Drive: step 4, image 1 of 1
    • Make sure computer is powered off and unplugged.

    • Flip computer over so that the bottom is facing the ceiling and the hinges are farthest from you.

  5. HP Pavilion 15-AB153NR Hard Drive Replacement: step 5, image 1 of 1
    • Using the Phillips #000 screwdriver, remove the 7 mm screw on the middle right.

    • There is an icon that looks like a CD stamped into the back panel near this screw.

  6. HP Pavilion 15-AB153NR Hard Drive Replacement: step 6, image 1 of 2 HP Pavilion 15-AB153NR Hard Drive Replacement: step 6, image 2 of 2
    • Slide the drive out from the right side of the device.

  7. HP Pavilion 15-AB153NR Hard Drive Replacement, Bottom Case Cover: step 7, image 1 of 1
    • Using the Phillips #1 screwdriver, remove the two 12mm screws located on the hinge covers.

  8. HP Pavilion 15-AB153NR Hard Drive Replacement: step 8, image 1 of 2 HP Pavilion 15-AB153NR Hard Drive Replacement: step 8, image 2 of 2
    • Lift the corner covers off of the computer using a prying tool.

  9. HP Pavilion 15-AB153NR Hard Drive Replacement: step 9, image 1 of 1
    • Remove the six 6.5mm screws using a Phillips #1 screwdriver that are located near the top of the laptop.

  10. HP Pavilion 15-AB153NR Hard Drive Replacement: step 10, image 1 of 1
    • Remove the remaining seven 6.5mm screws using a Phillips #1 screwdriver that are securing the back cover.

  11. HP Pavilion 15-AB153NR Hard Drive Replacement: step 11, image 1 of 1
    • Use the Phillips #0 screwdriver to remove the two 2mm screws.

  12. HP Pavilion 15-AB153NR Hard Drive Replacement: step 12, image 1 of 3 HP Pavilion 15-AB153NR Hard Drive Replacement: step 12, image 2 of 3 HP Pavilion 15-AB153NR Hard Drive Replacement: step 12, image 3 of 3
    • Use prying tools to pry the covers off of the screwholes.

    • Using the Phillips #1 screwdriver, remove the two 6.5mm screws.

  13. HP Pavilion 15-AB153NR Hard Drive Replacement: step 13, image 1 of 1
    • Be mindful of sharp edges on computer while using prying tools.

    • Flip computer over and open so that the screen is facing you.

    • Starting at the bottom right corner, insert the prying tool and lift upwards to loosen the back panel.

    • Continue down all sides and corners of the device.

  14. HP Pavilion 15-AB153NR Hard Drive Replacement: step 14, image 1 of 2 HP Pavilion 15-AB153NR Hard Drive Replacement: step 14, image 2 of 2
    • Flip laptop back over so that the bottom is facing up

    • After all sides are loosened, remove the back panel from the device.

  15. HP Pavilion 15-AB153NR Hard Drive Replacement, Hard Drive: step 15, image 1 of 2 HP Pavilion 15-AB153NR Hard Drive Replacement, Hard Drive: step 15, image 2 of 2
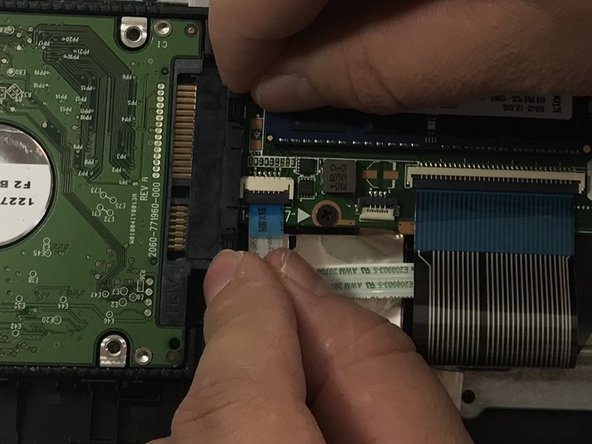
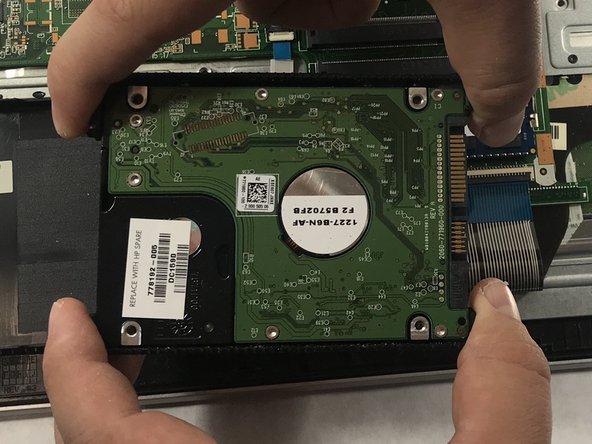
    • Disconnect the hard drive cable from the motherboard by sliding it left to right.

  16. HP Pavilion 15-AB153NR Hard Drive Replacement: step 16, image 1 of 2 HP Pavilion 15-AB153NR Hard Drive Replacement: step 16, image 2 of 2
    • Lift the hard drive from the computer.

  17. HP Pavilion 15-AB153NR Hard Drive Replacement: step 17, image 1 of 2 HP Pavilion 15-AB153NR Hard Drive Replacement: step 17, image 2 of 2
    • Pull the brackets away from each side of the hard drive.

Conclusion

To reassemble your device, follow these instructions in reverse order.

One other person completed this guide.

Nicole Vachon

Member since: 03/21/19

926 Reputation

7 Guides authored

Team

0 Comments

Add Comment

View Statistics:

Past 24 Hours: 0

Past 7 Days: 0

Past 30 Days: 3

All Time: 950