
HP Omen 15-ax243dx Ventilation Fans Replacement

What you need

  1. HP Omen 15-ax243dx Ventilation Fans Replacement, Battery: step 1, image 1 of 2 HP Omen 15-ax243dx Ventilation Fans Replacement, Battery: step 1, image 2 of 2
    • The rear panel is secured by 10 screws. Using a #00 Phillips Screwdriver, remove the ten 1.2 mm screws.

    • The screwdriver should be inserted at the same angle as the screws.

    • Be sure to keep track of the screws and where they came from. Some only fit in to one spot.

  2. HP Omen 15-ax243dx Ventilation Fans Replacement: step 2, image 1 of 2 HP Omen 15-ax243dx Ventilation Fans Replacement: step 2, image 2 of 2
    • Insert a plastic opening tool between the rear panel and the top case. Pry the opening tool upwards to separate the top case from the bottom case.

    • Slide the opening tool along the case perimeter to loosen the bottom case.

    • Gently pull the bottom case away from the laptop.

  3. HP Omen 15-ax243dx Ventilation Fans Replacement: step 3, image 1 of 2 HP Omen 15-ax243dx Ventilation Fans Replacement: step 3, image 2 of 2
    • Remove the four 1.2 mm Phillips #00 screws around the battery.

  4. HP Omen 15-ax243dx Ventilation Fans Replacement: step 4, image 1 of 2 HP Omen 15-ax243dx Ventilation Fans Replacement: step 4, image 2 of 2
    • Pull the battery cable out from its motherboard socket.

    • Pull parallel to the motherboard, not straight up.

    • Remove the battery.

    • Disconnect the power cord from the battery and transfer it to your replacement battery.

  5. HP Omen 15-ax243dx Ventilation Fans Replacement, Ventilation Fans: step 5, image 1 of 1
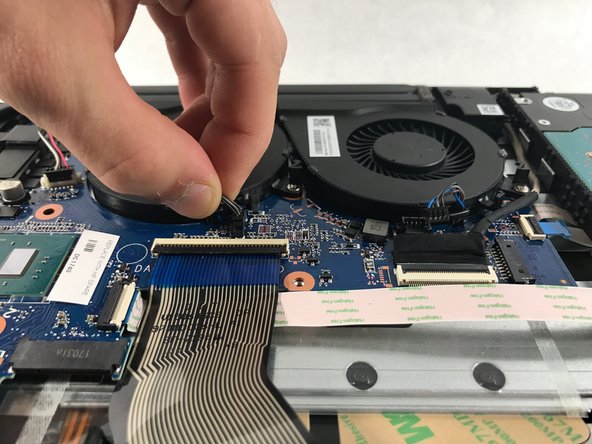
    • The two ventilation fans are secured with the system by 5 screws. Unscrew these five 1.2 mm screws using the Phillips #0 screwdriver.

    • When removing the screws, use a magnetic screwdriver to prevent the screws from falling behind the motherboard

  6. HP Omen 15-ax243dx Ventilation Fans Replacement: step 6, image 1 of 2 HP Omen 15-ax243dx Ventilation Fans Replacement: step 6, image 2 of 2
    • After removing all 5 screws, the fans are still connected with the system through 2 cables.

    • Carefully pull the fan cables out of the connectors on the motherboard.

    • Be cautious when pulling by the wires, this can permanently damage the fans beyond repair.

  7. HP Omen 15-ax243dx Ventilation Fans Replacement: step 7, image 1 of 1
    • The fans can now be removed from the device.

Conclusion

To reassemble your device, follow these instructions in reverse order.

4 other people completed this guide.

vangnam

Member since: 10/19/17

594 Reputation

4 Guides authored

Team

0 Comments

Add Comment

View Statistics:

Past 24 Hours: 0

Past 7 Days: 2

Past 30 Days: 10

All Time: 5,572