
HP Officejet Pro 8625 Motherboard Replacement

What you need

  1. HP Officejet Pro 8625 Motherboard Replacement, Left Side Panel: step 1, image 1 of 3 HP Officejet Pro 8625 Motherboard Replacement, Left Side Panel: step 1, image 2 of 3 HP Officejet Pro 8625 Motherboard Replacement, Left Side Panel: step 1, image 3 of 3
    • Remove the two 11.6 mm T9 screws from the right side of the back of the printer.

  2. HP Officejet Pro 8625 Motherboard Replacement: step 2, image 1 of 3 HP Officejet Pro 8625 Motherboard Replacement: step 2, image 2 of 3 HP Officejet Pro 8625 Motherboard Replacement: step 2, image 3 of 3
    • Pull down the front panel to expose the screws on the front.

    • Remove the one 11.6 mm T9 screw on the left side of the front face.

  3. HP Officejet Pro 8625 Motherboard Replacement: step 3, image 1 of 2 HP Officejet Pro 8625 Motherboard Replacement: step 3, image 2 of 2
    • Remove the side panel by pushing down and towards the back.

    • This step may be easier if the printer is laid on its side with the left side panel facing up.

  4. HP Officejet Pro 8625 Motherboard Replacement, Motherboard: step 4, image 1 of 3 HP Officejet Pro 8625 Motherboard Replacement, Motherboard: step 4, image 2 of 3 HP Officejet Pro 8625 Motherboard Replacement, Motherboard: step 4, image 3 of 3
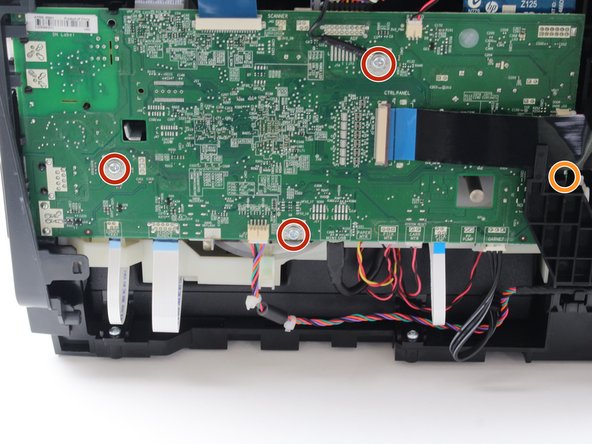
    • Remove the three 5.3 mm T9 screws from the motherboard.

    • Remove the one 6.7 mm T9 screw from the motherboard.

  5. HP Officejet Pro 8625 Motherboard Replacement: step 5, image 1 of 2 HP Officejet Pro 8625 Motherboard Replacement: step 5, image 2 of 2
    • Remove the connectors from the front and sides of the motherboard by pulling straight away from the connection.

  6. HP Officejet Pro 8625 Motherboard Replacement: step 6, image 1 of 3 HP Officejet Pro 8625 Motherboard Replacement: step 6, image 2 of 3 HP Officejet Pro 8625 Motherboard Replacement: step 6, image 3 of 3
    • Lift the bottom of the motherboard and remove the connectors from the back.

    • Remove the motherboard.

    • There are two white connectors underneath the motherboard, remove them separately.

Conclusion

To reassemble your device, follow these instructions in reverse order.

Cam Engle

Member since: 10/08/18

531 Reputation

3 Guides authored

Team

Cal Poly, Team S13-G3, White Fall 2018 Member of Cal Poly, Team S13-G3, White Fall 2018

CPSU-WHITE-F18S13G3

3 Members

14 Guides authored

0 Comments

Add Comment

View Statistics:

Past 24 Hours: 0

Past 7 Days: 5

Past 30 Days: 9

All Time: 480