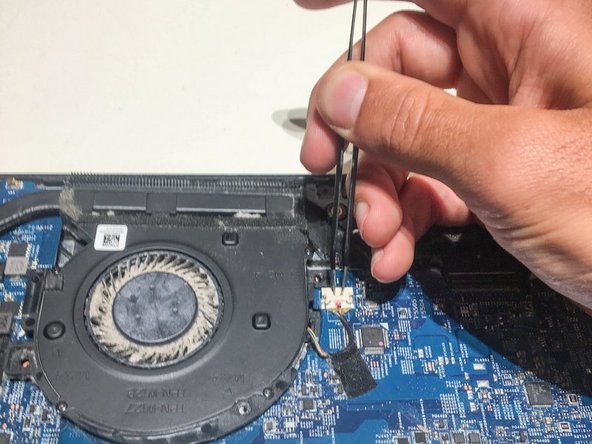
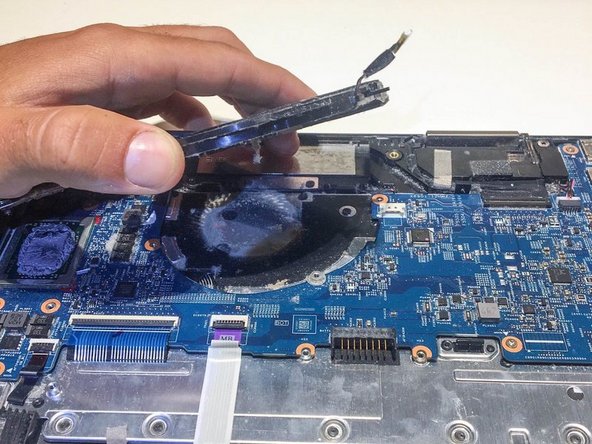
HP Envy x360 15m-bq121dx Cooling Fan Replacement

What you need

  1. HP Envy x360 15m-bq121dx Cooling Fan Replacement, Cooling Fan: step 1, image 1 of 2 HP Envy x360 15m-bq121dx Cooling Fan Replacement, Cooling Fan: step 1, image 2 of 2
    • Be sure the computer is powered off.

    • Remove the rubber strip along the top of the backside of the computer.

    • On the back panel of the device, remove the four (4) 2.5 mm screws at the top of the photo using a Phillips #0 screwdriver.

    • Unscrew the three (3) screws at the bottom of the photo using a T5 Torx screwdriver.

  2. HP Envy x360 15m-bq121dx Cooling Fan Replacement: step 2, image 1 of 3 HP Envy x360 15m-bq121dx Cooling Fan Replacement: step 2, image 2 of 3 HP Envy x360 15m-bq121dx Cooling Fan Replacement: step 2, image 3 of 3
    • To remove the back cover, use the spudger to lift up on the edges of the cover.

    • Use a suction cup to assist in lifting the back cover

    • Be sure to not damage any of the electronics on the inside.

  3. HP Envy x360 15m-bq121dx Cooling Fan Replacement: step 3, image 1 of 1
    • Use the Philips #0 screwdriver to remove seven 2 mm screws from battery.

  4. HP Envy x360 15m-bq121dx Cooling Fan Replacement: step 4, image 1 of 1
    • Lift and pull the front of the battery up and out away from the connector to remove.

  5. HP Envy x360 15m-bq121dx Cooling Fan Replacement: step 5, image 1 of 2 HP Envy x360 15m-bq121dx Cooling Fan Replacement: step 5, image 2 of 2
    • Using a Philips #0 screwdriver, remove the three 2 mm screws located around the cooling fan as shown in this picture.

    • The fan may have sharp edges so be careful upon removal.

  6. HP Envy x360 15m-bq121dx Cooling Fan Replacement: step 6, image 1 of 2 HP Envy x360 15m-bq121dx Cooling Fan Replacement: step 6, image 2 of 2
    • Remove the connector clip with the tweezers.

  7. HP Envy x360 15m-bq121dx Cooling Fan Replacement: step 7, image 1 of 1
    • Remove the four spring loaded screws with a Philips #1 screwdriver.

  8. HP Envy x360 15m-bq121dx Cooling Fan Replacement: step 8, image 1 of 2 HP Envy x360 15m-bq121dx Cooling Fan Replacement: step 8, image 2 of 2
    • Remove the cooling fan.

Conclusion

To reassemble your device, follow these instructions in reverse order.

Fabien Perez

Member since: 02/13/20

157 Reputation

1 Guide authored

0 Comments

Add Comment

View Statistics:

Past 24 Hours: 1

Past 7 Days: 10

Past 30 Days: 31

All Time: 1,806