HP Envy x360 15-bp143cl Hard Drive Replacement

What you need

  1. HP Envy x360 15-bp143cl Hard Drive Replacement, Hard Drive: step 1, image 1 of 1
    • Flip the laptop over.

    • Peel off the rubber strip closest to the hinges.

  2. HP Envy x360 15-bp143cl Hard Drive Replacement: step 2, image 1 of 1
    • Use a Phillips #1 screwdriver (PH1 bit) to remove the four 6.5mm screws that were underneath the rubber strip.

  3. HP Envy x360 15-bp143cl Hard Drive Replacement: step 3, image 1 of 1
    • Use a Torx T5 screwdriver (T5 bit) to remove the three 5mm screws near the bottom edge of the laptop.

  4. HP Envy x360 15-bp143cl Hard Drive Replacement: step 4, image 1 of 1
    • Lift the back panel to remove it from the laptop.

    • Use an opening tool to pry open the back panel if it does not easily lift apart.

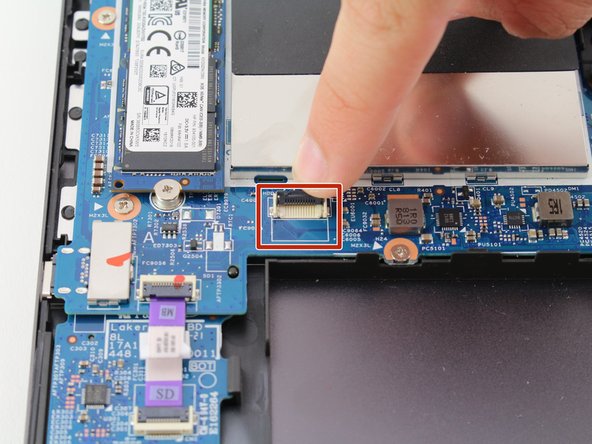
  5. HP Envy x360 15-bp143cl Hard Drive Replacement: step 5, image 1 of 2 HP Envy x360 15-bp143cl Hard Drive Replacement: step 5, image 2 of 2
    • Lift the black tab securing the hard drive connecting cable to the laptop to remove the cable.

  6. HP Envy x360 15-bp143cl Hard Drive Replacement: step 6, image 1 of 1
    • Lift the hard drive from its slot.

    • If the hard drive is attached using adhesive, use an opening tool to pry it from the laptop.

Conclusion

To reassemble your device, follow these instructions in reverse order.

One other person completed this guide.

Spencer Berkins

Member since: 10/10/19

574 Reputation

4 Guides authored

Team

Cal Poly, Team S12-G3, Regan Fall 2019 Member of Cal Poly, Team S12-G3, Regan Fall 2019

CPSU-REGAN-F19S12G3

3 Members

6 Guides authored

0 Comments

Add Comment

View Statistics:

Past 24 Hours: 0

Past 7 Days: 2

Past 30 Days: 14

All Time: 1,117