Free Shipping on Domestic Orders $75+

HP Elite X2 1013 G3 Solid State Drive Replacement

What you need

  1. HP Elite X2 1013 G3 Solid State Drive Replacement, Screen: step 1, image 1 of 1
    • Flip the device over so the base is facing the ceiling.

    • Lift up the tablet stand.

    • Remove the four 2 mm screws from the tablet using a T5 Torx screwdriver.

    Ask FixBot

    Add Comment

  2. HP Elite X2 1013 G3 Solid State Drive Replacement: step 2, image 1 of 2 HP Elite X2 1013 G3 Solid State Drive Replacement: step 2, image 2 of 2
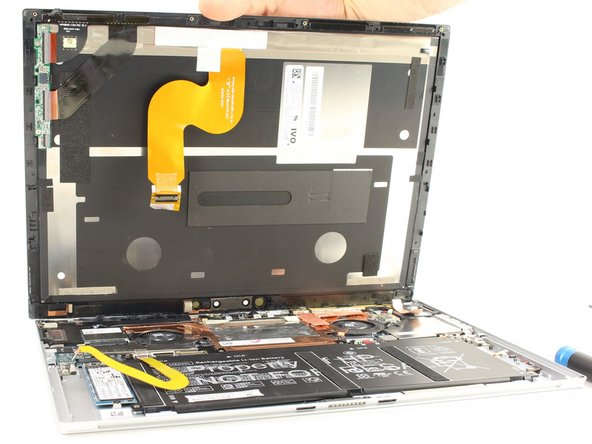
    • Flip the tablet over with the screen facing upwards.

    • Place the suction handle in the center of the screen and slowly lift off the screen until it is at a 30 degree angle, starting by gently prying up the bottom.

    • Do not pull the screen beyond a 30 degree angle. Additional internal components must be disconnected first.

    Ask FixBot

    Add Comment

  3. HP Elite X2 1013 G3 Solid State Drive Replacement: step 3, image 1 of 2 HP Elite X2 1013 G3 Solid State Drive Replacement: step 3, image 2 of 2
    • With the screen lifted at a 30 degree angle, gently disconnect the yellow ribbon cable at the end connected to the screen.

    • Gently disconnect the orange ribbon cable at the end connected to the bottom plate.

    Ask FixBot

    Add Comment

  4. HP Elite X2 1013 G3 Solid State Drive Replacement: step 4, image 1 of 2 HP Elite X2 1013 G3 Solid State Drive Replacement: step 4, image 2 of 2
    • Remove the screen from the tablet.

    Ask FixBot

    Add Comment

  5. HP Elite X2 1013 G3 Solid State Drive Replacement, Battery: step 5, image 1 of 1
    • Use the Phillips #00 screwdriver to remove the six 2 mm screws.

    • Gently disconnect the two connectors.

    Ask FixBot

    Add Comment

  6. HP Elite X2 1013 G3 Solid State Drive Replacement: step 6, image 1 of 1
    • Lift the battery out of the housing.

    Ask FixBot

    Add Comment

  7. HP Elite X2 1013 G3 Solid State Drive Replacement, Solid State Drive: step 7, image 1 of 1
    • Make sure the device is powered off and the battery is removed before continuing!

    • Using the Phillips #00 Screwdriver, remove the single indicated screw.

    Ask FixBot

    Add Comment

  8. HP Elite X2 1013 G3 Solid State Drive Replacement: step 8, image 1 of 1
    • Gently tilt the drive upward, then firmly pull it out from the motherboard.

    • Pay attention to the orientation of the SSD. Trying to put your replacement SSD in the wrong way could damage the part or the connector.

    Ask FixBot

    Add Comment

Conclusion

To reassemble your device, follow these instructions in reverse order.

Cancel: I did not complete this guide.

One other person completed this guide.

Kory Haydon

Member since: 04/18/19

259 Reputation

2 Guides authored

Team

Cal Poly, Team S9-G12, Maness Spring 2019 Member of Cal Poly, Team S9-G12, Maness Spring 2019

CPSU-MANESS-S19S9G12

4 Members

6 Guides authored

0 Guide Comments

Add Comment

View Statistics:

Past 24 Hours: 2

Past 7 Days: 8

Past 30 Days: 63

All Time: 3,956