
HP ENVY 5530 Paper Tray Replacement

What you need

  1. HP ENVY 5530 Paper Tray Replacement, Paper Tray: step 1, image 1 of 2 HP ENVY 5530 Paper Tray Replacement, Paper Tray: step 1, image 2 of 2
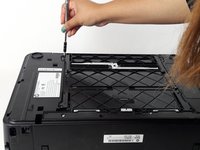
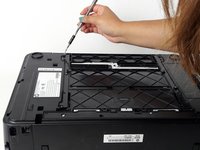
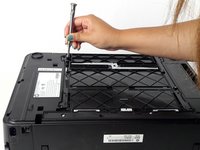
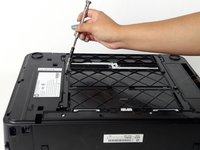
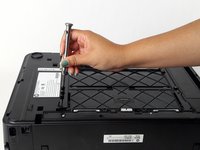
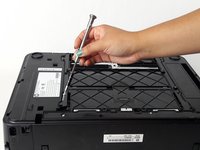
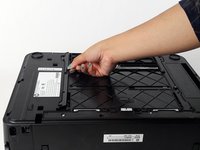
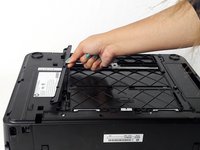
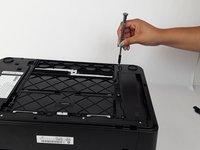
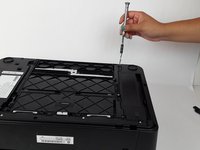
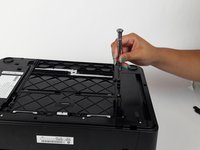
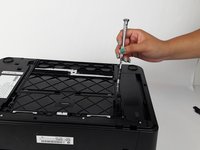
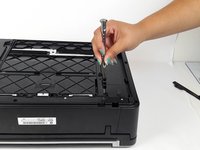
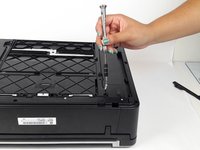
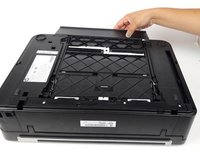
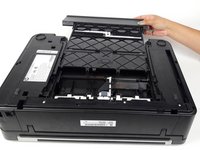
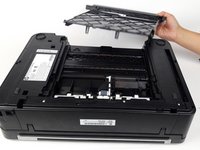
    • Grab both sides of the printer and flip it away from you so the bottom is facing up.

  2. HP ENVY 5530 Paper Tray Replacement: step 2, image 1 of 1
    • Locate the 13mm TR10 Torx screws on the left side of the paper tray.

  3. HP ENVY 5530 Paper Tray Replacement: step 3, image 1 of 2 HP ENVY 5530 Paper Tray Replacement: step 3, image 2 of 2
    • Unscrew and remove the 13mm TR10 Torx Security screw, starting with the farthest screw on the left

  4. HP ENVY 5530 Paper Tray Replacement: step 4, image 1 of 2 HP ENVY 5530 Paper Tray Replacement: step 4, image 2 of 2
    • Locate and remove middle 13mm TR10 Torx Security screw using a Torx screwdriver.

  5. HP ENVY 5530 Paper Tray Replacement: step 5, image 1 of 2 HP ENVY 5530 Paper Tray Replacement: step 5, image 2 of 2
    • Locate and remove the last 13mm TR10 Torx Security screw.

  6. HP ENVY 5530 Paper Tray Replacement: step 6, image 1 of 2 HP ENVY 5530 Paper Tray Replacement: step 6, image 2 of 2
    • Locate the side tab and lift up to remove.

  7. HP ENVY 5530 Paper Tray Replacement: step 7, image 1 of 1
    • Locate the three 13mm TR10 Torx Security screws on the right side panel.

  8. HP ENVY 5530 Paper Tray Replacement: step 8, image 1 of 2 HP ENVY 5530 Paper Tray Replacement: step 8, image 2 of 2
    • Locate and remove the farthest 13mm TR10 Torx Security screw.

  9. HP ENVY 5530 Paper Tray Replacement: step 9, image 1 of 2 HP ENVY 5530 Paper Tray Replacement: step 9, image 2 of 2
    • Locate middle 13mm TR10 Torx Security screw and remove it.

  10. HP ENVY 5530 Paper Tray Replacement: step 10, image 1 of 2 HP ENVY 5530 Paper Tray Replacement: step 10, image 2 of 2
    • Locate last 13mm TR10 Torx Security screw and remove it.

  11. HP ENVY 5530 Paper Tray Replacement: step 11, image 1 of 2 HP ENVY 5530 Paper Tray Replacement: step 11, image 2 of 2
    • Locate tab on the right side panel and lift to remove it.

  12. HP ENVY 5530 Paper Tray Replacement: step 12, image 1 of 1
    • The back should look like this.

  13. HP ENVY 5530 Paper Tray Replacement: step 13, image 1 of 3 HP ENVY 5530 Paper Tray Replacement: step 13, image 2 of 3 HP ENVY 5530 Paper Tray Replacement: step 13, image 3 of 3
    • Remove paper tray by pulling it out and away from the printer.

    • Be cautious of jumping springs once pulling out the paper tray.

Conclusion

To reassemble your device, follow these instructions in reverse order.

2 other people completed this guide.

Elizabeth Surface

Member since: 08/26/15

1,465 Reputation

9 Guides authored

Team

USF Tampa, Team 4-6, Meier Fall 2015 Member of USF Tampa, Team 4-6, Meier Fall 2015

USFT-MEIER-F15S4G6

4 Members

18 Guides authored

0 Comments

Add Comment

View Statistics:

Past 24 Hours: 1

Past 7 Days: 6

Past 30 Days: 15

All Time: 2,279