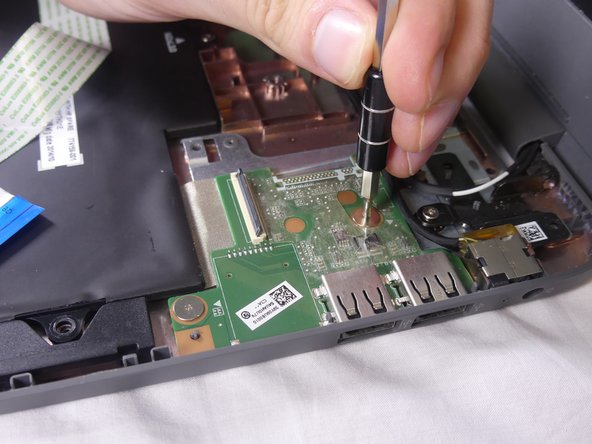
HP Chromebook 14-x013dx I/O Board Replacement

What you need

  1. HP Chromebook 14-x013dx I/O Board Replacement, Keyboard, Touchpad: step 1, image 1 of 2 HP Chromebook 14-x013dx I/O Board Replacement, Keyboard, Touchpad: step 1, image 2 of 2
    • Using the plastic spudger, gently lift the 5 rubber pads away from their seating.

  2. HP Chromebook 14-x013dx I/O Board Replacement: step 2, image 1 of 1
    • Remove the five 6mm screws located under the removed pads using Phillips #00 screwdriver.

  3. HP Chromebook 14-x013dx I/O Board Replacement: step 3, image 1 of 2 HP Chromebook 14-x013dx I/O Board Replacement: step 3, image 2 of 2
    • With the Phillips #00 screwdriver, remove the remaining eight 6mm screws. You will now have thirteen 6mm screws removed from the case.

  4. HP Chromebook 14-x013dx I/O Board Replacement: step 4, image 1 of 2 HP Chromebook 14-x013dx I/O Board Replacement: step 4, image 2 of 2
    • To continue removing the back cover, turn the laptop over as displayed.

    • Use the plastic spudger to gently pry around the base of the laptop from the back cover. Continue prying around the entire base of the laptop.

  5. HP Chromebook 14-x013dx I/O Board Replacement: step 5, image 1 of 3 HP Chromebook 14-x013dx I/O Board Replacement: step 5, image 2 of 3 HP Chromebook 14-x013dx I/O Board Replacement: step 5, image 3 of 3
    • Gently lift the silver base of the laptop from the bottom, but do not remove it.

    • To remove the ribbon cables, lift the latch holding the ribbon cables in place and then pull them free.

    • Remove the keyboard panel from the laptop.

  6. HP Chromebook 14-x013dx I/O Board Replacement, I/O Board: step 6, image 1 of 2 HP Chromebook 14-x013dx I/O Board Replacement, I/O Board: step 6, image 2 of 2
    • Unhook the ribbon connecting the I/O board and the battery.

    • To remove the ribbon, lift the latch holding the ribbons in place and then pull them free.

  7. HP Chromebook 14-x013dx I/O Board Replacement: step 7, image 1 of 2 HP Chromebook 14-x013dx I/O Board Replacement: step 7, image 2 of 2
    • Remove two 2mm screws from the I/O board using the Phillips PH00 screwdriver.

  8. HP Chromebook 14-x013dx I/O Board Replacement: step 8, image 1 of 1
    • Lift the I/O board out of the laptop case.

Conclusion

To reassemble your device, follow these instructions in reverse order.

2 other people completed this guide.

NHerbert

Member since: 09/28/17

602 Reputation

5 Guides authored

Team

USF Tampa, Team S3-G6, Nance Fall 2017 Member of USF Tampa, Team S3-G6, Nance Fall 2017

USFT-NANCE-F17S3G6

4 Members

5 Guides authored

0 Comments

Add Comment

View Statistics:

Past 24 Hours: 0

Past 7 Days: 1

Past 30 Days: 1

All Time: 450