Introduction
The RAM is an extremely fast type of computer memory which temporarily stores all information of your PC needs now and in the near future. If your computer is running very slow or installing things fail multiple times, then you may have RAM damage. This guide will show you steps to replacing the RAM.
What you need
-
-
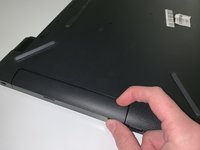
Remove the four screws (13.7mm) with a Phillips #0 screwdriver.
-
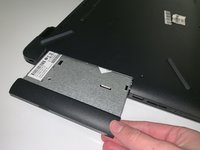
Be sure to lift all four rubber tabs to access screws (7.51mm) underneath.
-
-
-
-
Use the Philips 0 screwdriver to unscrew the screws (7.51mm) that were underneath the battery.
-
-
-
To take off the RAM, pull out the circled taps in the direction of the arrows on the pictures.
-


To reassemble your device, follow these instructions in reverse order.
Cancel: I did not complete this guide.
One other person completed this guide.
Team

University of North Texas, Team S7-G2, Thompson Fall 2018 Member of University of North Texas, Team S7-G2, Thompson Fall 2018
UNT-THOMPSON-F18S7G2
6 Members
7 Guides authored