Free Shipping on Domestic Orders $75+

Google Pixel 10 Pro Fold Graphite Sheet Installation

Prerequisite Only
This is a prerequisite-only guide! This guide is part of another procedure and isn’t meant to be used alone.
    1. Google Pixel 10 Pro Fold Graphite Sheet Installation, Apply the graphite sheet: step 1, image 1 of 3 Google Pixel 10 Pro Fold Graphite Sheet Installation, Apply the graphite sheet: step 1, image 2 of 3 Google Pixel 10 Pro Fold Graphite Sheet Installation, Apply the graphite sheet: step 1, image 3 of 3
      • Peel the clear liner off your replacement graphite sheet to expose the adhesive on the upper half.

      • Align the upper half of the graphite sheet over the logic board and lay it down.

      Ask FixBot

      Add Comment

    2. Google Pixel 10 Pro Fold Graphite Sheet Installation: step 2, image 1 of 3 Google Pixel 10 Pro Fold Graphite Sheet Installation: step 2, image 2 of 3 Google Pixel 10 Pro Fold Graphite Sheet Installation: step 2, image 3 of 3
      • Use the flat end of your spudger or your finger to press down the upper half of the graphite sheet and secure it to the logic board.

      Ask FixBot

      Add Comment

    3. Google Pixel 10 Pro Fold Graphite Sheet Installation: step 3, image 1 of 3 Google Pixel 10 Pro Fold Graphite Sheet Installation: step 3, image 2 of 3 Google Pixel 10 Pro Fold Graphite Sheet Installation: step 3, image 3 of 3
      • Remove the blue liner on the underside of the graphite sheet to expose the adhesive.

      Ask FixBot

      Add Comment

    4. Google Pixel 10 Pro Fold Graphite Sheet Installation: step 4, image 1 of 3 Google Pixel 10 Pro Fold Graphite Sheet Installation: step 4, image 2 of 3 Google Pixel 10 Pro Fold Graphite Sheet Installation: step 4, image 3 of 3
      • Drag a spudger or your finger from the middle section of the graphite sheet to the adhesive section over the loudspeaker to flatten the graphite sheet and adhere it.

      Ask FixBot

      Add Comment

    5. Google Pixel 10 Pro Fold Graphite Sheet Installation: step 5, image 1 of 3 Google Pixel 10 Pro Fold Graphite Sheet Installation: step 5, image 2 of 3 Google Pixel 10 Pro Fold Graphite Sheet Installation: step 5, image 3 of 3
      • Remove the two small blue liners from the top of the graphite sheet to expose the copper.

      Ask FixBot

      Add Comment

    6. Google Pixel 10 Pro Fold Graphite Sheet Installation: step 6, image 1 of 3 Google Pixel 10 Pro Fold Graphite Sheet Installation: step 6, image 2 of 3 Google Pixel 10 Pro Fold Graphite Sheet Installation: step 6, image 3 of 3
      • Grip the pull tab at the top of the graphite sheet and peel off the remaining liner.

      Ask FixBot

      Add Comment

    7. Google Pixel 10 Pro Fold Graphite Sheet Installation, Apply the G5 sticker: step 7, image 1 of 3 Google Pixel 10 Pro Fold Graphite Sheet Installation, Apply the G5 sticker: step 7, image 2 of 3 Google Pixel 10 Pro Fold Graphite Sheet Installation, Apply the G5 sticker: step 7, image 3 of 3
      Ask FixBot

      Add Comment

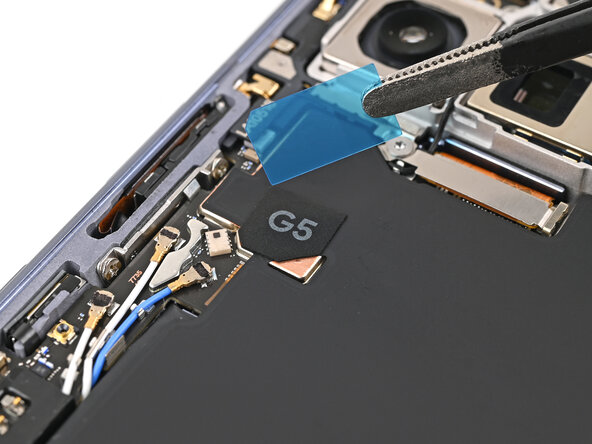
    8. Google Pixel 10 Pro Fold Graphite Sheet Installation: step 8, image 1 of 2 Google Pixel 10 Pro Fold Graphite Sheet Installation: step 8, image 2 of 2
      • Remove the blue liner from the G5 sticker.

      Ask FixBot

      Add Comment

Conclusion

To reassemble your device, follow these instructions in reverse order.

Cancel: I did not complete this guide.

Alex Diaz-Kokaisl

Member since: 01/16/22

249,976 Reputation

1,203 Guides authored

0 Guide Comments

Add Comment

View Statistics:

Past 24 Hours: 0

Past 7 Days: 3

Past 30 Days: 13

All Time: 62