Introduction
Model: Mortise Latch (Adjustable) Vertical Lever Slot
Model Code: E2013
This fast fix is replacing an adjustable mortise latch to a sliding glass patio door. The goal is to replace the broken/damaged latch with the same model due to the possible home security risk that a broken latch poses to a home.
Note that the latch or its replacement can be lost inside the door if the fast fix is done incorrectly. If you’re unsure that you can keep the latch from being lost, ask a friend or family member for a second pair of hands.
Possible symptoms of a damaged/broken latch:
- Considerably loose
- Door can be forcibly opened while locked
- Cannot be unlocked/locked
Additional Resources: PLPCI Website
What you need
-
-
Using a Phillips #3 screwdriver, unscrew the two 50mm screws on the inner and outer handles.
-
Remove the handles.
 Ask FixBot
-
-
-
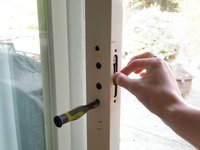
Using the latch key, make sure the key is pointed in the downward position.
-
Insert the second screwdriver or dowel into the bottom hole or latch key hole to prevent the mechanism from falling.
-
-
-
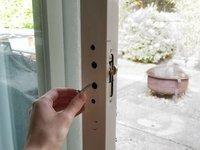
Using a Phillips #3 screwdriver, remove the two 13mm screws from the door while holding the latch.
-
-
-
-
While holding the latch, move the mechanism downwards and remove it from the door.
-
-
-
Using a Phillips #3 screwdriver, screw in the two 13mm screws in the original holes.
-
Remove the screwdriver or dowel from the hole once the mechanism is screwed into the door.
-
-
-
Insert the latch key back into the keyhole.
-
Move the latch key back into the unlocked position.
-
-
-
Place the handles back into place and screw in the two 50mm screws with a Phillips #3 screwdriver.
-


To reassemble your device, follow these instructions in reverse order.
Cancel: I did not complete this guide.
One other person completed this guide.
2 Guide Comments
what brand or manufacturer is this door/lock assembly. im trying to find keyed trim for this