
Gateway NE51006u CPU Fan Replacement

What you need

  1. Gateway NE51006u CPU Fan Replacement, Battery: step 1, image 1 of 2 Gateway NE51006u CPU Fan Replacement, Battery: step 1, image 2 of 2
    • Make sure your device is powered off before beginning this guide.

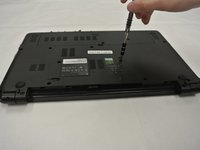
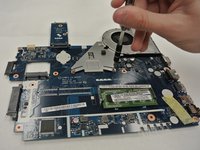
    • Place your device on your workspace, screen facing down. Take the Spudger and use the pointed end to catch the latch below the battery. Drag the latch to the right until the battery detaches from the body of the device.

  2. Gateway NE51006u CPU Fan Replacement: step 2, image 1 of 1
    • Pull the battery out, making sure to pull the battery parallel to the device.

  3. Gateway NE51006u CPU Fan Replacement, Hard Drive: step 3, image 1 of 1
    • Ensure device is powered off and unplugged from a power source. Place the device upside down.

  4. Gateway NE51006u CPU Fan Replacement: step 4, image 1 of 1
    • Use a PH0 Phillips head screwdriver to remove the 9.0 mm screw on the rectangular panel underneath the device.

  5. Gateway NE51006u CPU Fan Replacement: step 5, image 1 of 1
    • Use a plastic opening tool to pry open the rectangular panel the 9.0 mm screw was removed from.

  6. Gateway NE51006u CPU Fan Replacement: step 6, image 1 of 3 Gateway NE51006u CPU Fan Replacement: step 6, image 2 of 3 Gateway NE51006u CPU Fan Replacement: step 6, image 3 of 3
    • Remove a single 9.0 mm screw on the silver box containing the hard drive. Pull the plastic flap at the side opposite to the side of the screw housing back in order to remove the silver box containing the hard drive.

  7. Gateway NE51006u CPU Fan Replacement: step 7, image 1 of 3 Gateway NE51006u CPU Fan Replacement: step 7, image 2 of 3 Gateway NE51006u CPU Fan Replacement: step 7, image 3 of 3
    • Remove the two 9.0 mm screws on each side of the silver box to slide the hard drive from the silver box housing.

  8. Gateway NE51006u CPU Fan Replacement, CPU Fan: step 8, image 1 of 2 Gateway NE51006u CPU Fan Replacement, CPU Fan: step 8, image 2 of 2
    • Prior to completing the steps laid out in this guide, it is imperative that the user remove the battery and hard drive via the battery and hard drive replacement guide steps available.

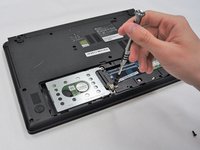
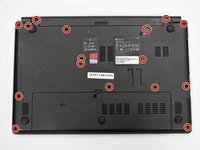
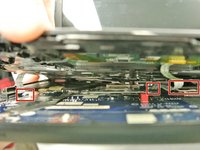
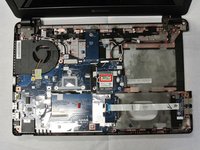
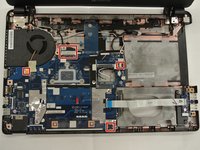
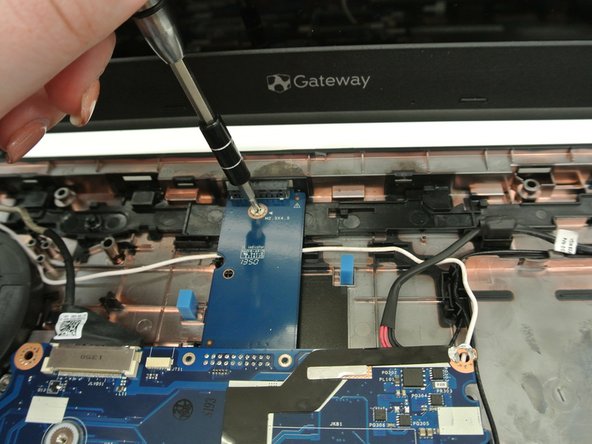
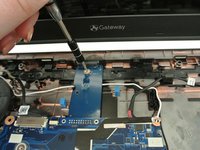
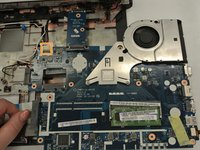
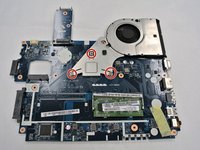
    • Use a PH0 Philips head screwdriver to remove the remaining 9.0 mm screws on the back of the device which should be sixteen screw in total.

  9. Gateway NE51006u CPU Fan Replacement: step 9, image 1 of 1
    • Use a plastic opening tool to pry open the sides of the laptop base starting closest to the hinges.

  10. Gateway NE51006u CPU Fan Replacement: step 10, image 1 of 3 Gateway NE51006u CPU Fan Replacement: step 10, image 2 of 3 Gateway NE51006u CPU Fan Replacement: step 10, image 3 of 3
    • After prying the keyboard unit off of the base, Lift the white, hinged covers connected to the three ribbons shown and pull gently to disconnect.

    • When putting the laptop back together, lift the hinged covers and connect the ribbons before dropping the hinged covers back down.

  11. Gateway NE51006u CPU Fan Replacement: step 11, image 1 of 3 Gateway NE51006u CPU Fan Replacement: step 11, image 2 of 3 Gateway NE51006u CPU Fan Replacement: step 11, image 3 of 3
    • Disconnect the wires that are connected to the Wireless Lan chip.

    • Use the PH0 Philips head screwdriver to remove the 9.0 mm screw that is connected to the Wireless Lan chip in the right upper corner. Then remove the CPU by angling it upwards and pulling it towards the laptop screen.

  12. Gateway NE51006u CPU Fan Replacement: step 12, image 1 of 3 Gateway NE51006u CPU Fan Replacement: step 12, image 2 of 3 Gateway NE51006u CPU Fan Replacement: step 12, image 3 of 3
    • Disconnect the remaining wires indicated.

    • The flat head of the spudger tool may be helpful in removing these wires without damaging the device.

  13. Gateway NE51006u CPU Fan Replacement: step 13, image 1 of 3 Gateway NE51006u CPU Fan Replacement: step 13, image 2 of 3 Gateway NE51006u CPU Fan Replacement: step 13, image 3 of 3
    • Use a PH0 Philips head screwdriver to remove the 9.0 mm screw connected to the CPU Fan.

    • Once the screw is out of the CPU Fan, then remove the two other 9.0 mm screws indicated.

  14. Gateway NE51006u CPU Fan Replacement: step 14, image 1 of 3 Gateway NE51006u CPU Fan Replacement: step 14, image 2 of 3 Gateway NE51006u CPU Fan Replacement: step 14, image 3 of 3
    • This step requires the most caution. The CPU fan will remain attached to the motherboard.

    • Lift the motherboard up and out of the casing and pull it away from the screen in order to partially detach it from the laptop.

    • Turn over the motherboard and disconnect the wire labeled.

    • Some of the motherboard is connected to the battery so be extra careful from detaching the motherboard from the device.

  15. Gateway NE51006u CPU Fan Replacement: step 15, image 1 of 3 Gateway NE51006u CPU Fan Replacement: step 15, image 2 of 3 Gateway NE51006u CPU Fan Replacement: step 15, image 3 of 3
    • Use the PH0 screwdriver to unscrew the three 9.0 mm screws that are connected to the CPU Fan.

    • At this point of the process, the CPU Fan should be detached from the device.

Conclusion

To reassemble your device, follow these instructions in reverse order.

0 Comments

Add Comment

View Statistics:

Past 24 Hours: 0

Past 7 Days: 0

Past 30 Days: 2

All Time: 374