
Gateway M-2626u CD Drive Replacement

What you need

  1. Gateway M-2626u CD Drive Replacement, Battery: step 1, image 1 of 1
    • To prevent injury, make sure the laptop is not plugged in while removing the battery!

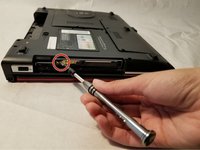
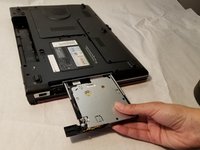
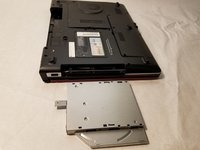
    • Make the switch in the upper right corner of the turned over laptop is switched to the "unlocked" position. (the unlocked padlock icon)

  2. Gateway M-2626u CD Drive Replacement: step 2, image 1 of 3 Gateway M-2626u CD Drive Replacement: step 2, image 2 of 3 Gateway M-2626u CD Drive Replacement: step 2, image 3 of 3
    • Push the switch to the right, toward the inside of the computer to dislodge the battery.

    • Finally, pull the battery outwards and away from the laptop as depicted in this image.

  3. Gateway M-2626u CD Drive Replacement, CD Drive: step 3, image 1 of 2 Gateway M-2626u CD Drive Replacement, CD Drive: step 3, image 2 of 2
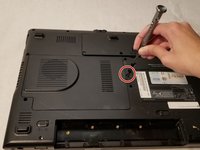
    • Using the Phillips #1 screwdriver, remove the indicated 6mm screw holding the CD drive.

  4. Gateway M-2626u CD Drive Replacement: step 4, image 1 of 2 Gateway M-2626u CD Drive Replacement: step 4, image 2 of 2
    • Using the screwdriver, push the release button for the CD drive.

  5. Gateway M-2626u CD Drive Replacement: step 5, image 1 of 2 Gateway M-2626u CD Drive Replacement: step 5, image 2 of 2
    • Remove the CD drive from the device.

Conclusion

To reassemble your device, follow these instructions in reverse order.

Femi

Member since: 04/06/18

219 Reputation

2 Guides authored

Team

0 Comments

Add Comment

View Statistics:

Past 24 Hours: 0

Past 7 Days: 2

Past 30 Days: 13

All Time: 169