Introduction
If the LCD touchscreen is cracked or damaged, obtain a new touchscreen and replace it with the old one. Keep in mind the the touchscreen is made of glass and can be easily broken.
What you need
-
-
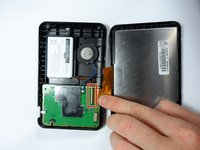
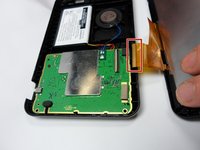
Ensure the LCD screen is face down on a flat surface.
-
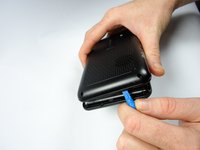
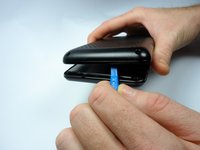
Make sure the side containing the speaker and the charging port is facing up on a flat surface.
-
-


To reassemble your device, follow these instructions in reverse order.
Cancel: I did not complete this guide.
4 other people completed this guide.
Team

Sam Houston State, Team 2-7, Blackburne Fall 2015 Member of Sam Houston State, Team 2-7, Blackburne Fall 2015
SHSU-BLACKBURNE-F15S2G7
4 Members
5 Guides authored
3 Guide Comments
Hi. Just a quick word to avoid confusion on these units. There is more than one model, and they are quite different in their design, both in the screen design and how it’s fitted together.
The model I have with me (I’m fixing the cracked touch panel) is held together by the same 4 screws as shown here, but the screen looks far more modern. The one shown in this guide appears to be the old style of touch panel, these have a kind of hazy appearance to them. The model I have, which is still named DriveSmart 50LM, has a full width real glass touch panel and is a far more rectangular design. It’s also extremely tight to crack apart the casing once the screws are removed.
Also mine has the same size of circuit inside, but looks far more complicated that the one here, with no circuit shielding, and a MIC on a length of wire that also needs removing (it just plugs in to a space inside).
I’ll try to find time to write a guide for this other model while I have it.
Thanks for creating this guide all of you :)
Ouch! Thanks for your post philpeacock. I wish I would’ve read it before I ordered the exact same part number, but got something that
I’m pretty sure can’t fit.