Introduction
If you find yourself on this guide, it means that you are having problems attaching your Garmin Edge 830 to its respective mount. The best solution to this is to replace the back cover . In order to do this you will have to take the device apart in its entirety. This may sound like a lot of work, but we have attached all the required steps that will have you done in a timely manner. Make sure you keep track of all your parts/screws along the way.
What you need
-
-
Microwave the iOpener for about 30 seconds. Then place it on top of the screen, and let it sit for about 2 minutes.
-
Repeat this process a second to ensure that the glue is becoming loose.
-
Alternative: Use a heat gun or hair dryer to heat up the glue
 Ask FixBot
-
-
-
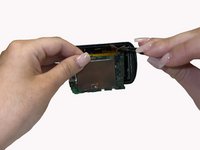
Use the Jimmy tool carve around the edges of the screen to break the glue seal.
-
-
-
Tool used on this step:Tweezers$3.99
-
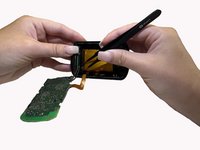
Remove brown copper tape with the FPC (not clipped). Removing of the copper tape is necessary, I didn't find a way to avoid it. Try to remove the copper tape as gentle as possible to reuse it.
-
Also remove green tape with angled tweezers and unclip in a 2nd step the FPC from the board
-
-
-
Unscrew the three 1 mm screws around the perimeter of the motherboard
-
with the 2nd screw also the light senor will come of the PCB
-
-
-
Use the reverse tweezers to gently pull on the silver box on top of the motherboard to remove it from the back cover.
-
Alternative: Use a plastic card in between PCB and cover.
-
-
-
Locate the wire connector on the motherboard. Slowly release the wires by gently pulling with the blunt tweezers.
-
-
-
Use the halberd spudger to lift and remove the battery from the back cover.
-
-
-
Once all previous steps are completed, you will be left with the back cover.
-


To reassemble your device, follow these instructions in reverse order.
Cancel: I did not complete this guide.
One other person completed this guide.
Team

University of Alabama, Team 3-2, Bedsole Spring 2022 Member of University of Alabama, Team 3-2, Bedsole Spring 2022
UA-BEDSOLE-S22S3G2
4 Members
13 Guides authored
2 Guide Comments
What are the steps required to put the screen back on? What glue should we use and how?
Do we need some glue to put the screen back?