Shop the Holiday Gift Guide
Free Shipping on Domestic Orders $75+

Game Boy Outer Case Replacement

Views: 16K

View statistics:

Past 24 Hours:
0
Past 7 Days:
12
Past 30 Days:
41
All Time:
16,297
Comments: 3

1 comment on steps, 2 guide comments.

Go to guide comments
Completed: 13

13 people have marked this guide "completed." Will you be next?

Favorites: 15

15 people have favorited (and subscribed to) this guide. Will you be next?

Time Required: 15 - 25 minutes
Difficulty: Moderate
Prerequisite Only

This is a prerequisite-only guide! This guide is part of another procedure and isn’t meant to be used alone.

Game Boy Outer Case Replacement

Introduction

Go to step 1 ↓

This guide explains how to remove the outer case so that you can access the internal components of the Game Boy. This will be helpful for other guides related to this hand-held gaming console.

What you need

Tools

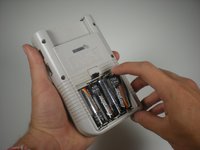
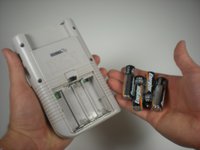
    1. Game Boy Outer Case Replacement, Batteries: step 1, image 1 of 2 Game Boy Outer Case Replacement, Batteries: step 1, image 2 of 2
      • Switch your Game Boy off and remove the cartridge.

      Ask FixBot

      Add Comment

    2. Game Boy Outer Case Replacement: step 2, image 1 of 3 Game Boy Outer Case Replacement: step 2, image 2 of 3 Game Boy Outer Case Replacement: step 2, image 3 of 3
      • Use a fingernail (or small coin) to push down on the battery door latch and remove the battery door.

      • The release latch is a plastic spring clip. If your Game Boy is getting on in years, be careful as the plastic may be brittle.

      • When you're replacing the cover, be sure to get its two plastic tabs into the slots in the bottom of the battery compartment before pushing the cover back in place.

      Ask FixBot

      Add Comment

    3. Game Boy Outer Case Replacement: step 3, image 1 of 2 Game Boy Outer Case Replacement: step 3, image 2 of 2
      • Use a fingernail to pry each battery outward from the positive (+) terminal to remove them.

      • Dispose of used batteries properly!

      • Remove the batteries from your Game Boy before storing it for more than a month or so.

      Ask FixBot

      Add Comment

    1. Game Boy Outer Case Replacement, Outer Case: step 4, image 1 of 1
      • Remove the six Triwing screws from the back of the device.

      Ask FixBot

      Add Comment

    2. Game Boy Outer Case Replacement: step 5, image 1 of 1
      • Gently separate the device's front casing from the back casing after you remove the screws.

      • Be careful not to completely separate the casing halves, as they are still joined by a large ribbon cable that may be damaged.

      Ask FixBot

      Add Comment

    3. Game Boy Outer Case Replacement: step 6, image 1 of 1
      • Slide the front side of the casing down to expose the ribbon cable connector.

      Ask FixBot

      Add Comment

    4. Game Boy Outer Case Replacement: step 7, image 1 of 1
      • Grip the ribbon connector with your thumb and forefinger. Pull down gently until the connector, not the ribbon itself, comes out of its socket.

      • Separate the front and back casings.

      Ask FixBot

      Add Comment

Conclusion

To reassemble your device, follow these instructions in reverse order.

Cancel: I did not complete this guide.

13 other people completed this guide.

Author

with

Andrew Tramposch

Member since: 06/24/10

2,387 Reputation

6 Guides authored

Team

Cal Poly, Team 3-2, Johann Summer 2010 Member of Cal Poly, Team 3-2, Johann Summer 2010

CPSU-JOHANN-R10S3G2

3 Members

72 Guides authored

2 Guide Comments

U need a tri-wing screwdriver not a Philips #00

radiofreeroyaloak - Reply Share

It is a Philips if gb was made after 1998 or so.

Sam - Reply Share

Add Comment

View Statistics:

Past 24 Hours: 0

Past 7 Days: 12

Past 30 Days: 41

All Time: 16,297