
GE 7-4836B Alarm Clock AM-FM Radio On/Off/Music/Alarm Switch Replacement

What you need

  1. GE 7-4836B Alarm Clock AM-FM Radio On/Off/Music/Alarm Switch Replacement, Battery Compartment Cover: step 1, image 1 of 3 GE 7-4836B Alarm Clock AM-FM Radio On/Off/Music/Alarm Switch Replacement, Battery Compartment Cover: step 1, image 2 of 3 GE 7-4836B Alarm Clock AM-FM Radio On/Off/Music/Alarm Switch Replacement, Battery Compartment Cover: step 1, image 3 of 3
    • Find the battery compartment on the bottom of the clock radio.

    • Using your thumb, push the compartment cover latch toward the battery.

    • With the latch pushed in, pull the compartment cover upward to remove it..

  2. GE 7-4836B Alarm Clock AM-FM Radio On/Off/Music/Alarm Switch Replacement, Battery: step 2, image 1 of 2 GE 7-4836B Alarm Clock AM-FM Radio On/Off/Music/Alarm Switch Replacement, Battery: step 2, image 2 of 2
    • Lift the battery from the compartment.

    • Pull the battery up and gently disconnect it from the battery connector.

  3. GE 7-4836B Alarm Clock AM-FM Radio On/Off/Music/Alarm Switch Replacement, Screws: step 3, image 1 of 2 GE 7-4836B Alarm Clock AM-FM Radio On/Off/Music/Alarm Switch Replacement, Screws: step 3, image 2 of 2
    • Using a Phillips #00 Screwdriver, unscrew the six 12mm screws from around the bottom of the clock radio.

  4. GE 7-4836B Alarm Clock AM-FM Radio On/Off/Music/Alarm Switch Replacement, LCD Cover: step 4, image 1 of 1
    • Gently pull the liquid crystal display (LCD) cover off.

  5. GE 7-4836B Alarm Clock AM-FM Radio On/Off/Music/Alarm Switch Replacement, Clock Radio: step 5, image 1 of 2 GE 7-4836B Alarm Clock AM-FM Radio On/Off/Music/Alarm Switch Replacement, Clock Radio: step 5, image 2 of 2
    • Lift the top off. Two gray, plastic internal pieces will fall out when you do this; set them aside.

  6. GE 7-4836B Alarm Clock AM-FM Radio On/Off/Music/Alarm Switch Replacement, Battery Wires Wire Tie: step 6, image 1 of 2 GE 7-4836B Alarm Clock AM-FM Radio On/Off/Music/Alarm Switch Replacement, Battery Wires Wire Tie: step 6, image 2 of 2
    • Using the wire cutters, carefully cut the plastic wire tie.

  7. GE 7-4836B Alarm Clock AM-FM Radio On/Off/Music/Alarm Switch Replacement, Speaker: step 7, image 1 of 1
    • Grip the speaker.

    • Lift the speaker from the holder.

  8. GE 7-4836B Alarm Clock AM-FM Radio On/Off/Music/Alarm Switch Replacement, Two Screws: step 8, image 1 of 2 GE 7-4836B Alarm Clock AM-FM Radio On/Off/Music/Alarm Switch Replacement, Two Screws: step 8, image 2 of 2
    • Locate the two 6mm screws on the PCB.

    • Using a Phillips #0 Screwdriver, unscrew the two 6mm screws from the PCB.

  9. GE 7-4836B Alarm Clock AM-FM Radio On/Off/Music/Alarm Switch Replacement, Four-Position Switch: step 9, image 1 of 2 GE 7-4836B Alarm Clock AM-FM Radio On/Off/Music/Alarm Switch Replacement, Four-Position Switch: step 9, image 2 of 2
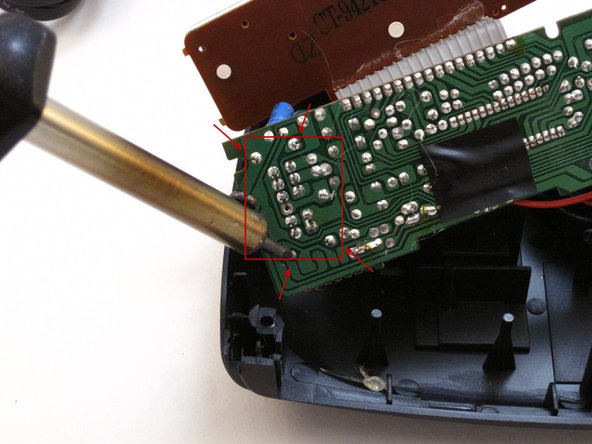
    • Locate the four-position switch marked SW101. On the underside of the PCB, there will be 4 soldered pins as pointed at in the picture.

    • Apply the hot soldering iron to those four soldered pins to disconnect the four-position switch.

Conclusion

To reassemble your device, follow these instructions in reverse order.

2 other people completed this guide.

Dominick Giguere

Member since: 10/28/14

848 Reputation

6 Guides authored

0 Comments

Add Comment

View Statistics:

Past 24 Hours: 0

Past 7 Days: 4

Past 30 Days: 21

All Time: 1,777