
Fujitsu LifeBook N3510 Hard Drive Replacement

What you need

  1. Fujitsu LifeBook N3510 Hard Drive Replacement, Battery: step 1, image 1 of 1
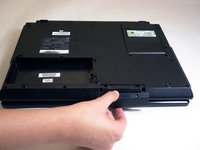
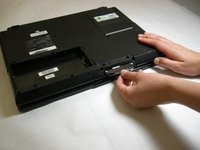
    • Locate the two clips on the bottom of the computer that support the battery.

  2. Fujitsu LifeBook N3510 Hard Drive Replacement: step 2, image 1 of 1
    • Using your fingers, push the clips inward and then upward.

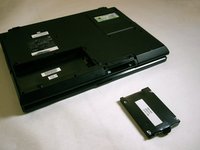
    • Lift the battery out of the computer.

  3. Fujitsu LifeBook N3510 Hard Drive Replacement, Hard Drive: step 3, image 1 of 1
    • Remove the two screws securing the hard drive access cover.

    • Screws not shown in picture.

  4. Fujitsu LifeBook N3510 Hard Drive Replacement: step 4, image 1 of 2 Fujitsu LifeBook N3510 Hard Drive Replacement: step 4, image 2 of 2
    • Remove hard drive access cover.

  5. Fujitsu LifeBook N3510 Hard Drive Replacement: step 5, image 1 of 2 Fujitsu LifeBook N3510 Hard Drive Replacement: step 5, image 2 of 2
    • Grasp hard drive sleeve tab and pull out.

  6. Fujitsu LifeBook N3510 Hard Drive Replacement: step 6, image 1 of 3 Fujitsu LifeBook N3510 Hard Drive Replacement: step 6, image 2 of 3 Fujitsu LifeBook N3510 Hard Drive Replacement: step 6, image 3 of 3
    • Remove hard drive from plastic sleeve.

Conclusion

To reassemble your device, follow these instructions in reverse order.

4 other people completed this guide.

Neil Daniels

Member since: 01/17/11

1,411 Reputation

11 Guides authored

Team

Cal Poly, Team 5-18, Amido Winter 2011 Member of Cal Poly, Team 5-18, Amido Winter 2011

CPSU-AMIDO-W11S5G18

3 Members

22 Guides authored

0 Comments

Add Comment

View Statistics:

Past 24 Hours: 0

Past 7 Days: 2

Past 30 Days: 13

All Time: 9,995