Free Shipping on Domestic Orders $75+

Framework Laptop 16 Dual M.2 Adapter Installation

Prerequisite Only
This is a prerequisite-only guide! This guide is part of another procedure and isn’t meant to be used alone.
    1. Framework Laptop 16 Dual M.2 Adapter Installation, Dual M.2 Adapter information: step 1, image 1 of 2 Framework Laptop 16 Dual M.2 Adapter Installation, Dual M.2 Adapter information: step 1, image 2 of 2
      • Flip over your Dual M.2 Adapter and locate the marked section where you'll place the 1.75 mm thermal pad.

      • When placing the thermal pad, make sure you don't cover the screw holes.

      Ask FixBot

      Add Comment

    2. Framework Laptop 16 Dual M.2 Adapter Installation, Place the thermal pad: step 2, image 1 of 3 Framework Laptop 16 Dual M.2 Adapter Installation, Place the thermal pad: step 2, image 2 of 3 Framework Laptop 16 Dual M.2 Adapter Installation, Place the thermal pad: step 2, image 3 of 3
      • Once you place the thermal pad, it's difficult to peel it off and move it without damaging it. Take your time and work slowly to ensure it's aligned properly.

      • Remove the clear liner from the thermal pad labeled 1.75 mm to expose one side of it.

      • Place the thermal pad over its spot on the back of the adapter.

      • If you have trouble handling your thermal pad, you can store it in your fridge for a few minutes to make it more rigid.

      Ask FixBot

      Add Comment

    3. Framework Laptop 16 Dual M.2 Adapter Installation: step 3, image 1 of 2 Framework Laptop 16 Dual M.2 Adapter Installation: step 3, image 2 of 2
      • Use your finger to gently press the thermal pad onto the adapter.

      Ask FixBot

      Add Comment

    4. Framework Laptop 16 Dual M.2 Adapter Installation: step 4, image 1 of 2 Framework Laptop 16 Dual M.2 Adapter Installation: step 4, image 2 of 2
      • Remove the blue liner to expose its top side.

      Ask FixBot

      Add Comment

    5. Framework Laptop 16 Dual M.2 Adapter Installation, Place the Dual M.2 Adapter: step 5, image 1 of 3 Framework Laptop 16 Dual M.2 Adapter Installation, Place the Dual M.2 Adapter: step 5, image 2 of 3 Framework Laptop 16 Dual M.2 Adapter Installation, Place the Dual M.2 Adapter: step 5, image 3 of 3
      • Once you place the Dual M.2 Adapter, it's difficult to remove it without damaging the thermal pad. Take your time and work slowly to ensure the adapter is aligned properly.

      • Flip over the adapter and place it into its spot in the Expansion Bay Shell, making sure it slots into its alignment pegs.

      • Before continuing, make sure the fan cables aren't trapped under the adapter.

      Ask FixBot

      Add Comment

    6. Framework Laptop 16 Dual M.2 Adapter Installation, Install the Dual M.2 Adapter screws: step 6, image 1 of 2 Framework Laptop 16 Dual M.2 Adapter Installation, Install the Dual M.2 Adapter screws: step 6, image 2 of 2
      • Use your Framework Screwdriver to partially install the four 3.6 mm‑long screws securing the Dual M.2 Adapter—only screw them in a few turns.

      • Tighten the four screws in an "X" pattern starting with the top left screw.

      • Only tighten the screws a few turns at a time to evenly compress the thermal pad.

      • In order: top left → bottom right → bottom left → top right

      Ask FixBot

      Add Comment

    7. Framework Laptop 16 Dual M.2 Adapter Installation, Connect the right fan: step 7, image 1 of 3 Framework Laptop 16 Dual M.2 Adapter Installation, Connect the right fan: step 7, image 2 of 3 Framework Laptop 16 Dual M.2 Adapter Installation, Connect the right fan: step 7, image 3 of 3
      • Use your fingers to grip the brown pull tab and slide the right fan cable straight into its socket.

      • Use the flat end of your Framework Screwdriver, or a clean fingernail, to press down the locking tab on the right fan ZIF connector.

      Ask FixBot

      Add Comment

    8. Framework Laptop 16 Dual M.2 Adapter Installation, Connect the left fan: step 8, image 1 of 3 Framework Laptop 16 Dual M.2 Adapter Installation, Connect the left fan: step 8, image 2 of 3 Framework Laptop 16 Dual M.2 Adapter Installation, Connect the left fan: step 8, image 3 of 3
      • Repeat the previous step for the left fan.

      Ask FixBot

      Add Comment

    9. Framework Laptop 16 Dual M.2 Adapter Installation, SSD information: step 9, image 1 of 2 Framework Laptop 16 Dual M.2 Adapter Installation, SSD information: step 9, image 2 of 2
      • Depending on the size of your SSD, you may need to change the screw position and cut down the included thermal pad to fit the SSD.

      • Refer to the markings on the adapter to figure out where your SSD will go:

      • 2230 SSDs → H1 or H5

      • 2242 SSDs → H2 or H6

      • 2260 SSDs → H3 or H7

      • 2280 SSDs → H4 or H8

      Ask FixBot

      Add Comment

    10. Framework Laptop 16 Dual M.2 Adapter Installation, Remove the SSD screws: step 10, image 1 of 2 Framework Laptop 16 Dual M.2 Adapter Installation, Remove the SSD screws: step 10, image 2 of 2
      • Use your Framework Screwdriver to remove one or both of the 6.7 mm‑long T5 Torx SSD screws, depending on how many SSDs you're installing.

      Ask FixBot

      Add Comment

    11. Framework Laptop 16 Dual M.2 Adapter Installation, Thermal pad information: step 11, image 1 of 3 Framework Laptop 16 Dual M.2 Adapter Installation, Thermal pad information: step 11, image 2 of 3 Framework Laptop 16 Dual M.2 Adapter Installation, Thermal pad information: step 11, image 3 of 3
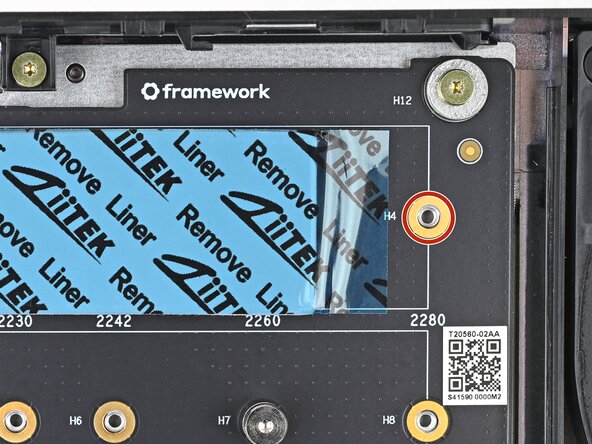
      • The next six steps will show how to install a 2280 SSD. If you're installing anything smaller, skip to this step.

      • If you're installing a single‑sided SSD (chips on only one side), grab the 2.25 mm thermal pad.

      • If you're installing a double‑sided SSD (chips on both sides), grab the 1.25 mm thermal pad.

      • Without removing any liners, place the thermal pad over the slot where you want to install your SSD.

      • Orient the thermal pad so it sits between the small components next to the SSD's socket and the screw hole—including the gold ring around it.

      • When you're confident in how your thermal pad should be oriented, remove it and continue to the next step.

      Ask FixBot

      Add Comment

    12. Framework Laptop 16 Dual M.2 Adapter Installation, Install the thermal pad: step 12, image 1 of 3 Framework Laptop 16 Dual M.2 Adapter Installation, Install the thermal pad: step 12, image 2 of 3 Framework Laptop 16 Dual M.2 Adapter Installation, Install the thermal pad: step 12, image 3 of 3
      • Remove the clear liner from the thermal pad to expose one side of it.

      • Place the thermal pad over its spot on the adapter.

      Ask FixBot

      Add Comment

    13. Framework Laptop 16 Dual M.2 Adapter Installation: step 13, image 1 of 2 Framework Laptop 16 Dual M.2 Adapter Installation: step 13, image 2 of 2
      • Use your finger to gently press the thermal pad onto the adapter.

      Ask FixBot

      Add Comment

    14. Framework Laptop 16 Dual M.2 Adapter Installation: step 14, image 1 of 2 Framework Laptop 16 Dual M.2 Adapter Installation: step 14, image 2 of 2
      • Remove the blue liner to expose its top side.

      Ask FixBot

      Add Comment

    15. Framework Laptop 16 Dual M.2 Adapter Installation, Install the SSD: step 15, image 1 of 2 Framework Laptop 16 Dual M.2 Adapter Installation, Install the SSD: step 15, image 2 of 2
      • Hold the SSD by its edges. Don't touch the gold contacts with your fingers. If you do, wipe the contacts with a clean, lint-free cloth to remove any finger oils.

      • Insert the SSD into the socket at a shallow angle. The gold contacts should mostly be covered by the socket.

      • The SSD fits into the socket in one orientation. If it doesn't feel like it fits, try flipping the module.

      Ask FixBot

      Add Comment

    16. Framework Laptop 16 Dual M.2 Adapter Installation, Install the SSD screw: step 16, image 1 of 3 Framework Laptop 16 Dual M.2 Adapter Installation, Install the SSD screw: step 16, image 2 of 3 Framework Laptop 16 Dual M.2 Adapter Installation, Install the SSD screw: step 16, image 3 of 3
      • While lightly pressing the SSD into the thermal pad, guide the gap in the SSD screw into the notch on back of the SSD

      • The head of the screw should completely cover the notch and its threads should slot into the adapter's screw hole.

      • Use your Framework Screwdriver to install the 6.7 mm‑long screw securing the SSD.

      • Only tighten the screw until it feels snug. If your SSD is bending, then loosen the screw until the SSD sits flat.

      Ask FixBot

      Add Comment

    17. Framework Laptop 16 Dual M.2 Adapter Installation, Thermal pad information: step 17, image 1 of 3 Framework Laptop 16 Dual M.2 Adapter Installation, Thermal pad information: step 17, image 2 of 3 Framework Laptop 16 Dual M.2 Adapter Installation, Thermal pad information: step 17, image 3 of 3
      • The next seven steps will show how to install an SSD that's 2260 or smaller (in this case a 2230).

      • If you're installing a single‑sided SSD (chips on only one side), grab the 2.25 mm thermal pad.

      • If you're installing a double‑sided SSD (chips on both sides), grab the 1.25 mm thermal pad.

      • Without removing any liners, place the thermal pad over the slot where you want to install your SSD.

      • Orient the thermal pad so it sits near the small components next to the SSD's socket.

      • Use a marker to indicate where you need to cut the thermal pad so it fits between the socket and your SSD's screw hole—including the gold ring around it.

      • Use the SSD size numbers to judge where the screw holes and its contacts are located. The screw holes are slightly to the left of its number.

      • When you're confident in how your thermal pad should be oriented, remove it and continue to the next step.

      Ask FixBot

      Add Comment

    18. Framework Laptop 16 Dual M.2 Adapter Installation: step 18, image 1 of 2 Framework Laptop 16 Dual M.2 Adapter Installation: step 18, image 2 of 2
      • Use scissors to cut the thermal pad to your desired length.

      Ask FixBot

      Add Comment

    19. Framework Laptop 16 Dual M.2 Adapter Installation, Install the thermal pad: step 19, image 1 of 3 Framework Laptop 16 Dual M.2 Adapter Installation, Install the thermal pad: step 19, image 2 of 3 Framework Laptop 16 Dual M.2 Adapter Installation, Install the thermal pad: step 19, image 3 of 3
      • Remove the clear liner from the thermal pad to expose one side of it.

      • Place the thermal pad over its spot on the adapter.

      Ask FixBot

      Add Comment

    20. Framework Laptop 16 Dual M.2 Adapter Installation: step 20, image 1 of 2 Framework Laptop 16 Dual M.2 Adapter Installation: step 20, image 2 of 2
      • Use your finger to gently press the thermal pad onto the adapter.

      Ask FixBot

      Add Comment

    21. Framework Laptop 16 Dual M.2 Adapter Installation: step 21, image 1 of 2 Framework Laptop 16 Dual M.2 Adapter Installation: step 21, image 2 of 2
      • Remove the blue liner to expose its top side.

      Ask FixBot

      Add Comment

    22. Framework Laptop 16 Dual M.2 Adapter Installation, Install the SSD: step 22, image 1 of 2 Framework Laptop 16 Dual M.2 Adapter Installation, Install the SSD: step 22, image 2 of 2
      • Hold the SSD by its edges. Don't touch the gold contacts with your fingers. If you do, wipe the contacts with a clean, lint-free cloth to remove any finger oils.

      • Insert the SSD into the socket at a shallow angle. The gold contacts should mostly be covered by the socket.

      • The SSD fits into the socket in one orientation. If it doesn't feel like it fits, try flipping the module.

      Ask FixBot

      Add Comment

    23. Framework Laptop 16 Dual M.2 Adapter Installation, Install the SSD screw: step 23, image 1 of 3 Framework Laptop 16 Dual M.2 Adapter Installation, Install the SSD screw: step 23, image 2 of 3 Framework Laptop 16 Dual M.2 Adapter Installation, Install the SSD screw: step 23, image 3 of 3
      • While lightly pressing the SSD into the thermal pad, guide the gap in the SSD screw into the notch on back of the SSD

      • The head of the screw should completely cover the notch and its threads should slot into the adapter's screw hole.

      • Use your Framework Screwdriver to install the 6.7 mm‑long screw securing the SSD.

      • Only tighten the screw until it feels snug. If your SSD is bending, then loosen the screw until the SSD sits flat.

      Ask FixBot

      Add Comment

Conclusion

To reassemble your device, follow these instructions in reverse order.

Cancel: I did not complete this guide.

Alex Diaz-Kokaisl

Member since: 01/16/22

250,105 Reputation

1,203 Guides authored

0 Guide Comments

Add Comment

View Statistics:

Past 24 Hours: 1

Past 7 Days: 1

Past 30 Days: 7

All Time: 95