Free Shipping on Domestic Orders $75+

Framework Laptop 13 Pro Mainboard Installation

Prerequisite Only
This is a prerequisite-only guide! This guide is part of another procedure and isn’t meant to be used alone.
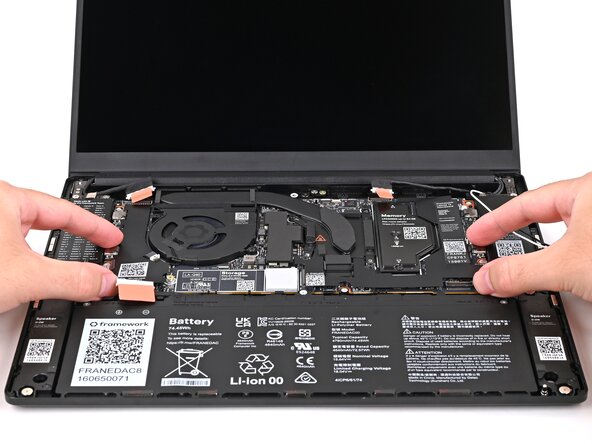
    1. Framework Laptop 13 Pro Mainboard Installation, Place the Mainboard: step 1, image 1 of 3 Framework Laptop 13 Pro Mainboard Installation, Place the Mainboard: step 1, image 2 of 3 Framework Laptop 13 Pro Mainboard Installation, Place the Mainboard: step 1, image 3 of 3
      • Grab the Mainboard by its edges and place it into the laptop and onto its alignment pegs.

      • Make sure all of the cables are above the Mainboard before continuing. Refer to this image for where the cables are located.

      Ask FixBot

      Add Comment

    2. Framework Laptop 13 Pro Mainboard Installation, Install the Mainboard screws: step 2, image 1 of 2 Framework Laptop 13 Pro Mainboard Installation, Install the Mainboard screws: step 2, image 2 of 2
      • Use your Framework Screwdriver to install the five 1.5 mm‑long T5 Torx screws securing the Mainboard.

      Ask FixBot

      Add Comment

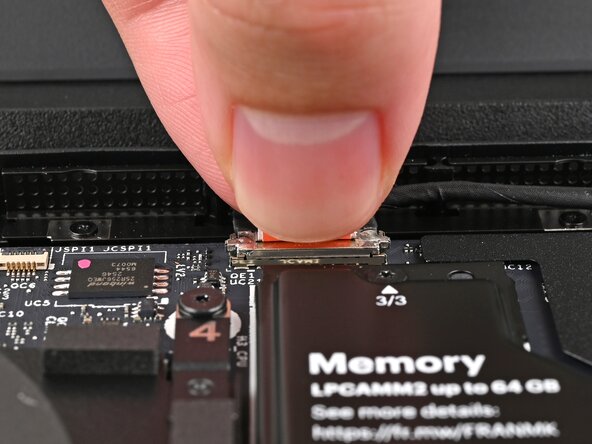
    3. Framework Laptop 13 Pro Mainboard Installation, Connect the Webcam Cable: step 3, image 1 of 2 Framework Laptop 13 Pro Mainboard Installation, Connect the Webcam Cable: step 3, image 2 of 2
      • Press the Webcam Cable connector straight down into its socket to connect it.

      Ask FixBot

      Add Comment

    4. Framework Laptop 13 Pro Mainboard Installation, Connect the Display eDP Cable: step 4, image 1 of 2 Framework Laptop 13 Pro Mainboard Installation, Connect the Display eDP Cable: step 4, image 2 of 2
      • Repeat the previous step for the Display eDP Cable.

      Ask FixBot

      Add Comment

    5. Framework Laptop 13 Pro Mainboard Installation, Install the Wi-Fi module: step 5, image 1 of 2 Framework Laptop 13 Pro Mainboard Installation, Install the Wi-Fi module: step 5, image 2 of 2
      • Hold the Wi-Fi module by its edges. Don't touch the gold contacts with your fingers. If you do, wipe the contacts with a clean, lint-free cloth to remove any finger oils.

      • Align the Wi-Fi module's gold contacts and notch with the socket on the Mainboard.

      • Insert the Wi-Fi module into the socket at a shallow angle. The gold contacts should mostly be covered by the socket.

      • The Wi-Fi module fits into the socket in one orientation. If it doesn't fit, try flipping the module.

      Ask FixBot

      Add Comment

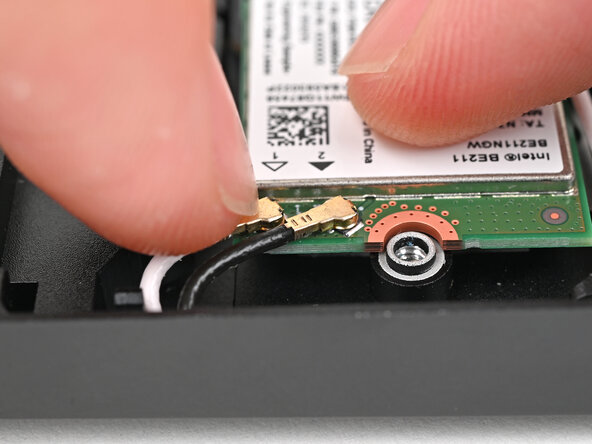
    6. Framework Laptop 13 Pro Mainboard Installation, Reconnect the Wi-Fi module: step 6, image 1 of 3 Framework Laptop 13 Pro Mainboard Installation, Reconnect the Wi-Fi module: step 6, image 2 of 3 Framework Laptop 13 Pro Mainboard Installation, Reconnect the Wi-Fi module: step 6, image 3 of 3
      • If the Antenna Cables got accidentally disconnected, follow this step to reconnect them. Otherwise, skip this step to continue the guide normally.

      • Hold the Wi-Fi module down with your finger.

      • Position the black antenna cable connector over the left Wi-Fi module's coaxial socket.

      • If you're unsure which cable goes where, refer to the arrows on the Wi-Fi module for which color cable matches with its connector.

      • Tweezers can help position the connector.

      • Use your finger to press the connector into place. You should feel a faint click, and the cable will stay attached to the socket by itself.

      • These connectors are very delicate! If the connector doesn't feel like it's clicking in place, reposition the connector and try again.

      • Repeat the procedure with the white antenna cable.

      Ask FixBot

      Add Comment

    7. Framework Laptop 13 Pro Mainboard Installation, Tighten the Wi-Fi Module screw: step 7, image 1 of 2 Framework Laptop 13 Pro Mainboard Installation, Tighten the Wi-Fi Module screw: step 7, image 2 of 2
      • Use your Framework Screwdriver to tighten the captive T5 Torx screw securing the Wi-Fi module.

      Ask FixBot

      Add Comment

    8. Framework Laptop 13 Pro Mainboard Installation, Reroute the Antenna Cables: step 8, image 1 of 3 Framework Laptop 13 Pro Mainboard Installation, Reroute the Antenna Cables: step 8, image 2 of 3 Framework Laptop 13 Pro Mainboard Installation, Reroute the Antenna Cables: step 8, image 3 of 3
      • Use the flat end of your Framework Screwdriver to press the two Antenna Cables into their clips on the Mainboard.

      Ask FixBot

      Add Comment

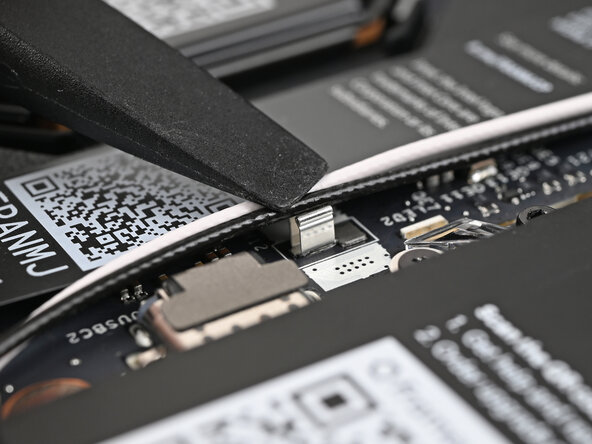
    9. Framework Laptop 13 Pro Mainboard Installation, Connect the Audio Board: step 9, image 1 of 2 Framework Laptop 13 Pro Mainboard Installation, Connect the Audio Board: step 9, image 2 of 2
      • Slide the Audio Board cable straight into its socket.

      Ask FixBot

      Add Comment

    10. Framework Laptop 13 Pro Mainboard Installation: step 10, image 1 of 2 Framework Laptop 13 Pro Mainboard Installation: step 10, image 2 of 2
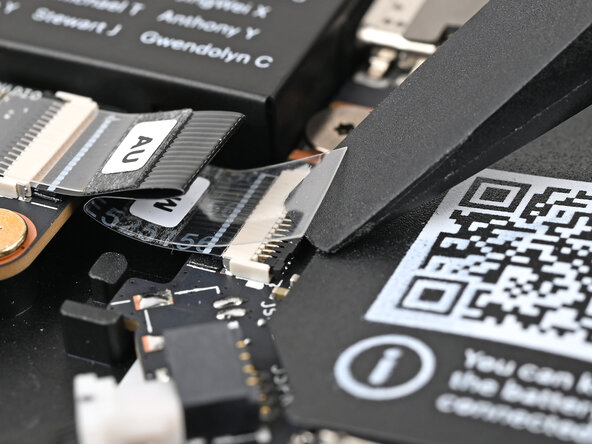
      • Use the flat end of your Framework Screwdriver, or a clean fingernail, to press down the locking tab on the Audio Board ZIF connector.

      Ask FixBot

      Add Comment

    11. Framework Laptop 13 Pro Mainboard Installation, Connect the Speakers: step 11, image 1 of 2 Framework Laptop 13 Pro Mainboard Installation, Connect the Speakers: step 11, image 2 of 2
      • Slide the Speakers Cable connector straight into its socket.

      Ask FixBot

      Add Comment

Conclusion

To reassemble your device, follow these instructions in reverse order.

Cancel: I did not complete this guide.

Alex Diaz-Kokaisl

Member since: 01/16/22

250,018 Reputation

1,203 Guides authored

0 Guide Comments

Add Comment

View Statistics:

Past 24 Hours: 0

Past 7 Days: 0

Past 30 Days: 0

All Time: 19