Free Shipping on Domestic Orders $75+

Framework Laptop 13 Memory (LPCAMM) Installation

Prerequisite Only
This is a prerequisite-only guide! This guide is part of another procedure and isn’t meant to be used alone.
    1. Framework Laptop 13 Memory (LPCAMM) Installation, Loosen the LPCAMM2 Memory Cover: step 1, image 1 of 2 Framework Laptop 13 Memory (LPCAMM) Installation, Loosen the LPCAMM2 Memory Cover: step 1, image 2 of 2
      • If you're installing an LPCAMM2 module, follow the next six steps. If you're installing DDR4 or DDR5 SO-DIMM modules, skip here.

      • Use your Framework Screwdriver to loosen the captive T5 Torx screws securing the LPCAMM2 Memory Cover in reverse order from 3–1.

      Ask FixBot

      Add Comment

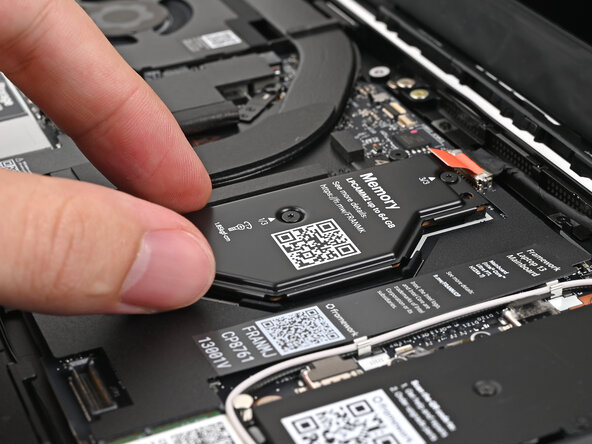
    2. Framework Laptop 13 Memory (LPCAMM) Installation, Remove the LPCAMM2 Memory Cover: step 2, image 1 of 2 Framework Laptop 13 Memory (LPCAMM) Installation, Remove the LPCAMM2 Memory Cover: step 2, image 2 of 2
      • Lift the LPCAMM2 Memory Cover straight off the memory and remove it.

      Ask FixBot

      Add Comment

    3. Framework Laptop 13 Memory (LPCAMM) Installation, Remove the LPCAMM2 Memory Spacer: step 3, image 1 of 2 Framework Laptop 13 Memory (LPCAMM) Installation, Remove the LPCAMM2 Memory Spacer: step 3, image 2 of 2
      • Remove the LPCAMM2 Memory Spacer and recycle it.

      • Avoid touching the Interposer below the Spacer. If the Interposer accidentally shifts, grab it by its edges to place it back into its alignment pegs.

      • Make sure there's no dust or debris on top of the Interposer before continuing.

      Ask FixBot

      Add Comment

    4. Framework Laptop 13 Memory (LPCAMM) Installation, Place the LPCAMM2 Memory: step 4, image 1 of 3 Framework Laptop 13 Memory (LPCAMM) Installation, Place the LPCAMM2 Memory: step 4, image 2 of 3 Framework Laptop 13 Memory (LPCAMM) Installation, Place the LPCAMM2 Memory: step 4, image 3 of 3
      • Place the LPCAMM2 module on top of the Interposer, making sure it slots into its alignment pegs.

      Ask FixBot

      Add Comment

    5. Framework Laptop 13 Memory (LPCAMM) Installation, Place the LPCAMM2 Memory Cover: step 5, image 1 of 2 Framework Laptop 13 Memory (LPCAMM) Installation, Place the LPCAMM2 Memory Cover: step 5, image 2 of 2
      • Place the LPCAMM2 Memory Cover on top of the memory, making sure its screws align with the screw holes.

      • The cover should lay flat when aligned properly.

      Ask FixBot

      Add Comment

    6. Framework Laptop 13 Memory (LPCAMM) Installation, Tighten the LPCAMM2 Memory Cover: step 6, image 1 of 2 Framework Laptop 13 Memory (LPCAMM) Installation, Tighten the LPCAMM2 Memory Cover: step 6, image 2 of 2
      • Use your Framework Screwdriver to tighten the captive T5 Torx screws securing the LPCAMM2 Memory Cover in order from 1–3.

      • Make sure the screws are snug enough to create proper contact between the memory and the Mainboard.

      Ask FixBot

      Add Comment

Conclusion

To reassemble your device, follow these instructions in reverse order.

Cancel: I did not complete this guide.

Alex Diaz-Kokaisl

Member since: 01/16/22

249,976 Reputation

1,203 Guides authored

0 Guide Comments

Add Comment

View Statistics:

Past 24 Hours: 0

Past 7 Days: 0

Past 30 Days: 0

All Time: 5