Introduction
This guide provides instructions for replacing a fluorescent light ballast and may not reflect different florescent light fixture designs. Intermediate multimeter knowledge is recommended to safely measure and confirm voltage, rewire the ballast, and remove electrical components from the ballast. Please contact a certified electrician if you are unsure what to do or do not feel comfortable proceeding.
What you need
-
-
Turn off the light switch.
-
Remove light fixture cover according to the manufacturer's instruction guide.
 Ask FixBot
-
-
-
Remove the light bulbs by gently twisting each bulb counterclockwise.
-
Remove the light bulb from the light bulb socket.
-
-
-
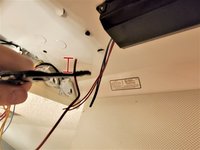
Remove wire nut by twisting it counterclockwise from the hot side (black or red wire) and the neutral side (white wire). Do not untwist wires.
-
-
-
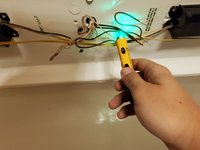
Place the red lead on the bare metal of the black or red wire.
-
Place the black lead on the bare metal of the white wire.
-
-
-
-
Switch room's circuit breaker to ON position.
-
Turn light switch on and repeat step 5.
-
Make sure multimeter reads between 110-125 volts.
-
Turn off light switch.
-
Change room's circuit breaker to OFF position.
-
-
-
Take a picture of the ballast's data plate or take note of the information on the data plate to make sure you have the correct replacement part.
-
-
-
Disconnect all wires from the ballast.
-
Use a screwdriver to remove the ballast from the light fixture.
-
-
-
Use a screwdriver to install the new ballast to the light fixture.
-
Reconnect all wires according to your notes or picture, add wire nuts to bare wire ends and twisting clockwise.
-
-
-
Screw in light bulb by placing a light bulb in light bulb socket.
-
Gently twist light bulb clockwise until light bulb is firmly in place.
-
Repeat until all light bulbs are firmly in place.
-
-
-
Attach light fixture cover over light bulbs according to manufacturer's instruction guide.
-
Move the room's circuit breaker back to ON position.
-
Turn light switch on to make sure the light works.
-


Put the fixture back together by reversing the steps 1-3. Test the light to make sure it works. If it still does not function, contact a qualified electrician.
Cancel: I did not complete this guide.
One other person completed this guide.

Team

University of Memphis, Team S5-G12, Willis Spring 2021 Member of University of Memphis, Team S5-G12, Willis Spring 2021
UM-WILLIS-S21S5G12
1 Member
2 Guides authored