
Fixing the Automatic Reverse Flipping of a Cassette-to-Aux Adaptor

What you need

  1. Fixing the Automatic Reverse Flipping of a Cassette-to-Aux Adaptor, Fixing the Automatic Reverse Flipping of a Cassette-to-Aux Adaptor: step 1, image 1 of 3 Fixing the Automatic Reverse Flipping of a Cassette-to-Aux Adaptor, Fixing the Automatic Reverse Flipping of a Cassette-to-Aux Adaptor: step 1, image 2 of 3 Fixing the Automatic Reverse Flipping of a Cassette-to-Aux Adaptor, Fixing the Automatic Reverse Flipping of a Cassette-to-Aux Adaptor: step 1, image 3 of 3
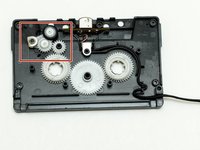
    • Remove the six screws around the cassette tape box.

    • Place the screws somewhere safe so you do not lose them.

    • Models, screw locations, and screw sizes may vary.

  2. Fixing the Automatic Reverse Flipping of a Cassette-to-Aux Adaptor: step 2, image 1 of 3 Fixing the Automatic Reverse Flipping of a Cassette-to-Aux Adaptor: step 2, image 2 of 3 Fixing the Automatic Reverse Flipping of a Cassette-to-Aux Adaptor: step 2, image 3 of 3
    • Slowly remove the cover of the cassette box.

    • Take a photo of the insides of the cassette box so it can guide when you are reassembling the cassette box.

    • Do not worry if you open the cassette box upside down (shown in 2nd photo) it is easy to correct; simply put the case back on, flip it over (shown in 3rd photo) and pull the new front side off (1st photo again).

  3. Fixing the Automatic Reverse Flipping of a Cassette-to-Aux Adaptor: step 3, image 1 of 2 Fixing the Automatic Reverse Flipping of a Cassette-to-Aux Adaptor: step 3, image 2 of 2
    • Remove the auto flip mechanism located on the top corner.

    • Do not throw this away; you may have to reinstall it if you want to use a different cassette player.

  4. Fixing the Automatic Reverse Flipping of a Cassette-to-Aux Adaptor: step 4, image 1 of 2 Fixing the Automatic Reverse Flipping of a Cassette-to-Aux Adaptor: step 4, image 2 of 2
    • Make sure all electrical circuitry and gears that were not removed are in their correct location.

    • Any other gears inside the cassette box, really aren't necessary. So feel free to remove them if the cassette is making too much noise (shown in 2nd photo).

    • Edit 3/14/2019: All cars are different. Many people in the comments have had luck keeping the center gears in the cassette and removing the interface gears. And also vice versa. Play around with it! If you can get it to work, awesome! If not, then try something else. Don't give up until you have your music playing in your car! Cheers!

Conclusion

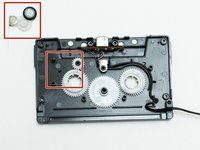
To reassemble your device, follow these instructions in reverse order, but do not replace the gears you removed.

18 other people completed this guide.

Jonathan Falco

Member since: 02/24/15

756 Reputation

2 Guides authored

29 Comments

that $@$* done work all it did was keep swtiching sides even more without the gears in it.............

pvmxfgt - Reply

It might have to do with the stereo in your car. When I made this guide, I was experiencing the problem in my 2000 Nissan Xterra, but my own guide didn’t help. Some stereos are just broken, like mine was. To be completely honest, I had no idea this guide would even work for people, like it is. Sorry it didn’t help fix your problem. I would suggest getting a new stereo installed in your car. If it’s an older car, you may be able to do it <$100 for a decent stereo. Cheers mate!

Jonathan Falco -

Worked perfectly for me, thanks for putting this guide together.

Patrick Osborne - Reply

You’re welcome!

Jonathan Falco -

Worked for me. I used to buy these things new every couple of years. Glad I did not throw all the old ones out

Peter K - Reply

Add Comment

View Statistics:

Past 24 Hours: 15

Past 7 Days: 57

Past 30 Days: 213

All Time: 85,461