Introduction
I'll start by saying that I am not a professional, just a guy with a few tools and about a 50% success rate of fixing things. But I bought a Fitbit Flex 2 listed as NEW from Ebay without doing my research in late August 2024. They have not been manufactured since 2019. Therefore, the rechargeable battery must be at least 5 years old (NEW).
The problem is that there is currently no product on the market similar to the Fitbit Flex 2. I guess no one wants a fitness tracker without a big obnoxious screen on it and if you like to wear normal "dumb" watches on your non-dominant wrist, you can just get bent.
I was not able to find any information on the repair process for these things other than others complaining about what I have said above so even if I fail this repair, you can at least know what you are getting into if you decide to try and repair yours.
What you need
-
-
-
This is a pretty standard electronic glue removal task. You can find much better guides of how to do this on this site, Youtube, etc. if you have never done it before.
-
Use a razorblade or prying tool to cut through the glue on the long edges of the fitbit. As long as you see white stuff coming out, keep cutting as there was quite a bit of glue. I did not heat the glue but it may have helped as I have done that in the past.
-
Once the glue was mostly gone, I used a sharp flathead screwdriver to do the initial prying and then a pick to pull it apart completely. I chewed the plastic a little with the metal screwdriver but its not that bad.
-
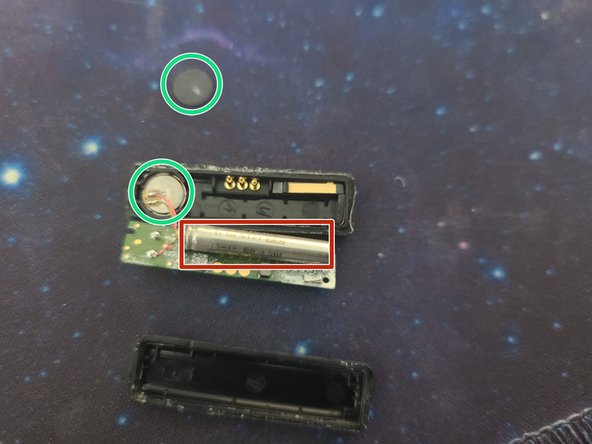
I initially thought the accelerometer was the battery (again, not a professional) so I peeled off a little black insulator disc that was stuck to it. Don't do this. I don't think it is a big deal but I will have to glue it back.
-
The thing with the red rectangle is the battery we need to replace.
 Ask FixBot
-
-
-
-
I learned that the Panasonic CG-320A (3.8V, 15mAh) battery comes standard with factory spot welded little metal flaps on each end when I tried to pry the battery off of them. They wont come off, so you're going to have to de-solder the whole assembly from the board. And for the love of god do not put the soldering iron directly to the battery.
-
Make sure your battery is discharged before this step. You're probably here because it doesn't hold a charge anyway but doesn't hurt to make sure.
-
I turned the board over and applied heat to the 2 little poke-through pins on the opposite side of the battery to get them off. Its not pictured here because I only have 2 hands but I used my tweezers to give gentle lifting pressure between the board and battery.
-
Either my soldering iron just sucks or this solder needed to be really hot to come off. I had to crank my iron to the highest setting (800F, 430C) and hold it for a while before it would come loose.
-
-
-
That's as far as I have gotten for now as I couldn't order a battery before I opened it up. If the info was out there already about what kind of battery this is, I couldn't find it.
-
There were not many good options for ordering this battery and the best one that I decided on is an Ebayer in the UK. I live the US and one of his feedbacks said it only took a week to get here but who knows.
-
The final price for me after shipping was $26.20 USD (19.25 GBP). Hopefully I'm not throwing good money after bad here but we'll see I guess.
-
-



I will write when complete.

1 Guide Comment
Please tell me theres an update to this! As far as I'm concerned this is the best looking fitness tracker ever made and I have two that I would love to get working again.
