
Fitbit Alta HR Battery Replacement

What you need

  1. Fitbit Alta HR Battery Replacement, Remove straps: step 1, image 1 of 2 Fitbit Alta HR Battery Replacement, Remove straps: step 1, image 2 of 2
    • Push in the clip and slide off the strap from each side.

  2. Fitbit Alta HR Battery Replacement, Remove front cover: step 2, image 1 of 1
    • Use a spudger to remove the front cover.

  3. Fitbit Alta HR Battery Replacement, Lift display: step 3, image 1 of 1
    • Use a spudger to lift the display.

  4. Fitbit Alta HR Battery Replacement, Disconnect heart rate monitor: step 4, image 1 of 1
    • Use a spudger to disconnect the cable that connects the heart rate monitor to the motherboard.

  5. Fitbit Alta HR Battery Replacement, Remove screws from motherboard: step 5, image 1 of 1
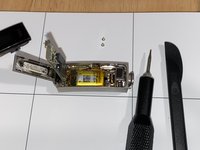
    • Use a hex 0.7 screwdriver to remove the screws from the motherboard.

  6. Fitbit Alta HR Battery Replacement, Lift motherboard: step 6, image 1 of 2 Fitbit Alta HR Battery Replacement, Lift motherboard: step 6, image 2 of 2
    • Use a spudger to lift the motherboard.

  7. Fitbit Alta HR Battery Replacement, Lift battery and remove innards: step 7, image 1 of 1
    • Use a spudger to lift the battery.

    • When the battery is lifted, the connected components (display, motherboard, battery) will come out.

    • Use a soldering iron to desolder the two battery contacts from the motherboard.

    • Ensure positive and negative wires are in the correct positions. There are + and – signs on the motherboard. Red is positive. Black is negative.

    • Use a soldering iron and lead-free solder to solder the new battery to the motherboard.

Conclusion

To reassemble your device, follow these instructions in reverse order.

3 other people completed this guide.

Wendy Sato

Member since: 11/12/16

229 Reputation

1 Guide authored

One Comment

Add Comment

View Statistics:

Past 24 Hours: 4

Past 7 Days: 33

Past 30 Days: 94

All Time: 1,703