Shop the Holiday Gift Guide
Free Shipping on Domestic Orders $75+

Fairphone 1 Midframe Assembly Replacement

Views: 921

View statistics:

Past 24 Hours:
1
Past 7 Days:
4
Past 30 Days:
21
All Time:
921
Comments: 7

7 comments on steps.

Completed: 1

1 person has marked this guide "completed." Will you be next?

Favorites: 1

1 person has favorited (and subscribed to) this guide. Will you be next?

Time Required: No estimate
Difficulty: Moderate
Prerequisite Only

This is a prerequisite-only guide! This guide is part of another procedure and isn’t meant to be used alone.

Fairphone 1 Midframe Assembly Replacement

Introduction

Go to step 1 ↓

Use this guide to remove the plastic midframe from your Fairphone to access internal components.

What you need

Tools

    1. Fairphone 1 Midframe Assembly Replacement, Midframe Assembly: step 1, image 1 of 1
      • Remove the five 3.9 mm Phillips #000 screws securing the midframe to the display assembly.

      Ask FixBot

      Add Comment

    2. Fairphone 1 Midframe Assembly Replacement: step 2, image 1 of 3 Fairphone 1 Midframe Assembly Replacement: step 2, image 2 of 3 Fairphone 1 Midframe Assembly Replacement: step 2, image 3 of 3
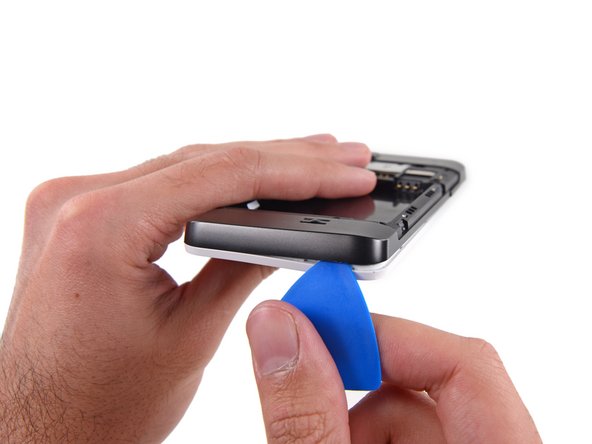
      • The midframe is secured to the display assembly by several small plastic clips.

      • Use an opening pick to carefully pry the midframe away from the display assembly.

      • Start just below the volume rocker and work your way down toward the bottom of the phone, freeing the plastic clips along the side.

      Ask FixBot

      Add Comment

    3. Fairphone 1 Midframe Assembly Replacement: step 3, image 1 of 2 Fairphone 1 Midframe Assembly Replacement: step 3, image 2 of 2
      • Carefully round the corner, separating the midframe from the display assembly.

      Ask FixBot

      Add Comment

    4. Fairphone 1 Midframe Assembly Replacement: step 4, image 1 of 1
      • After rounding the next corner, the midframe should be free along the bottom and the sides.

      Ask FixBot

      Add Comment

    5. Fairphone 1 Midframe Assembly Replacement: step 5, image 1 of 3 Fairphone 1 Midframe Assembly Replacement: step 5, image 2 of 3 Fairphone 1 Midframe Assembly Replacement: step 5, image 3 of 3
      • Run the opening pick and pry along the top seam.

      • To avoid bending or damaging the opening picks, do not pry near to the power switch, USB port, or headphone jack.

      Ask FixBot

      Add Comment

    6. Fairphone 1 Midframe Assembly Replacement: step 6, image 1 of 1
      • Separate any remaining clips and remove the midframe from the phone.

      Ask FixBot

      Add Comment

Conclusion

To reassemble your device, follow these instructions in reverse order.

Cancel: I did not complete this guide.

One other person completed this guide.

Author

with

Andrew Optimus Goldheart

Member since: 10/17/09

516,548 Reputation

405 Guides authored

Team

iFixit Member of iFixit

Staff

119 Members

72,954 Guides authored

0 Guide Comments

Add Comment

View Statistics:

Past 24 Hours: 1

Past 7 Days: 4

Past 30 Days: 21

All Time: 921