
Fairphone 1 Battery Replacement

What you need

  1. Fairphone 1 Battery Replacement, Back Cover: step 1, image 1 of 3 Fairphone 1 Battery Replacement, Back Cover: step 1, image 2 of 3 Fairphone 1 Battery Replacement, Back Cover: step 1, image 3 of 3
    • There is a small indentation in the side of the phone near the bottom of the back cover.

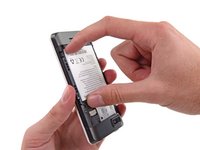
    • With the indentation as leverage, use your fingernail to pry the bottom portion of the back cover from the phone.

  2. Fairphone 1 Battery Replacement: step 2, image 1 of 3 Fairphone 1 Battery Replacement: step 2, image 2 of 3 Fairphone 1 Battery Replacement: step 2, image 3 of 3
    • Slide the back cover down and remove it from the phone.

  3. Fairphone 1 Battery Replacement, Battery: step 3, image 1 of 3 Fairphone 1 Battery Replacement, Battery: step 3, image 2 of 3 Fairphone 1 Battery Replacement, Battery: step 3, image 3 of 3
    • There is a small indentation in the back of the phone just below the battery.

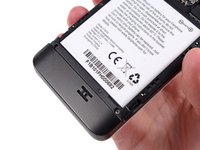
    • Use a fingernail in this indentation to push the battery toward the top of the phone

    • Pull the battery out away from the phone.

  4. Fairphone 1 Battery Replacement: step 4, image 1 of 1
    • Remove the battery from your Fairphone.

Conclusion

To reassemble your device, follow these instructions in reverse order.

4 other people completed this guide.

Andrew Optimus Goldheart

Member since: 10/17/09

502,746 Reputation

407 Guides authored

Team

iFixit Member of iFixit

Staff

135 Members

16,732 Guides authored

0 Comments

Add Comment

View Statistics:

Past 24 Hours: 2

Past 7 Days: 3

Past 30 Days: 16

All Time: 8,815