Electrolux LTE12 - Washing Machine Disassembly

What you need

  1. Electrolux LTE12 - Washing Machine Disassembly, Electrolux LTE12 - Washing Machine Disassembly: step 1, image 1 of 2 Electrolux LTE12 - Washing Machine Disassembly, Electrolux LTE12 - Washing Machine Disassembly: step 1, image 2 of 2
    • Unplug the wall outlet.

    • Release the water hose.

    • Loosen the 4 Phillips screws at the top and 2 1/4 screws below.

  2. Electrolux LTE12 - Washing Machine Disassembly: step 2, image 1 of 1
    • Fasten the lid of the washing machine with a large crepe tape. Do not open when removing the top of the machine.

    • There is no need to remove the glass cover to remove the top of the machine.

  3. Electrolux LTE12 - Washing Machine Disassembly: step 3, image 1 of 1
    • Open the top of the washer. Lift the back first. And then the front.

    • Grip the top of the machine with care. Take care not to drop and break the cover glass.

    • Release the power cord and hose clips from the pressure switch.

  4. Electrolux LTE12 - Washing Machine Disassembly: step 4, image 1 of 1
    • Remove the Phillips screw.

    • Remove the two plastic fasteners.

    • Remove the protective cap (semi-transparent) on the left side.

  5. Electrolux LTE12 - Washing Machine Disassembly: step 5, image 1 of 1
    • Remove the two Phillips screws.

    • Remove the protective cap (semi-transparent) on the right side.

  6. Electrolux LTE12 - Washing Machine Disassembly: step 6, image 1 of 1
    • To loosen the Control Panel cover, loosen the two Phillips screws. (Left side).

  7. Electrolux LTE12 - Washing Machine Disassembly: step 7, image 1 of 1
    • To loosen the Control Panel cover, also loosen the two Phillips screws on the right side.

  8. Electrolux LTE12 - Washing Machine Disassembly: step 8, image 1 of 1
    • Carefully lift the cover of the Control Panel. In this photo, the glass cover was removed to enlarge the image.

  9. Electrolux LTE12 - Washing Machine Disassembly: step 9, image 1 of 2 Electrolux LTE12 - Washing Machine Disassembly: step 9, image 2 of 2
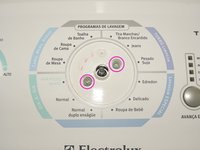
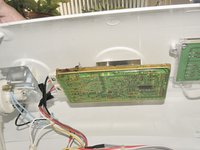
    • If there is a need to replace the Power Circuit Board, carefully pull out the program select button.

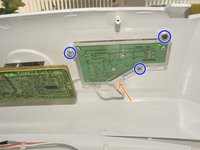
    • And then loosen the two Phillips screws.

    • Disconnect the cables carefully.

  10. Electrolux LTE12 - Washing Machine Disassembly: step 10, image 1 of 2 Electrolux LTE12 - Washing Machine Disassembly: step 10, image 2 of 2
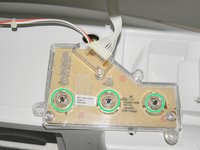
    • To remove the circuit board from the Panel buttons, remove the three Phillips screws. Disconnect the cable carefully.

    • When removing the circuit board from the buttons, be aware of the three button springs.

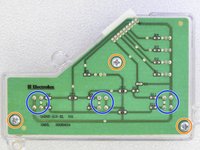
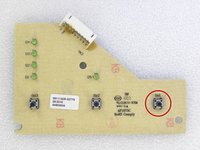
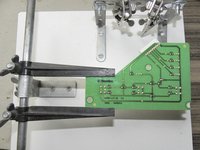
  11. Electrolux LTE12 - Washing Machine Disassembly: step 11, image 1 of 3 Electrolux LTE12 - Washing Machine Disassembly: step 11, image 2 of 3 Electrolux LTE12 - Washing Machine Disassembly: step 11, image 3 of 3
    • If you need to replace any components on the button circuit board, loosen the three Phillips screws to remove the acrylic shield.

    • The problem with my machine was the power button. With a soldering iron and a sucker, I switched on the power switch.

  12. Electrolux LTE12 - Washing Machine Disassembly: step 12, image 1 of 1
    • To change the pressure switch, cut the clamp and remove the

    • Disconnect wires.

    • And then loosen the two Phillips screws.

    • To assemble the Washing Machine, follow the same procedure, in the reverse order.

Conclusion

To reassemble your device, Follow these instructions in reverse order.

2 other people completed this guide.

Special thanks to these translators:

pt en

100%

irlanda is helping us fix the world! Want to contribute?
Start translating ›

Jose Gustavo Abreu Murta

Member since: 07/06/10

4,598 Reputation

9 Guides authored

3 Comments

muito boa a espricação

ramiro34676067 - Reply

Ola amigos boa noite. Estou como uma maquina de lavar eletrolux lt12f já troquei a placa de potencia e a de interface, agora ela fica com todos os leds ligados e o buzzer bipando sem parar.

Será que os amigos podem ame ajudar a identificar qual o problema?

Anael Dolesk - Reply

Anael, reveja todas as conexões e certifique-se que a placa principal é do modelo correto.

Sugiro desconectar os outros cabos e fazer um teste.

Jose Gustavo Abreu Murta - Reply

Add Comment

View Statistics:

Past 24 Hours: 4

Past 7 Days: 32

Past 30 Days: 113

All Time: 3,996