
Electric LED Switch Wall Dimmer Switch Replacement

What you need

  1. Electric LED Switch Wall Dimmer Switch Replacement, Wall Dimmer Switch: step 1, image 1 of 3 Electric LED Switch Wall Dimmer Switch Replacement, Wall Dimmer Switch: step 1, image 2 of 3 Electric LED Switch Wall Dimmer Switch Replacement, Wall Dimmer Switch: step 1, image 3 of 3
    • Remove the old switch/dimmer previously installed.

    • Remove the screws off the wall plate of the switch using a flat head screwdriver.

    • Remove the inner screws of the dimmer switch using a Phillips #1 screwdriver.

    • Grab the top and bottom end of the switch and pull it out from the wall.

  2. Electric LED Switch Wall Dimmer Switch Replacement: step 2, image 1 of 3 Electric LED Switch Wall Dimmer Switch Replacement: step 2, image 2 of 3 Electric LED Switch Wall Dimmer Switch Replacement: step 2, image 3 of 3
    • We will need to find the LIVE power wire on the circuit. Turn on the Voltage tester by pressing the power button on it. It should beep green to indicate it is turned ON.

    • Point it close to each of the insulated wires to find the LIVE/HOT wire. The Meter will start beeping rapidly and go red to indicate a live wires.

    • DO NOT Touch the metal screws with bare hands, as they can give you a shock since the connection is still Live.

    • Label the Wires. The dimmer I bought came with its own labels but you can Just put a piece of white Electrical tape on the LIVE/HOT wire when you find it in the above step and mark it with L for Live and LO for Load wire. Wiring color scheme is as follows:

    • Black Wire - Usually Power/LIVE wire (AC-L ) in this picture because that is the label that came with it

    • Red - Load Wire. Most homes (20-30 years old) you will find these RED cabels and they are marked LOAD as they control the switch. Sometimes it can also be a black cable, you can tell the difference between the live black and load black by checking for Power on them when u open the switch without cutting power.

    • White - Neutral (AC-N) in this case because of the given Labels with product. You dont need to mark it because white wires in home cabling is always white

    • Green/Bare coper - Netrual wire. Usually this will be screwed to the houseing unit/box

  3. Electric LED Switch Wall Dimmer Switch Replacement: step 3, image 1 of 2 Electric LED Switch Wall Dimmer Switch Replacement: step 3, image 2 of 2
    • Turn off the power to the switch by shutting off the breaker on the main power panel for your house.

    • Household electric switches usually operate on 15 AMPS breakers. These would the the single switches on the panel. They are usually labeled as well. The double switches are usually 30 AMPS and are used for heavier appliances such as stoves and dryers in the house.

    • 90% the single switches will be powering the light switches upstairs/downstairs. If you cant find the correct switch on the panel, you can switch off the MAIN Power on the panel to kill all power in the house, to be on the safe side.

  4. Electric LED Switch Wall Dimmer Switch Replacement: step 4, image 1 of 3 Electric LED Switch Wall Dimmer Switch Replacement: step 4, image 2 of 3 Electric LED Switch Wall Dimmer Switch Replacement: step 4, image 3 of 3
    • Remove the screws on either side of the wall switch with a Phillips #1 screwdriver.

    • Sometimes the wires will be hooked on the screws rather than being pushed in the back as shown in picture. Removing them would be the same concept—just loosen the screw or remove the screw and pull out the wire.

    • Remove the wires out of the existing switch by pulling them out.

    • You will need to straighten the wires if they were looped around the screw to push them in the back of the new dimmer. Alternatively, you can place the same hooks on the new dimmer by loosening the screw enough to get the hook on. I prefer pushing in a straight wire as it's less complex and more secure.

  5. Electric LED Switch Wall Dimmer Switch Replacement: step 5, image 1 of 3 Electric LED Switch Wall Dimmer Switch Replacement: step 5, image 2 of 3 Electric LED Switch Wall Dimmer Switch Replacement: step 5, image 3 of 3
    • This is the BACK of the new dimmer switch. We are replacing a SINGLE Pole switch so we will only need the 4 color marked holes on the picture. Ignore the holes marked as YL/RD as they don't apply for our switch.

    • Yl/RD : this is only used if you have a 3 way switch, which is more complex to replace. 3-way switches are where you have one light controlled with two switches, e.g. at the bottom and top of staircases to turn on a staircase light.

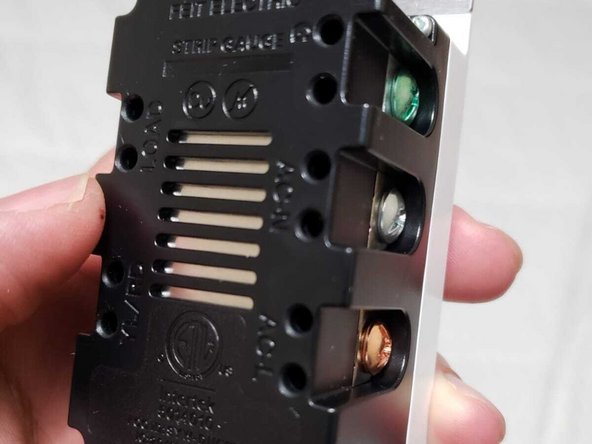
    • We will be working with the RED labeled squares in the picture and ignore the blue circle pins.

    • Loosen the screws of the dimmer so the wire can be pushed in properly and then tighten them once the wire is in.

    • Push the correct wires in their corresponding holes based on the markings we did in previous step.

    • Note the color coordination of the screws for each terminal AC-L (Live/Black wire) AC-N(Neutral/White wire) G (Ground/bare copper or green wire).

  6. Electric LED Switch Wall Dimmer Switch Replacement: step 6, image 1 of 3 Electric LED Switch Wall Dimmer Switch Replacement: step 6, image 2 of 3 Electric LED Switch Wall Dimmer Switch Replacement: step 6, image 3 of 3
    • Once the screws are loose, insert the appropriate wires (as marked previously) in their appropriate holes on the back of the dimmer corresponding to the correct labels on the wires.

    • Please see Step 2 for the color outline for the wires in my picture. I labeled my wires to correspond with the correct terms behind my dimmer in the picture.

    • Make sure the wires are inserted properly and securely all the way to the end of the hole before tightening the screws.

    • I have two bare coper wires in this picture as I am joining two dimmers to work next to each other.

    • After tightening the screws, check to see that the wires are securely held in the holes and won't come out if you pull on them.

    • If the wires come out while checking, then just loosen the screw as much as possible, push the wire back in and tighten the screw again securely.

  7. Electric LED Switch Wall Dimmer Switch Replacement: step 7, image 1 of 3 Electric LED Switch Wall Dimmer Switch Replacement: step 7, image 2 of 3 Electric LED Switch Wall Dimmer Switch Replacement: step 7, image 3 of 3
    • Make sure all the wires are inserted properly and securely. Double check the connections and make sure they are firm.

    • If you are installing dual dimmers next to each other, they can both share the connection from the hole of one dimmer to the same hold on the other dimmer, which is done in this picture

    • Once all the connections are done, push all the wires into the box and push the dimmer back into position on the wall.

    • Caution: make sure there is no exposed cut on the white/black/red wires as they can touch each other when pushed in and short out the dimmer when the power is turned on. If you do find a small cut you can apply eclectic tape on the wire to avoid it from shorting out.

    • Finally, align the screw holes to on the top and bottom of the dimmer brace with the hole on the electric box in the wall and screw it in securely until the dimmer is secure to the wall.

  8. Electric LED Switch Wall Dimmer Switch Replacement: step 8, image 1 of 3 Electric LED Switch Wall Dimmer Switch Replacement: step 8, image 2 of 3 Electric LED Switch Wall Dimmer Switch Replacement: step 8, image 3 of 3
    • Tighten the dimmers enough till they are securely again the wall.

    • Align the faceplate on the dimmer and screw it back on to place with the screws provided.

    • Turn the power back on the panel and test to see if the lights work on the dimmer switch. You can then adjust the lighting level of the dimmer switch to your liking.

Conclusion

To reassemble your device, follow these instructions in reverse order.

One other person completed this guide.

Abdul Butt

Member since: 01/08/21

157 Reputation

1 Guide authored

0 Comments

Add Comment

View Statistics:

Past 24 Hours: 0

Past 7 Days: 6

Past 30 Days: 42

All Time: 1,430