
EchoMaster MRC-WLP43 Display Replacement

Cheska king and
Last updated on Jun 9, 2023
Views: 626
View statistics:
- Past 24 Hours:
- 1
- Past 7 Days:
- 7
- Past 30 Days:
- 49
- All Time:
- 626
Comments: 0
No one has left comments on this guide. Will you be first?
Go to guide commentsCompleted: 0 1
No one has marked this guide "completed." Will you be the first?
1 person has marked this guide "completed." It's you — great job!
Favorites: 0 1
No one has favorited (and subscribed to) this guide. Will you be the first?
1 person has favorited (and subscribed to) this guide — and that's you!
Action Shots
Be an action hero! This guide needs images that better demonstrate how to perform specific actions.
Needs Better Images
Better photos will improve this guide. Help out by taking, editing, or uploading new ones!
Needs More Images
A few more images would make this guide's procedures crystal clear.
Better Introduction
Improve this guide by completing or revising its introduction.
Introduction
Go to step 1 ↓If The blue light on your monitor is turning on, but the display isn't then here is a guide on how to replace it. The only tool you will need is a #1 Philips head screwdriver.
What you need
Tools

-
-
-
Take your monitor and face in down so that the back is facing up. There will be four screws on each corner of the monitors back cover. Unscrew each one and set them to the side. Remove four 1.2 mm Phillips #1 screws.
 Ask FixBot
-
-
-
Carefully lift the back along with the screen then flip it around slowly so the back is placed down on the table.
-
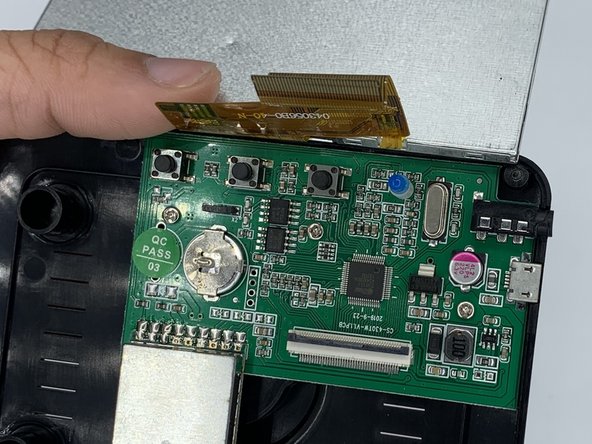
Lift your screen above the motherboard and set it down.
-
-
-
-
Once the screws are out, you can then remove the yellow strip connecting the screen to the motherboard.
-
There is a black tab that you can carefully flip up with your fingernail or a flathead screwdriver. Once it's flipped up you can easily slide the yellow ribbon out.
-
-
-
Once your yellow ribbon is removed from the motherboard you can take out your screen.
-
To reinstall a new screen all you need to do is retrace these steps.
-
-



To reassemble your device, follow these instructions in reverse order.

Team

University of North Texas, Team 3-1, Saru Jimmy Spring 2023 Member of University of North Texas, Team 3-1, Saru Jimmy Spring 2023
UNT-SARU JIMMY-S23S3G1
4 Members
60 Guides authored
