Introduction
This guide will help you replace the filter in your Dyson Pure Cool AM11 air purifier. A clean filter ensures your purifier works efficiently, providing clean air for your home.
-
-
Ensure the Dyson Pure Cool AM11 is turned off and unplugged from the power source.
-
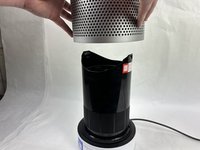
Stand in front of the device. Firmly grasp the base and the top section. Twist the top section counterclockwise (to your left) to unlock it.
-
Gently lift it away from the base to expose the filter.
 Ask FixBot
-
-
-
-
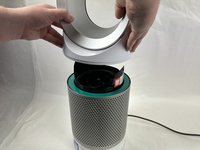
Grasp the filter housing and pull it upwards to remove it from the device.
-
Take the filter out from the housing.
-
Dispose of it according to your local waste disposal regulations.
-
-
-
Unbox your new Dyson filter. Remove any packaging or plastic wrapping.
-
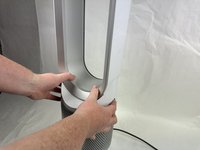
Align the new filter with the housing and then put it back to the base of the device.
-
Place the top section back onto the base. Align the two parts and twist the top section clockwise (to your right) until it locks into place.
-
Plug the device back in and turn it on to ensure it’s working properly with the new filter.
-


Your Dyson Pure Cool AM11 should now be operating with a new, clean filter. Regular filter replacement is key to maintaining the efficiency and longevity of your air purifier.

Team

UMass Dartmouth, Team 2-7, Gulbrandsen Fall 2023 Member of UMass Dartmouth, Team 2-7, Gulbrandsen Fall 2023
UMASSD-GULBRANDSEN-F23S2G7
3 Members
8 Guides authored