Introduction
Dyson Cinetic Big Ball Animal Vacuum motor replacement guide.
This guide will explain how to disassemble and replace a new motor in your Dyson Cinetic Big Ball Animal vacuum.
The motor is the piece within the vacuum that allows spinning for collection of dust, dirt, hair, etc.
Signs that may indicate that your vacuum needs a motor replacement:
-brush is no longer spinning
-suction is non existent or relatively weak
-unusual noises
-unusual or unpleasant smell
-vacuum is not picking up particles
What you need
-
-
Find and remove the four 21.5mm screws on the bottom that hold the base plate on using a T15 Torx bit.
-
-
-
-
Locate and remove the five 22mm screws on each side of the ball that keep the plastic enclosure together using a T15 Torx bit.
-
-
-
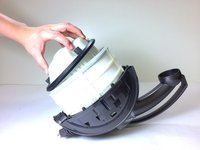
Remove the bottom half of the plastic sphere to reveal the motor.
-
-
-
Carefully slide the motor out of its housing in the ball.
-
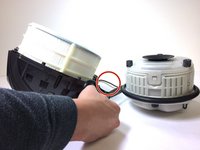
Cut the two wires near the side of the motor using wire cutters.
-


To reassemble your device, follow these instructions in reverse order.
Cancel: I did not complete this guide.
5 other people completed this guide.



Team

Cal Poly, Team 9-5, Banghart Winter 2017 Member of Cal Poly, Team 9-5, Banghart Winter 2017
CPSU-BANGHART-W17S9G5
3 Members
18 Guides authored
4 Guide Comments
Basic but correct only mine has spade connectors on the motor so no need to cut and solder wires. The problem I found was that the main inner filter was blocked, probably by cement dust who I am guilty of! I would like to know if this is available as a spare part? I have cleaned it for now but it really needs changing.
This vacuum cleaner is based on the DC52 model. The post motor HEPA filter has the part number 922444-02 and is offered by many spart part vendors in the web. Just google Dyson 922444-02. I have made an instruction on how to replare or clean it.
very good instructions, dismantled perfectly.
great instructions, dismantled perfectly.
