
Dyson Ball Animal Power Cord Replacement

What you need

  1. Dyson Ball Animal Power Cord Replacement, Power Cord: step 1, image 1 of 1
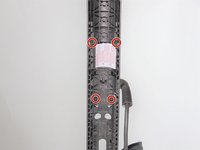
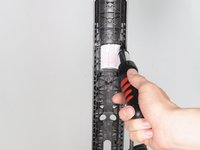
    • Turn off and unplug the vacuum.

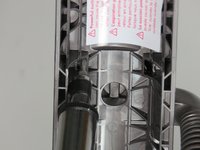
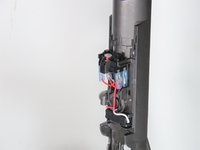
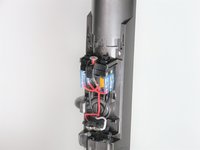
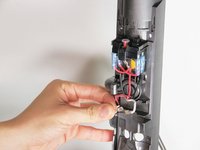
    • Remove the vacuum canister from the front of the vacuum.

  2. Dyson Ball Animal Power Cord Replacement: step 2, image 1 of 1
    • Flip the vacuum around and remove the hose so it is not blocking the back of the vacuum.

  3. Dyson Ball Animal Power Cord Replacement: step 3, image 1 of 3 Dyson Ball Animal Power Cord Replacement: step 3, image 2 of 3 Dyson Ball Animal Power Cord Replacement: step 3, image 3 of 3
    • There are four 15mm screws that must be removed with a Torx T15 screwdriver.

  4. Dyson Ball Animal Power Cord Replacement: step 4, image 1 of 3 Dyson Ball Animal Power Cord Replacement: step 4, image 2 of 3 Dyson Ball Animal Power Cord Replacement: step 4, image 3 of 3
    • After all the screws are released there are two tabs that must be pressed in and towards the center.

    • The tabs can be pressed in one at a time but may require some force.

  5. Dyson Ball Animal Power Cord Replacement: step 5, image 1 of 2 Dyson Ball Animal Power Cord Replacement: step 5, image 2 of 2
    • After removing the two tabs gently pull the face off the power supply.

  6. Dyson Ball Animal Power Cord Replacement: step 6, image 1 of 1
    • Follow the black cord from the power cord.

    • Pinch the plastic piece.

    • Remove from the metal tongue.

    • When removing the cords, grab them from the plastic parts and not the cord.

  7. Dyson Ball Animal Power Cord Replacement: step 7, image 1 of 3 Dyson Ball Animal Power Cord Replacement: step 7, image 2 of 3 Dyson Ball Animal Power Cord Replacement: step 7, image 3 of 3
    • There is also a black case that needs to be opened in order to remove the power cord.

    • After opening the case pull apart the wire and attach the new wire.

    • Again, make sure that you are pulling from the heads of the wires and not the wires themselves.

Conclusion

To reassemble your device, follow these instructions in reverse order.

3 other people completed this guide.

Jonathan Gong-Guy

Member since: 04/17/17

311 Reputation

1 Guide authored

Team

Cal Poly, Team S15-G5, Banghart Spring 2017 Member of Cal Poly, Team S15-G5, Banghart Spring 2017

CPSU-BANGHART-S17S15G5

4 Members

16 Guides authored

3 Comments

Great tutorial! The pictures were awesome, I replaced my cord in about 15 minutes thanks to this post. The only thing you might want to add is the gray switch with the spring. Mine fell out while I was trying to put the unit back together and I had to research how it went back together correctly. Thanks again!

Jim

Jim Knox - Reply

I had the same spring lever issue. This video shows how to replace them.

https://youtu.be/CLk1Zu6nREk

Robert W Marvin - Reply

Thank you for the YouTube link on the button reassembly. I should have expected it to be sitting loaded when I disassembled it.

chuckparent -

Add Comment

View Statistics:

Past 24 Hours: 20

Past 7 Days: 74

Past 30 Days: 384

All Time: 32,940