
DualShock 4 CHU-ZCT2U L1 and R1 Buttons Replacement

Archived Guide
This guide is retained solely for historical purposes. Use the updated version of the guide to perform your repair.

What you need

  1. DualShock 4 CHU-ZCT2U L1 and R1 Buttons Replacement, Outer Shell: step 1, image 1 of 3 DualShock 4 CHU-ZCT2U L1 and R1 Buttons Replacement, Outer Shell: step 1, image 2 of 3 DualShock 4 CHU-ZCT2U L1 and R1 Buttons Replacement, Outer Shell: step 1, image 3 of 3
    • Unscrew the four 6.5mm screws, using a Phillips-Head screwdriver.

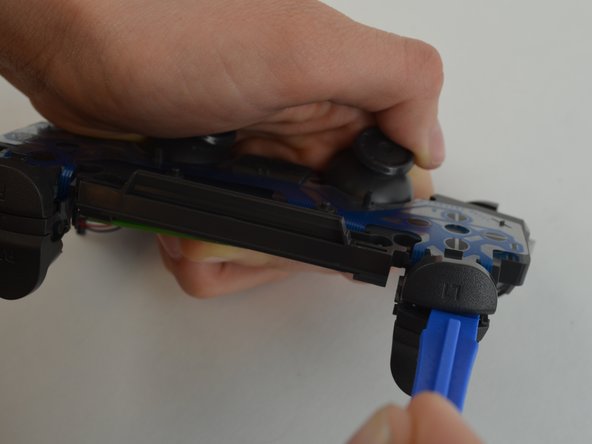
    • Pry the two halves of the shell apart using a plastic opening tool.

    • Be careful, as there will be a ribbon connecting the inner workings of the controller. It will not separate into two parts just by pulling apart the shell.

  2. DualShock 4 CHU-ZCT2U L1 and R1 Buttons Replacement: step 2, image 1 of 3 DualShock 4 CHU-ZCT2U L1 and R1 Buttons Replacement: step 2, image 2 of 3 DualShock 4 CHU-ZCT2U L1 and R1 Buttons Replacement: step 2, image 3 of 3
    • Pull the ribbon cable out of the motherboard port to fully separate the two halves, using a pair of tweezers.

  3. DualShock 4 CHU-ZCT2U L1 and R1 Buttons Replacement, Battery: step 3, image 1 of 3 DualShock 4 CHU-ZCT2U L1 and R1 Buttons Replacement, Battery: step 3, image 2 of 3 DualShock 4 CHU-ZCT2U L1 and R1 Buttons Replacement, Battery: step 3, image 3 of 3
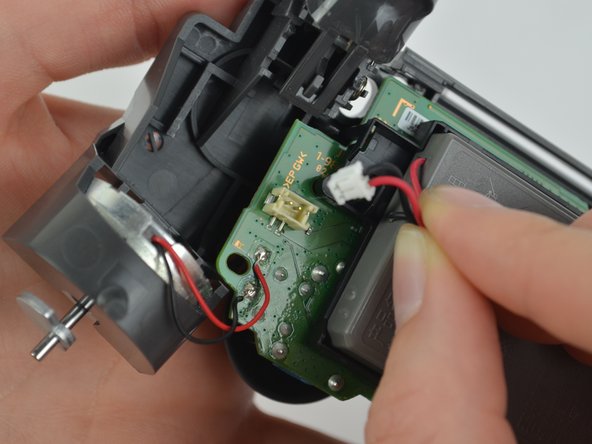
    • Unplug the black and red wires from the power port located on the motherboard.

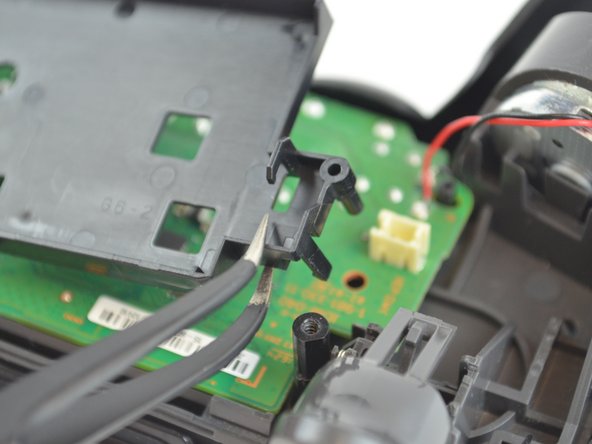
    • Remove the old battery from the controller.

  4. DualShock 4 CHU-ZCT2U L1 and R1 Buttons Replacement: step 4, image 1 of 2 DualShock 4 CHU-ZCT2U L1 and R1 Buttons Replacement: step 4, image 2 of 2
    • Remove the 6.43mm screw connecting the motherboard to the inner workings of the controller, using a Phillips-Head screwdriver.

  5. DualShock 4 CHU-ZCT2U L1 and R1 Buttons Replacement: step 5, image 1 of 3 DualShock 4 CHU-ZCT2U L1 and R1 Buttons Replacement: step 5, image 2 of 3 DualShock 4 CHU-ZCT2U L1 and R1 Buttons Replacement: step 5, image 3 of 3
    • Unhook the battery case from the motherboard, and pull it off.

  6. DualShock 4 CHU-ZCT2U L1 and R1 Buttons Replacement, L and R Buttons: step 6, image 1 of 3 DualShock 4 CHU-ZCT2U L1 and R1 Buttons Replacement, L and R Buttons: step 6, image 2 of 3 DualShock 4 CHU-ZCT2U L1 and R1 Buttons Replacement, L and R Buttons: step 6, image 3 of 3
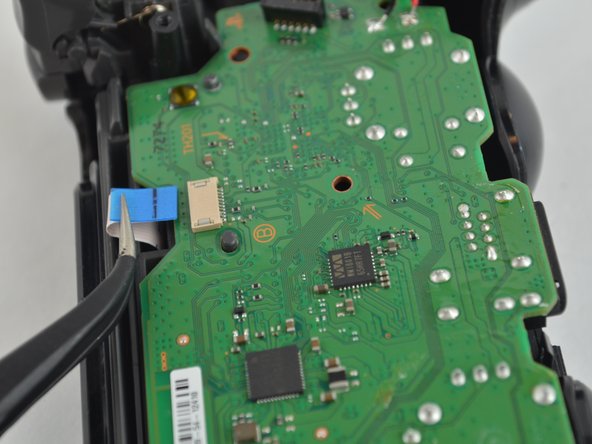
    • Pull out the second CPU ribbon to separate the inner workings from the top of the outer shell.

  7. DualShock 4 CHU-ZCT2U L1 and R1 Buttons Replacement: step 7, image 1 of 3 DualShock 4 CHU-ZCT2U L1 and R1 Buttons Replacement: step 7, image 2 of 3 DualShock 4 CHU-ZCT2U L1 and R1 Buttons Replacement: step 7, image 3 of 3
    • Pry the button from the controller using the plastic opening tool. Slide the tool between the buttons. There will be a tab you can push in to remove the button.

    • If too much force is applied, the button could go flying upon separating. Try not to force the buttons too much.

  8. DualShock 4 CHU-ZCT2U L1 and R1 Buttons Replacement: step 8, image 1 of 2 DualShock 4 CHU-ZCT2U L1 and R1 Buttons Replacement: step 8, image 2 of 2
    • Insert the plastic opening tool into the space created when the button is pressed down. Make sure the tool is situated directly in the center of the space, before attempting to pry the button out.

Conclusion

To reassemble your device, follow these instructions in reverse order.

26 other people completed this guide.

Michelle Joseph

Member since: 10/09/17

1,762 Reputation

3 Guides authored

Team

USF Tampa, Team S1-G5, Leahy Fall 2017 Member of USF Tampa, Team S1-G5, Leahy Fall 2017

USFT-LEAHY-F17S1G5

3 Members

22 Guides authored

4 Comments

Is it possible to replace the zct2u triggers with custom 1st gen triggers? It seems like the only major difference is the extra piece on the latest models to prevent losing the trigger.

FTC Gaming - Reply

Does this stops the issue I have that is when I press L2, my character sometimes goes forward, like the L2 would be creating contact with the left directional going forward option.

Erick Xavier - Reply

My controller lost the R1, so I need to buy one to replace it. After pulling apart my controller, I noticed the back of the L1 button looks different (the plastic connection pieces are completely different) than the photos in your directions. Are there different types of shoulder buttons available? Or is it that my controller is a different generation? If so, do you supply the pieces for this controller type?

Corbin - Reply

Hey, can you explain the differences between the V1 and V2 Trigger buttons, they are different. I stepped on the R2 button and it ripped out the R2 button and damaged the housing (my father is the trades guy, obviously).

I don’t know if it’s worth fixing, or if I should just buy a new controller.

Andrew Ahmed - Reply

Add Comment

View Statistics:

Past 24 Hours: 10

Past 7 Days: 74

Past 30 Days: 429

All Time: 36,994