This translation was generated by a machine and has not been reviewed by a person yet. Speak this language? Review it.
Introduction
Please be very careful and follow all warnings!
Background
The EU standard for the mandatory automatic shut-off time is set to 40 minutes. This modification will make the internal 40-minute timer inactive. Restoring the original condition is explicitly and easily possible after this intervention. (Note: models from 2011 onwards are equipped with this new feature.)
Rationale
The Braun Aromaster Classic (Model KF47/1, Type 4069) was used as the starting point for this guide. This drip coffee maker is widely available within the EEA, has an acceptable price/quality ratio, and has been in production for quite some time (continuity). It is therefore expected that this machine will remain available in the coming years. Incidentally, the manufacturer provides no further information regarding EOL and/or EOP (www.braunhousehold.com).
This guide was created with the goal of minimizing the total costs of the described modification, while respecting the applicable safety standard (CE marking). The main requirement here is that the total costs of the modification must not exceed 1 percent of the purchase price. Because of this requirement, a workaround has been included in the guide. The workaround relates exclusively to the mechanical part of the guide and therefore has no influence on the applicable safety requirements and/or the operation of the machine. If this workaround should unexpectedly fail, the machine will still function according to the specifications provided by the manufacturer.
To meet the intent of the legislator (EU), a suggestion has been included at the end of the guide with this in mind. Incidentally, this suggestion significantly exceeds the standard (<=1%).
Statement
The basis of this 'energy-saving' legal standard shows that the consumer is the 'residual item' in a closed compromise between the legislator on one hand and the manufacturers of household appliances on the other. The legislator (EU) wants to show that it takes the environment (i.e., saving energy) seriously, while the manufacturers, mainly for competitive reasons, have implemented the most impractical solution but still comply with their legal obligation. This measure is perceived by the consumer as 'the EU pestering consumers.' That is a pity because this way of brewing coffee is, in all respects, still the most environmentally friendly way! For the time being, this seems to be due to a lack (or lack of interest?) of knowledge on the part of the legislator about the impact that technical solutions could have in the public domain. Because this involves a fairly simple technical implementation, that does not bode well for the future; all technical artifacts are becoming increasingly complicated, making the 'simple' announcement of a new law no longer sufficient under pressure from a strong industrial lobby.
What you need
-
-
-
If you like, brew a cup of coffee with the device now while you still can (;-)). Afterwards, remove the plug FROM the socket and read through the following points.
-
Take into account an extended duration (possibly having to continue the next day) if the 'right' tool is not available (Step 5 / workaround).
-
In that last case, patience and accuracy are of great importance. If these qualities are lacking, it will become increasingly difficult (due to 'wear and tear' on the material) to bring this configuration change to a successful conclusion.
-
Also, if the Tri-Wing screwdriver is not available, quite a bit of physical force is required. If that is lacking, it is also not advisable to start this change unless you proceed to purchase the Tri-Wing screwdriver, of course (also read the disclaimer regarding this point in the 'Tools' section).
 Ask FixBot
-
-
-
Is the plug UNPLUGGED from the socket? (That was part of step 1!) Note: the mains voltage (NL/220V~) is transmitted raw/unfiltered and is therefore present on all internal components. In combination with the power consumption, this can be fatal (See image 2).
-
The device has cooled down sufficiently (during the work, steam or hot water may come out of the device, which can lead to burns!). Allow 25 minutes as a guideline for this.
-
Tape the water reservoir lid shut with a piece of tape. Because the device will soon have to be turned upside down and a lot of force will need to be used (especially with the workaround (Step 5)), a freely moving lid can easily be broken (accidentally).
-
Keep a tea towel handy to soak up any 'released' water. In any case, make sure that everything stays dry during the work.
-
Check the plug (again)!
-
-
-
-
Place the device upside down. You may want to place it on a tea towel to prevent damage to the top of the device.
-
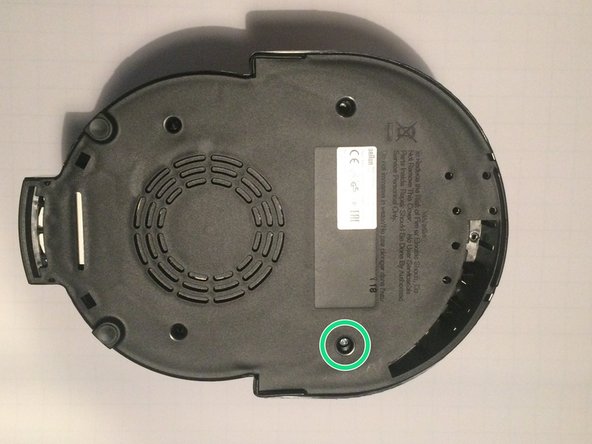
Identify the four recesses in the bottom plate as indicated by the green and red arrows.
-
GREEN ARROWS: In the recesses indicated by the green arrows (back of the device), you will find the Tri-Wing (security) screws.
-
RED ARROWS: In the recesses indicated by the red arrows (front of the device), there are NO screws as you might expect.
-
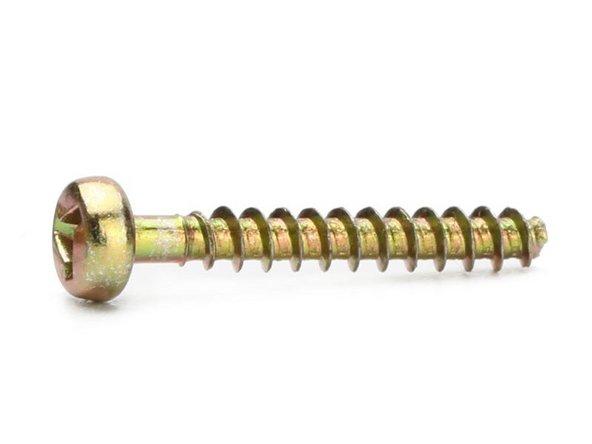
The Tri-Wing (security) screws (indicated by the green arrows) are of the 'self-tapping' type and have a length of 1.90 cm and a diameter of 3 mm. (Image 2 is included for identification purposes only).
-
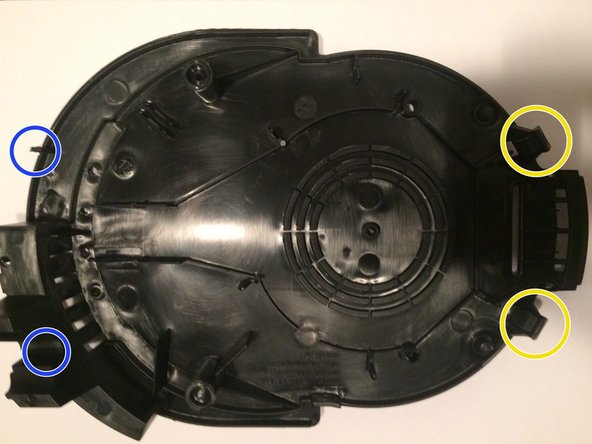
The depth of the recess is 2.4 cm and it has a diameter of 6 mm. Image 3 indicates which version of the Tri-Wing screws are located in these (2x) recesses.
-
Note: the plug is still REMOVED from the socket.
-
-
-
If using the Tri-Wing screwdriver (See image 1 and check the note (including disclaimer) in the tool list), follow this step. Otherwise, proceed to step 5 (Part 2b)
-
Loosen the two screws (marked by the 'green arrows', see previous step).
-
It is not necessary to fully remove the screws from the bottom cover. If the screw, measured from the top, is 1.1 cm deep (in closed state that is 2.2 cm) in the recess, the bottom cover is 'loose' from the rest of the device. The bottom cover is now still held in place (fixed) by four tabs (see step 6).
-
<Additional illustrations for bullet 3> In image 2: The screw (green circle) is no longer attached to the chassis in this position. Image 3 (inside of bottom cover) shows that it is not necessary to remove the screw completely.
-
By the way: the plug is still OUT of the socket.
-
Proceed to step 6.
-
-
-
In this step (the workaround without a Tri-Wing screwdriver), a voltage tester is used (See image 1). Check the requirements for this voltage tester (See tool list, details).
-
Place the voltage tester with your thumb and index finger perpendicularly (90 degrees) into the recess (See the 'green arrows' in step 3) and turn the voltage tester slightly left and right until the voltage tester has 'grip' on the screw (See image 2).
-
Because the moment of gaining 'grip' is quite subtle, some practice will be required here. If there is grip on the screw, proceed to the next bullet.
-
Hold the voltage tester in the perpendicular position and stabilize the situation by applying (significant) pressure with the palm of your hand (See image 3). With your other hand, the voltage tester must now be turned counterclockwise so that the screw comes loose. As the screw is unscrewed from the device, the pressure from your palm must decrease accordingly.
-
If there is no longer any 'grip' (due to insufficient pressure and/or the voltage tester is/was not perpendicular), you must start again at bullet 2.
-
Note: the screws do not need to be completely unscrewed from the device before the bottom cover comes loose! Tip: Loosen the screws (2 pieces) bit by bit, alternating between them, and check every now and then (carefully) whether the bottom cover is already starting to loosen. (See also Step 4 (2a), bullets 3 & 4, for further information)
-
If it does not work immediately, it is wise to continue at another time (Tip: for example, the next day).
-
By the way: the plug is still OUT of the socket.
-
-
-
Check: the plug is still OUT of the socket!
-
-








To reassemble the device, these instructions must be performed in reverse order*.
*1) It is worth considering replacing the original Tri-Wing screws with two Phillips or flat-head self-tapping screws (length: 1.90 cm / diameter: 3.0 mm / pan head: 5.5 mm), which makes it easier to reassemble (close) the device properly and potentially, in the long run, return the device to its original state more easily.
*2) To make it possible to safely replace the internal wiring, a document (with photos 'after' the modification) is attached for reference (file: ref_KF47/1_modification.pdf). Perhaps unnecessarily, but improper replacement of the internal wiring can cause fire and/or a short circuit with far-reaching consequences. Especially after the modification, because the coffee maker no longer shuts off automatically after 40 minutes.
Issued CE certificate:
To comply with EU regulations, it is possible to use an external timer (for example, the ICIDU 250V 16A 1/4/8 Hours Power Timer). This timer can also be used perfectly in combination with charging batteries (charging does not go on 'endlessly') if the coffee maker is sold off.
Cancel: I did not complete this guide.
One other person completed this guide.
Attached Documents

2 Guide Comments
Dage Remco,
Ja dat klopt maar wegens omstandigheden kon ik even niet verder met dit stuk. Het gaat trouwens helemaal anders worden.
Even iets anders: ik werk hier nu alleen aan maar het zou beter zijn (gelet op het feit dat ik er even niet aan kon werken) indien er meer eigenaren zijn. Weet jij ho zoiets gaat binnen deze site?
Met groet,
Artemisia
