Introduction
In a gas furnace, the draft inducer is responsible for expelling combustion gas out of the furnace and venting it to the outside. It’s one of the most important components in a furnace, and it’s the first thing that turns on when a heating cycle begins. It also stays running during a heating cycle to provide a steady and even flow of oxygen to the burners.
When a draft inducer motor stops working, the entire gas furnace will cease operation, so it’s important that you replace it as soon as possible. A loud whining noise is characteristic of a failing draft inducer motor, as the bearings inside are wearing out.
This replacement guide uses a Carrier WeatherMaker 8000TS furnace from 1999. The draft inducer motor and assembly may differ on your specific furnace model.
What you need
-
-
Start by turning off the flow of gas to your furnace, as well as cutting power to the whole furnace by flipping the service switch to the "Off" position.
 Ask FixBot
-
-
-
Grab the handle on the front panel marked "Lift" and push up to release the panel. Place it off to the side.
-
-
-
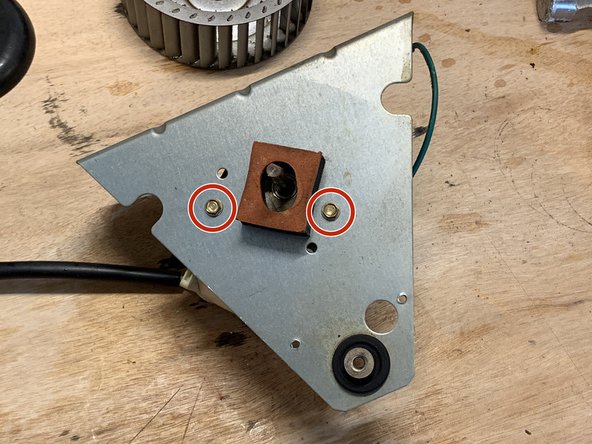
Use a flathead screwdriver or a 1/4-inch socket to remove the two screws holding the shield plate to the draft inducer assembly.
-
Remove the plate and set it off to the side.
-
-
-
-
Use a 1/4-inch socket to remove the three mounting bolts securing the draft inducer assembly to the furnace.
-
Support the motor and assembly from the bottom and slowly remove it from the furnace.
-
-
-
Use a flathead screwdriver or a small pry tool to carefully pry off the circular clip from the cooling fan.
-
-
-
Flip the assembly over and use a 1/8-inch hex key to loosen the set screw securing the blower fan to the motor's driveshaft.
-
-
-
Remove the blower fan from the motor's driveshaft.
-
As with the cooling fan, you may need to apply a decent amount of pressure and wiggle the blower fan in order to remove it.
-
-
-
Flip over the assembly and use a 1/4-inch socket to remove the three bolts securing the motor bracket to the motor plate.
-
Once the bolts are removed, flip the assembly back over and remove the motor bracket.
-
-
-
Use a 1/4-inch socket to remove the two bolts securing the motor to the motor plate.
-
Remove the motor bracket.
-


To reassemble your device, follow these instructions in reverse order.
Cancel: I did not complete this guide.
5 other people completed this guide.

3 Guide Comments
Thanks for the instructions, very helpful.
Do you know the Inducer motor part number?
Good morning, I need the whole unit ( motor, fan, blower fan, ) etc. This looks like same same unit I have but I can't find a model number for this to make sure I purchase the right one for my unit. I have a carrier weathermaker 8000vs looks exactly like the one here can someone please provide some helpful information thanks.